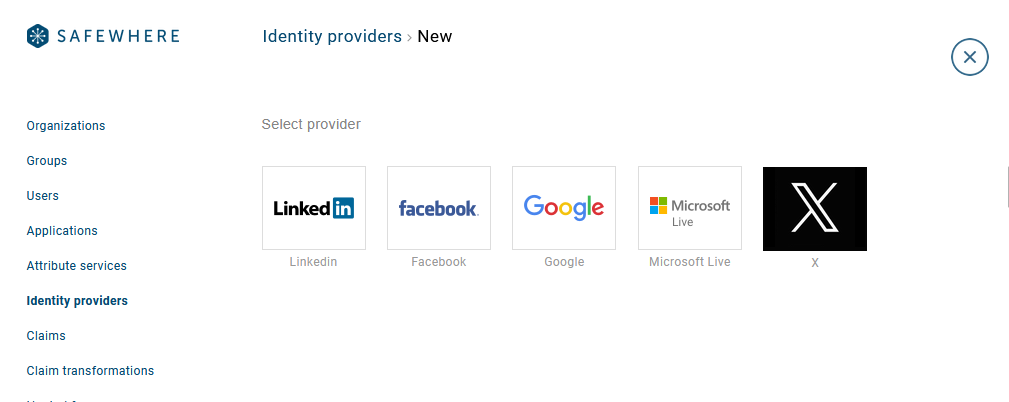
OAuth 2.0 provider
To create an OAuth 2.0 Identity Provider, you must access the Identity provider list on the Safewhere Admin portal and choose to create one of the supported social media providers:
Google application setup
It is possible to authenticate users into a federation using their Google account. Before it even becomes relevant to set up the Google provider connection, you must register Safewhere Identify as an Application with Google. The link to do this is:
https://console.cloud.google.com/iam-admin/projects
After signing up as a Google developer, you can start registering Safewhere Identify as an application as follows:
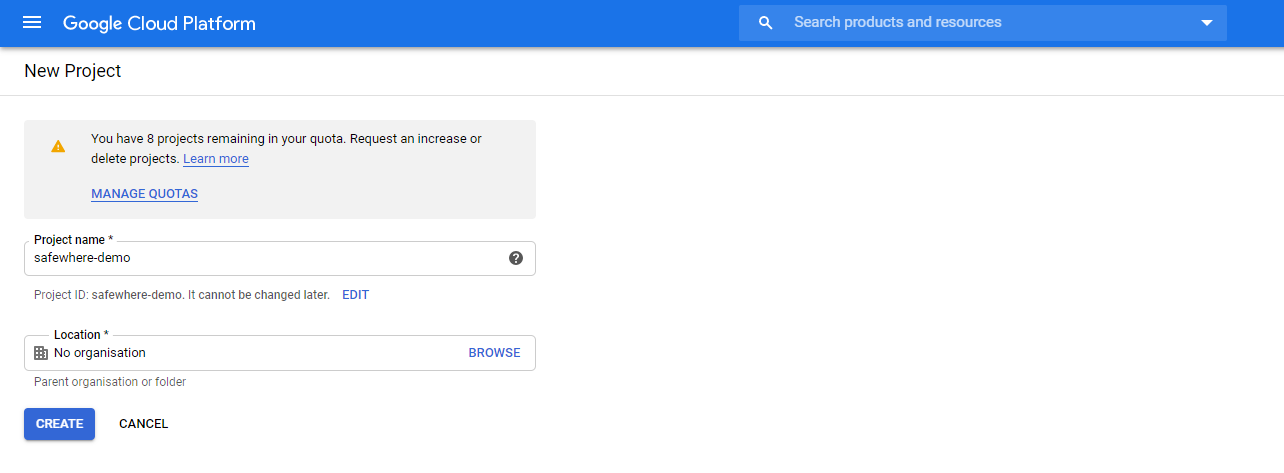
- Register your Safewhere Identify installation using the "Create project" button, input a project name and click "Create"
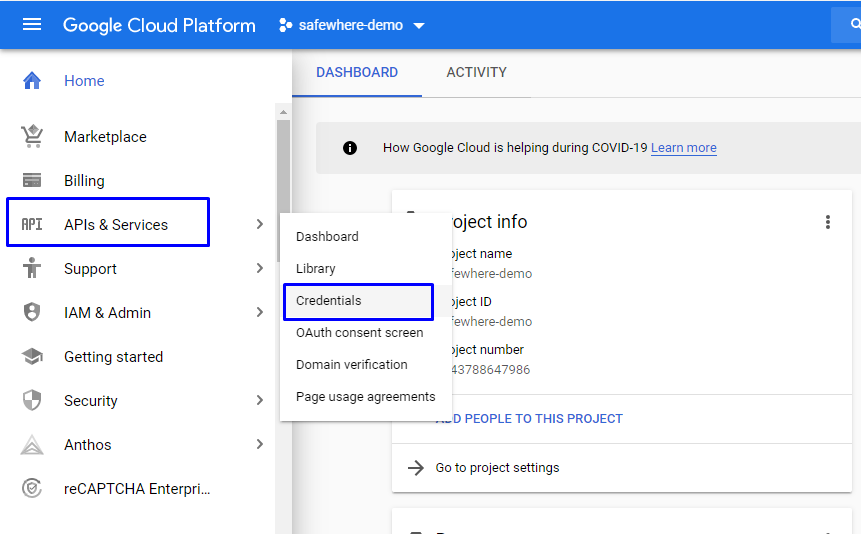
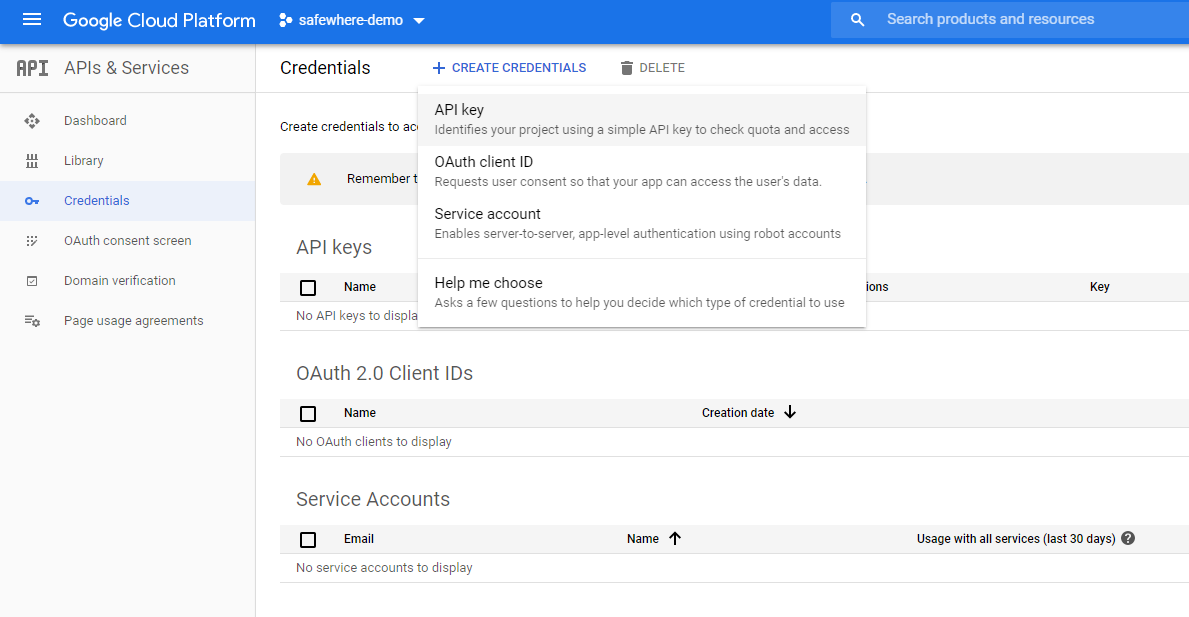
- Wait until the project is created successfully. On the dashboard of the newly created project, access the APIs & Services\Credentials menu.
Once the "Credentials" form opens, choose "Create credentials" and select "OAuth client ID"
You may be asked to specify the product name. Next, you need to choose the "Configure consent screen" setting:

Select the appropriate option for your setup:

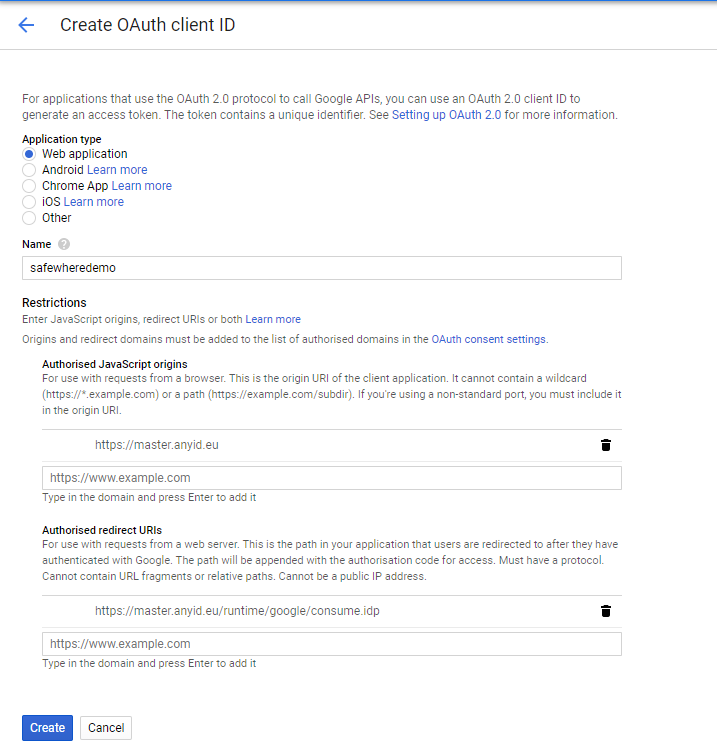
- Back to the "Credentials" form, choose "Create credentials" and select "OAuth client ID". On this form you will input the following values that points to your Safewhere Identify installation:
- Application type: Select "Web application"
- Name: Input the name of the credential.
- Authorized Javascript origins: Input the Identify site URL without a trailing slash "/", for example
https://identifydomain(Note: You need to add the domain of your Identify instance to the Authorised domains list of the OAuth consent screen) - Authorized redirect URI: Input the URI using the following format:
https://identifydomain/runtime/google/consume.idp
Make sure there are no whitespaces at the start and end.
Once registered, you will be given a number of important information that you will use to set up the Google connection in Safewhere Identify. These are:
- Client ID: The unique number that your app is given with Google.
- Client Secret: A secret code that will be used to ensure that your installation of Safewhere Identify is the only one that can use the Google authentication app setup.

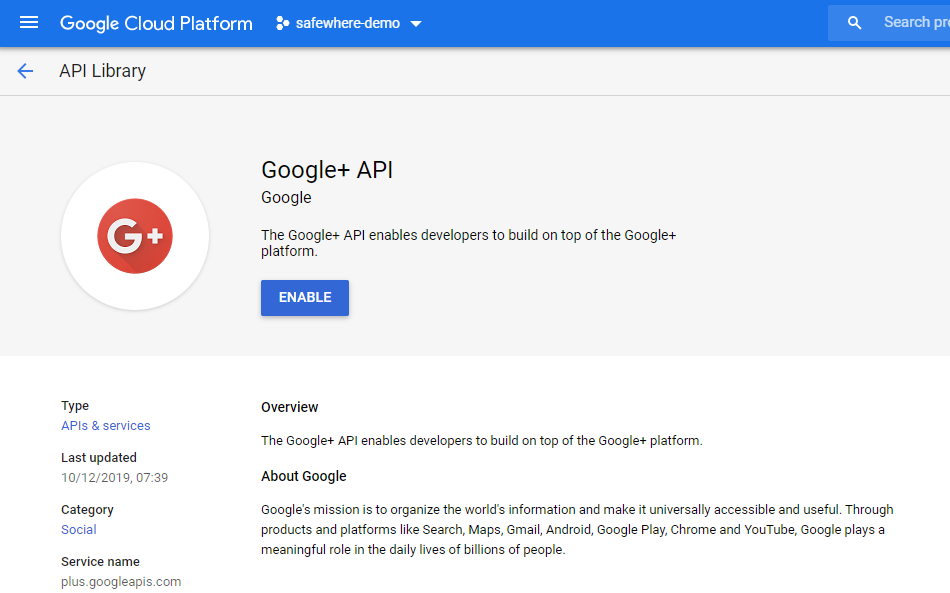
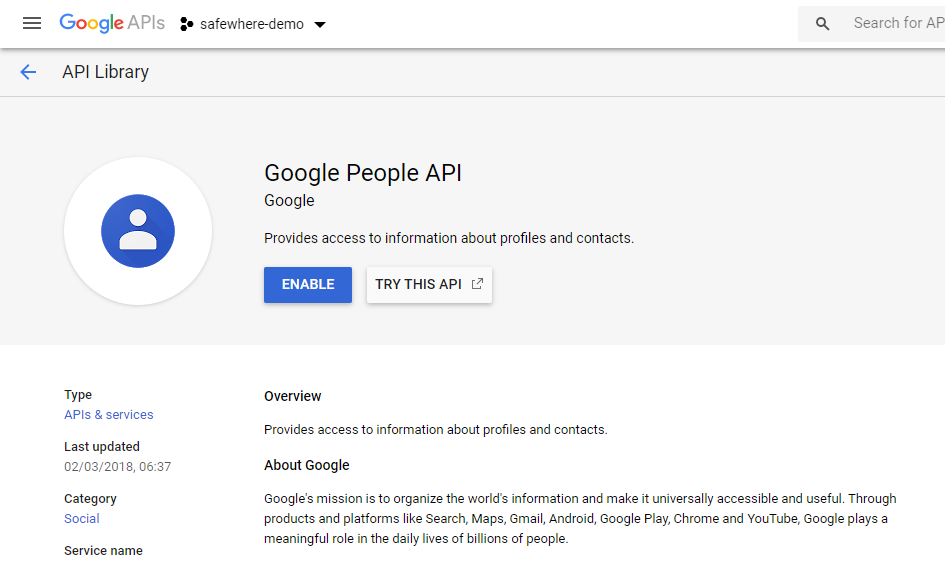
Note: You must enable the Google+ API and Google People API on the Google Cloud platform
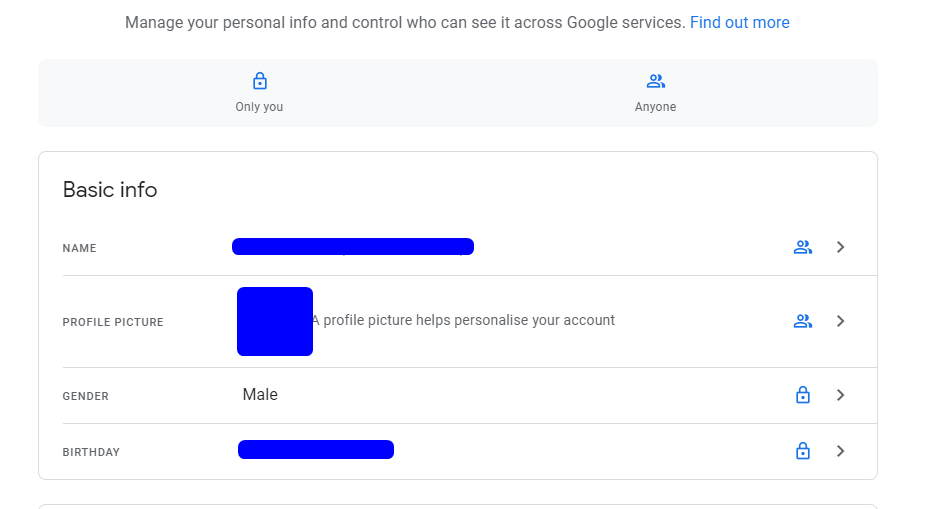
In addition, some Google attributes may need user approval before they are sent to the Identify:
Google identity provider setup
Now that you have Safewhere Identify registered with Google, you can continue to create a new Google authentication in Safewhere Admin.
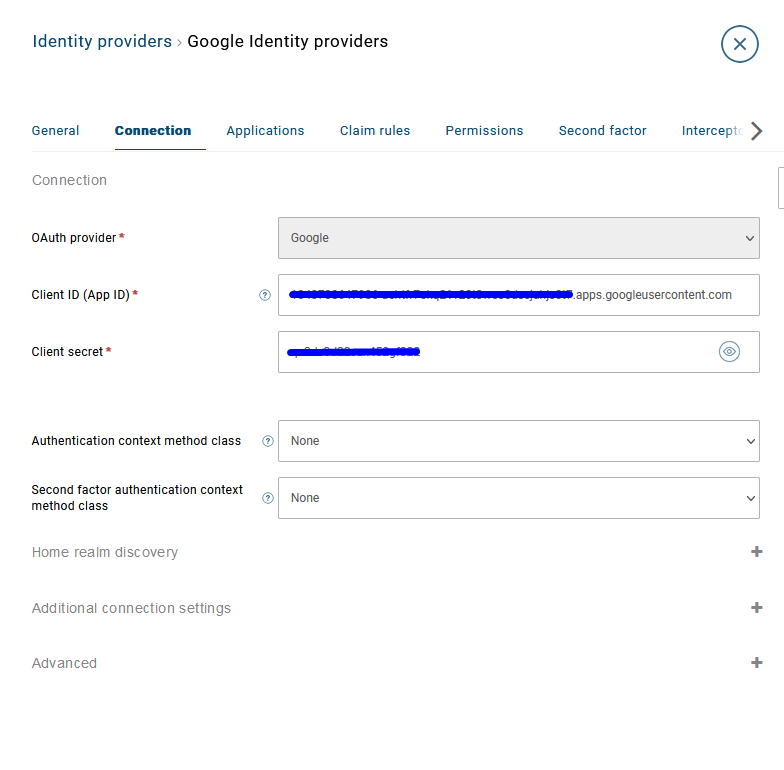
- After saving the new connection, access its connection tab and update the settings:
- Client id (App id): The App Id automatically generated by Google.
- Client secret: The secret code automatically generated by Google.
- You can also access the Permission tab to grant additional permissions:
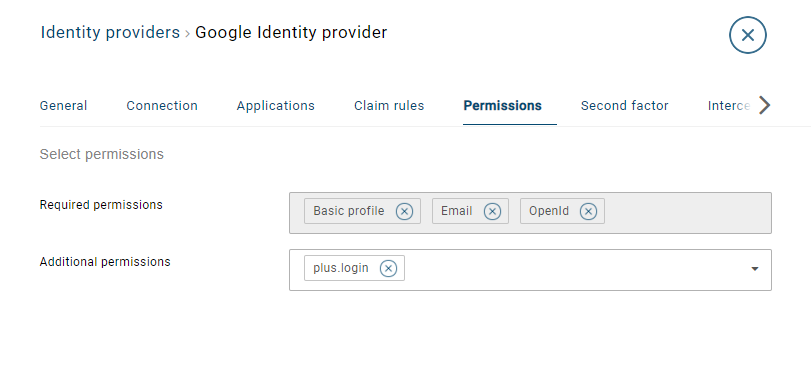
- Required permissions: There are default values: openid, profile (It collects the Google attributes: "id", "displayName", "name", "url", "gender", "givenName", "middleName", "familyName"), email
- Additional permissions: You can add "plus.login"(a.k.a https://www.googleapis.com/auth/plus.login) for collecting the age_range
Here is the mapping list from Google attributes to Identify claims:
| Google attribute | Identify claim |
|---|---|
| id | http://schemas.xmlsoap.org/ws/2005/05/identity/claims/nameidentifier |
| displayName | http://schemas.xmlsoap.org/ws/2005/05/identity/claims/name |
| http://schemas.xmlsoap.org/ws/2005/05/identity/claims/emailaddress | |
| givenName | http://schemas.xmlsoap.org/ws/2005/05/identity/claims/givenname |
| middleName | urn:identify:middlename |
| familyName | http://schemas.xmlsoap.org/ws/2005/05/identity/claims/surname |
| url | urn:google:profile |
| gender | http://schemas.xmlsoap.org/ws/2005/05/identity/claims/gender |
| birthday | http://schemas.xmlsoap.org/ws/2005/05/identity/claims/dateofbirth |
| age_range (min) | urn:google:age_range_min |
| age_range (max) | urn:google:age_range_max |
Note: All attributes that are not listed in the table above are mapped to the urn:google:[attributename] claim.
To see how the authentication page looks to the users, please click here.
Facebook application setup
It is possible to authenticate users into a federation using their Facebook account. Before it even becomes relevant to set up the Facebook authentication connection in Safewhere Identify, you must register Safewhere Identify as an Application with Facebook. The link to do this is:
https://developers.facebook.com/apps/
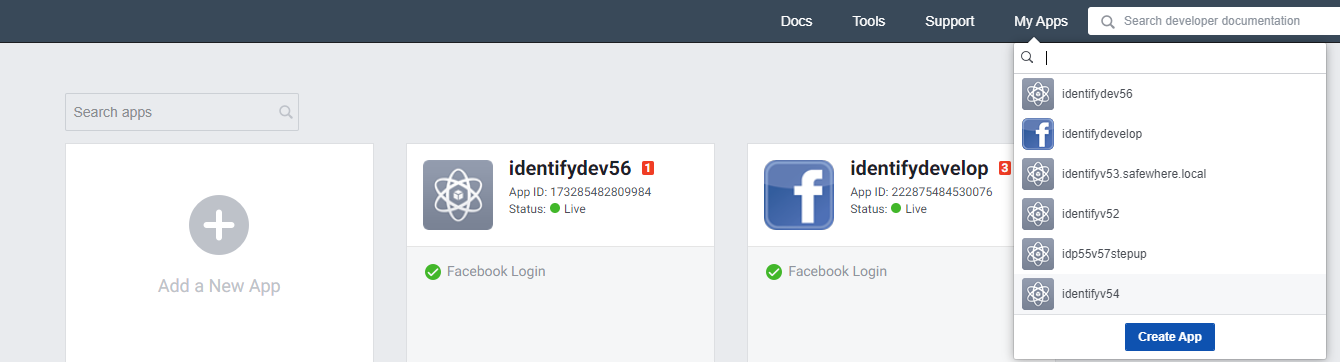
After signing up as a Facebook developer, you can start registering Safewhere Identify as an application as follows:
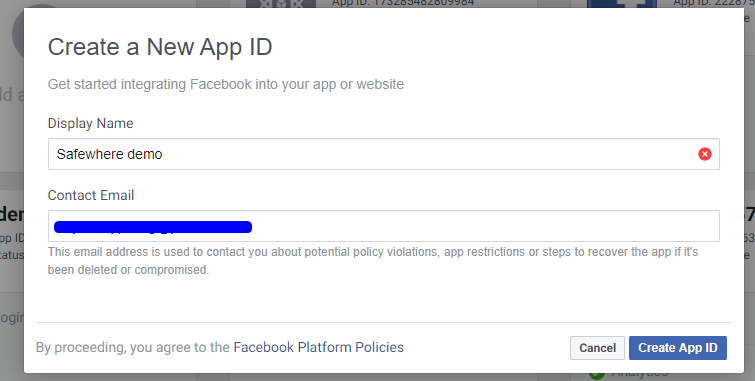
- Register your Safewhere Identify installation using the "Create App" button.
This will start a wizard of New App ID, where you can insert information about its display name and contact email.
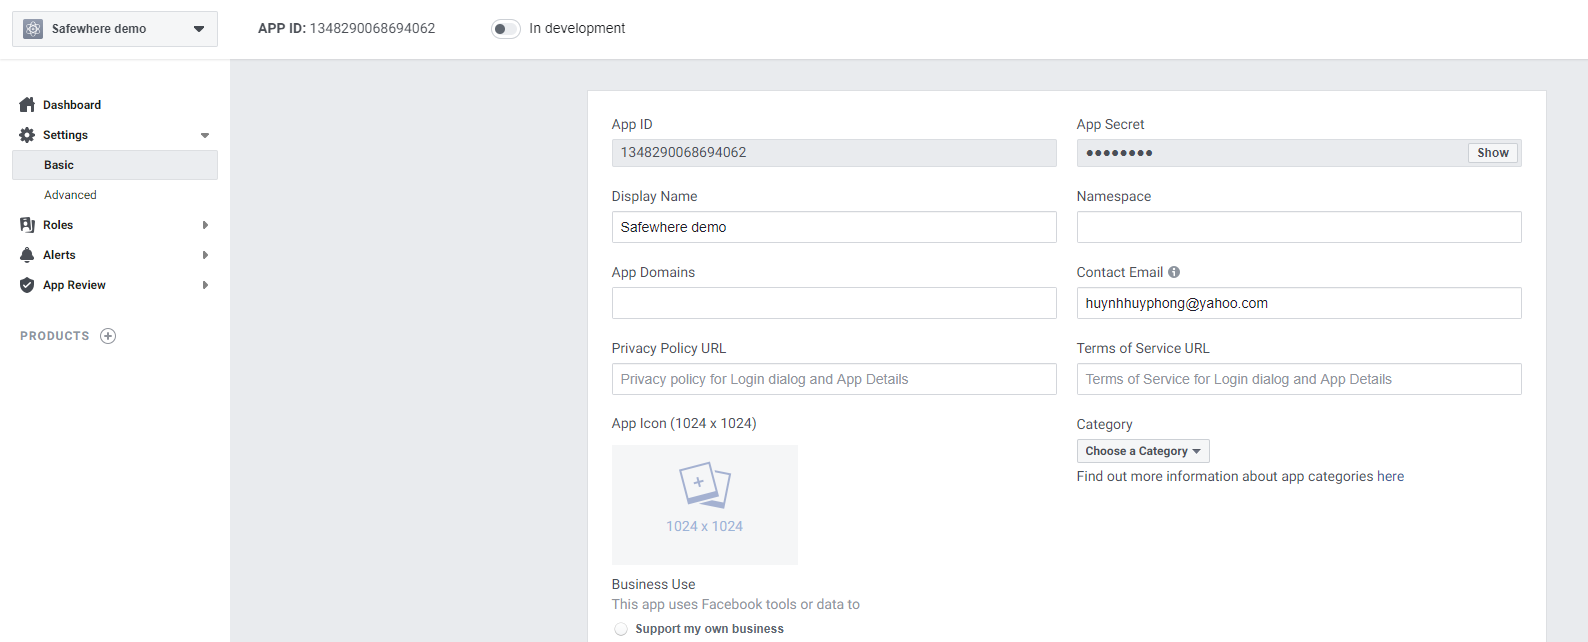
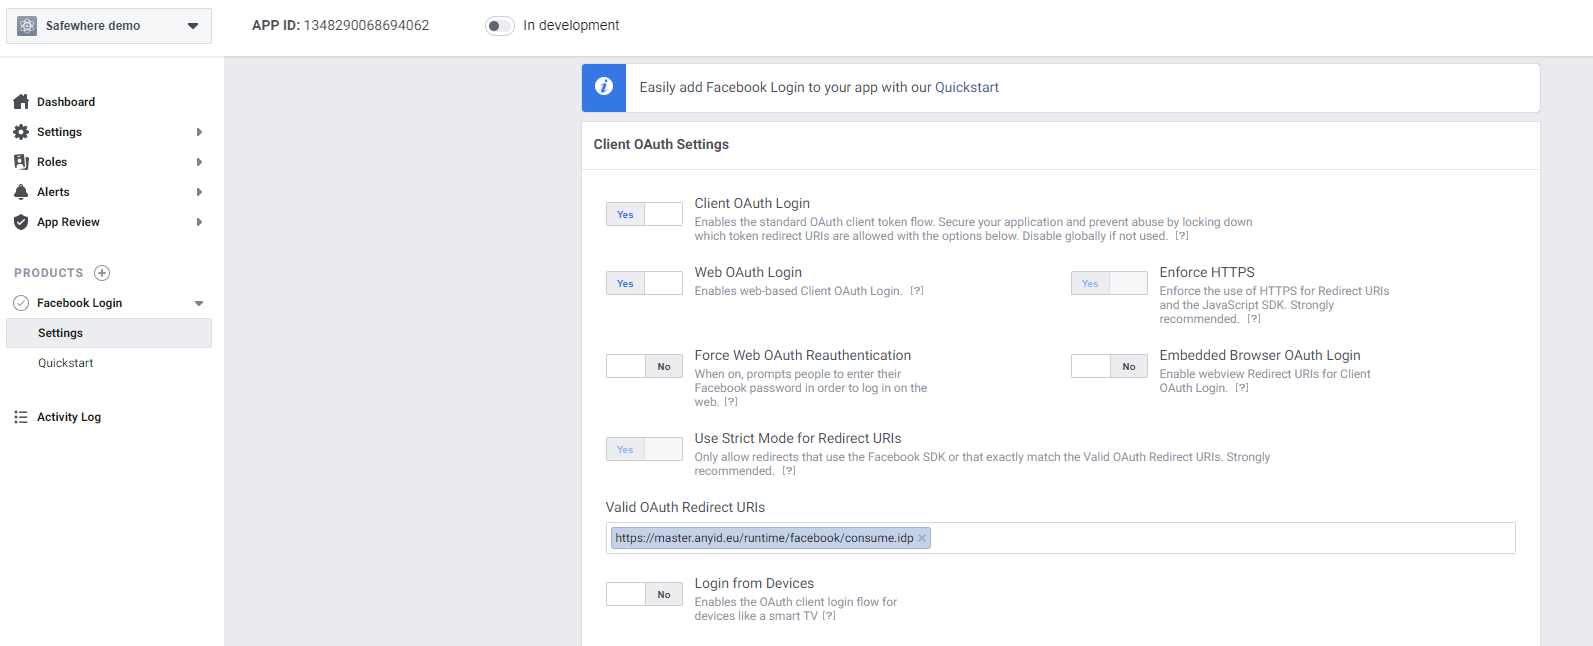
- Select Settings\Basic, you see this form and customize the following information:
- Display name: A name identifying the application (could e.g. be the Safewhere Identify site name).
- Namespace: Not relevant.
- Contact email: Primary email used for important communication related to the app.
- App Domains: Input the Identify domain.
- Privacy Policy URL: Input your policy URL
- Terms of Service URL: Input your terms of service URL (You need to input a valid URL as Facebook validates and detects this URL)
At the end of this form, select "Add platfom" and choose "Website"
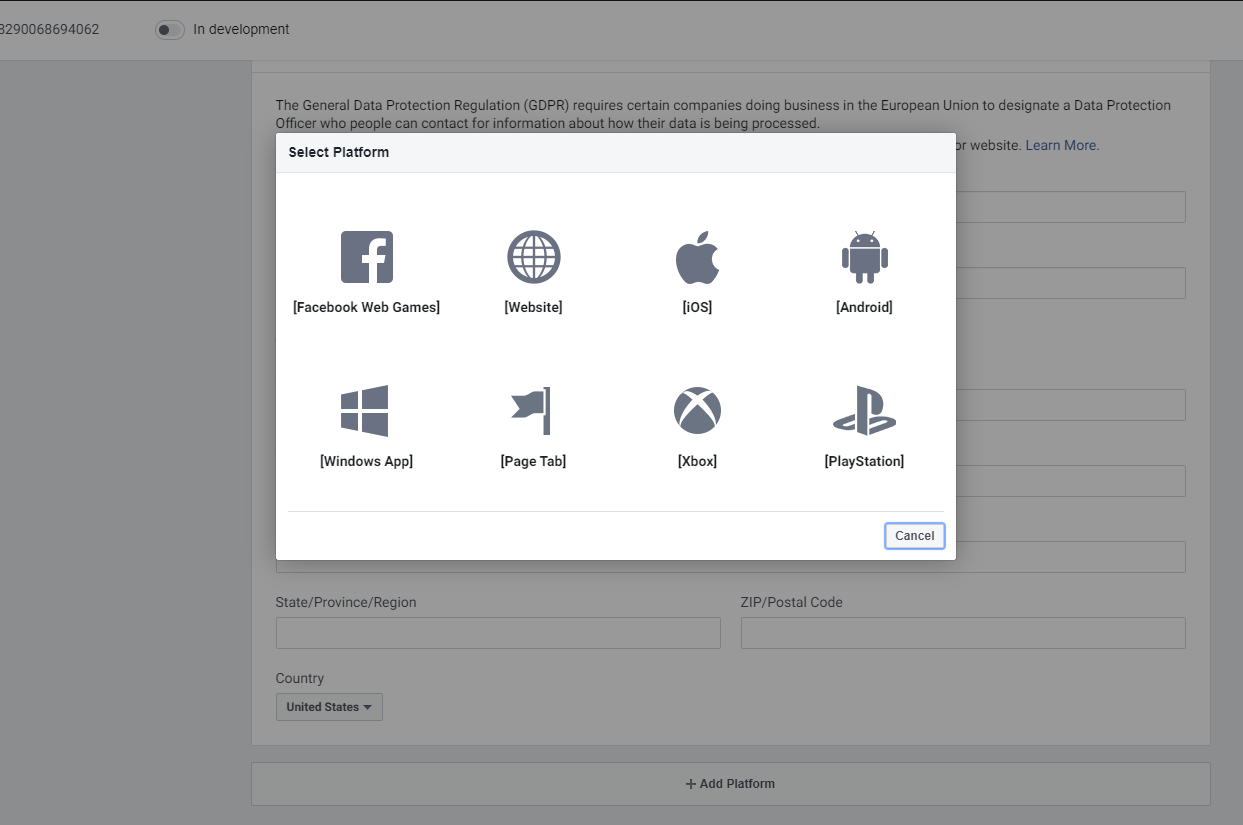
Input the below URL to the Site URL field:
https://identifydomain/runtime/facebook/consume.idp
- You need to add Identify URI to Valid OAuth redirect URIs list in the app's Login Settings. This rule was applied since Mar 2018 (refer to here)
Note: When you first register your app, it will be set to development mode
- You need to carry out the following steps in order to switch it to live mode:
- Fill in the URL with a hostname that can be resolved into a valid IP address at Privacy Policy URL/ Terms of Service URL
- Ensure that the Identify hostname can be resolved into a valid IP address.
- Temporarily change the Site URL from "https://identifydomain/runtime/facebook/consume.idp" to "https://identifydomain/runtime/"
- Save your app
- Switch the mode from "Development" to "Live"
After your app is "live", you need to update the Site URL from "https://identifydomain/runtime/" to "https://identifydomain/runtime/facebook/consume.idp" and save your app again.
Facebook identity provider setup
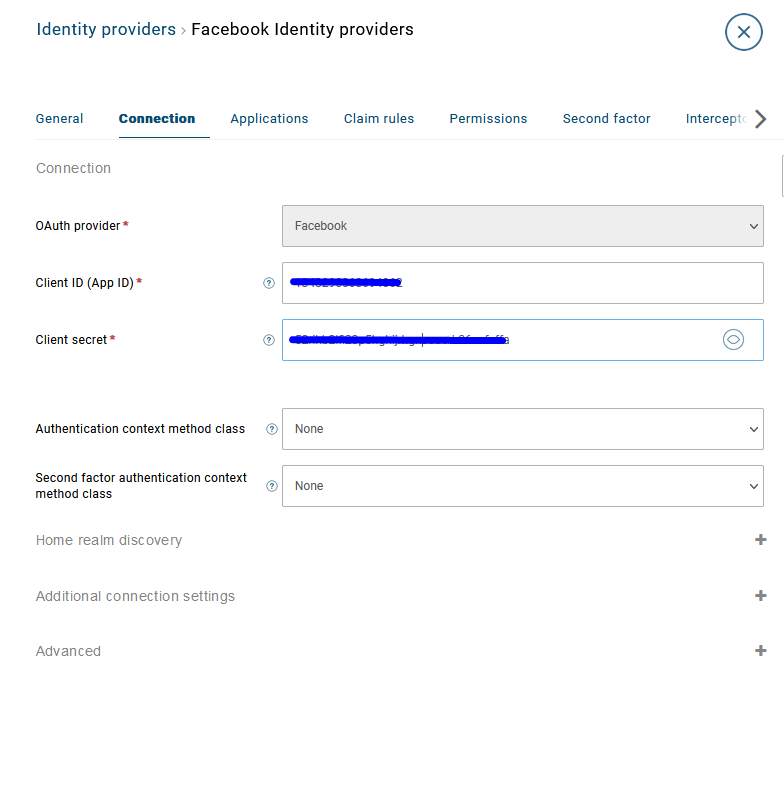
Now that you have Safewhere Identify registered with Facebook, you can continue to create a new Facebook authentication in Safewhere Admin.
- After saving the new connection, access the connection tab and update the settings:
- Client id (App id): The App Id automatically generated by Facebook.
- Client secret: The secret code automatically generated by Facebook.
- You can also access the Permission tab to grant additional permissions.
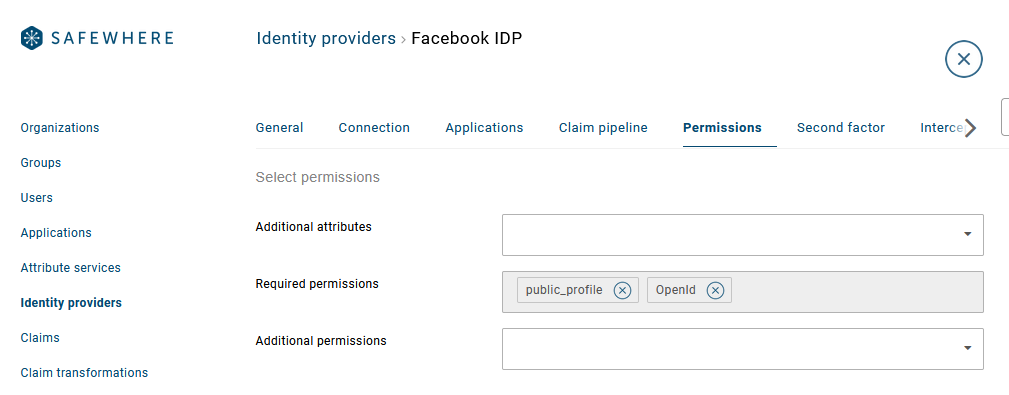
- Additional attributes: You can add "cover", "middle_name", "age_range", "link", "locale", "picture", "timezone", "updated_time", "verified", "gender", "birthday", "website", "hometown", "location", "work", "education", "about". When a attribute is selected on additional attributes input, its corresponding permission will be selected on additional permissions input.
- Required permissions: There are default values: "public_profile", "openid"
- Additional permissions: You can add user_birthday (birthday), user_website (website), user_hometown (hometown), user_location (location), user_work_history (work), user_education_history ("education"), user_about_me (about), email
Here is the overview of how Facebook attributes are mapped to Identify claims:
| Facebook attribute | identify claim |
|---|---|
| id | http://schemas.xmlsoap.org/ws/2005/05/identity/claims/nameidentifier |
| age_range (min) | urn:facebook:age_range_min |
| age_range (max) | urn:facebook:age_range_max |
| birthday | http://schemas.xmlsoap.org/ws/2005/05/identity/claims/dateofbirth |
| http://schemas.xmlsoap.org/ws/2005/05/identity/claims/emailaddress | |
| name | http://schemas.xmlsoap.org/ws/2005/05/identity/claims/name |
| first_name | http://schemas.xmlsoap.org/ws/2005/05/identity/claims/givenname |
| middle_name | urn:identify:middlename |
| last_name | http://schemas.xmlsoap.org/ws/2005/05/identity/claims/surname |
| gender | http://schemas.xmlsoap.org/ws/2005/05/identity/claims/gender |
| link | urn:facebook:link |
| location | urn:facebook:location |
| locale | http://schemas.xmlsoap.org/ws/2005/05/identity/claims/locality |
| timezone | urn:facebook:timezone |
Note: All attributes that are not listed in the table above are mapped to the urn:facebook:[attributename] claim.
To see how the authentication page looks to the users, please click here.
X
X application setup
It is possible to authenticate users into a federation using their X account. Before it even becomes relevant to set up the X authentication connection in Safewhere Identify, you must register Safewhere Identify as an Application with X. The link to do this is:
https://developer.x.com/en/portal/projects-and-apps
After signing up as a X account, you can start registering Safewhere Identify as an application:
- Register your Safewhere Identify installation using the "+ Add app" button under App section of your project.
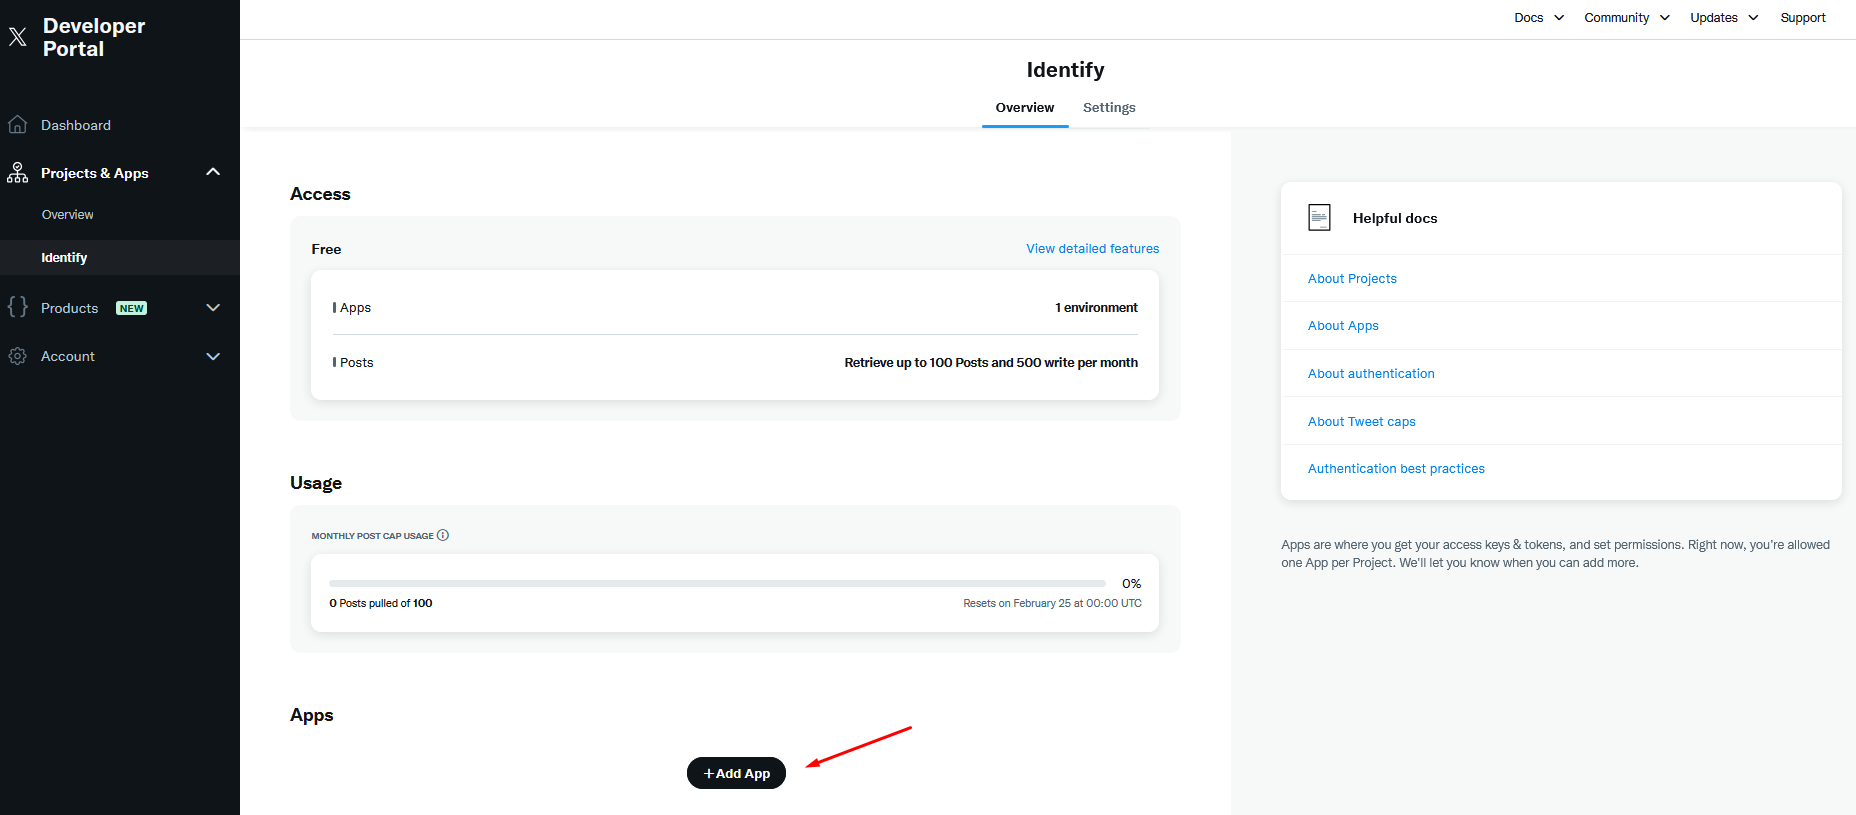

- Configure User Authentication Settings
After creating a new app, you must provide all required information by clicking the "Set up" button in the User authentication settings section.
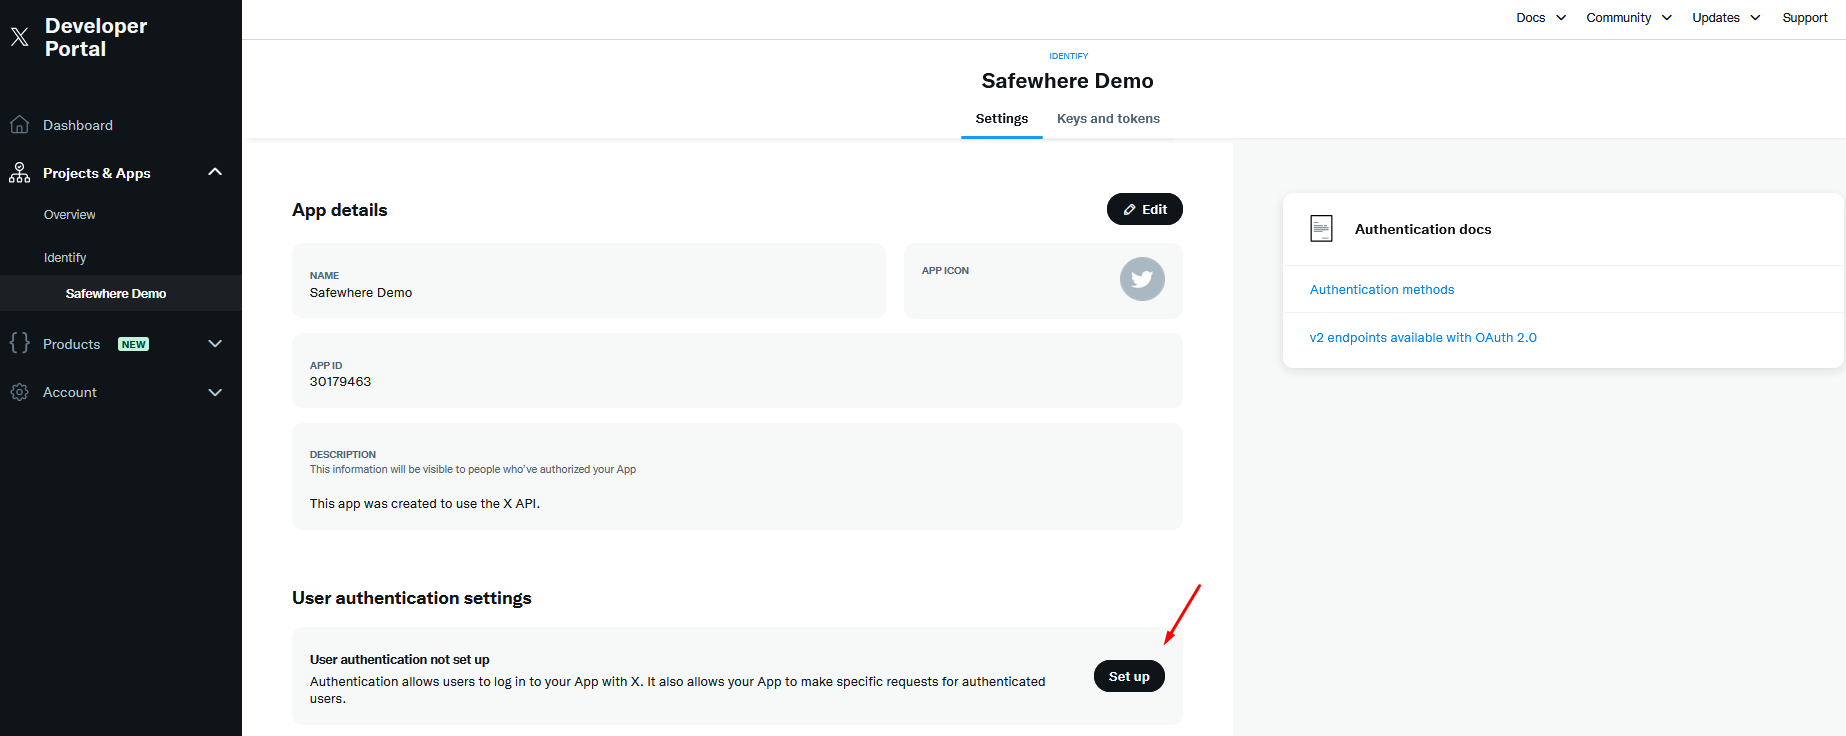
On the User authentication settings page, you need to configure the following:
App Permissions
Type of App
App info
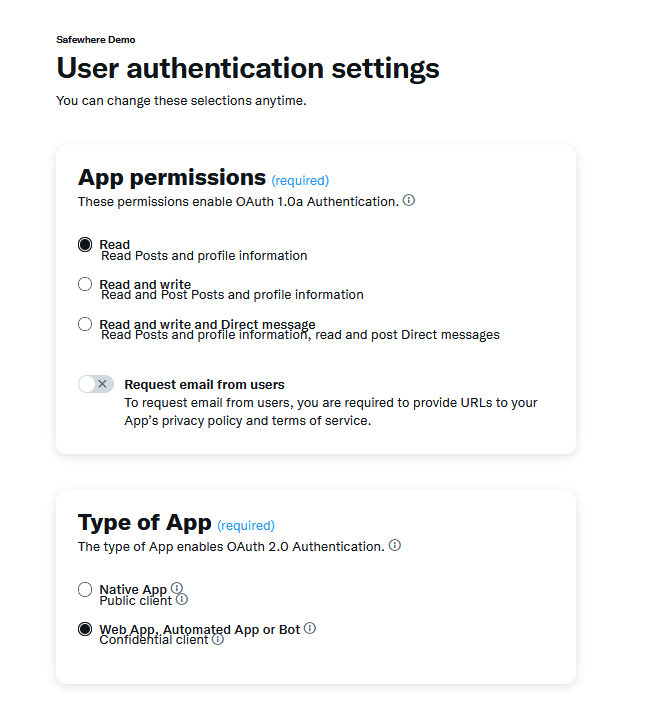
Note: X has a strict policy in terms of what you can pull from them. You can ask for a basic user profile, but email address will need elevated permission: verify_credentials and email. To request users' email addresses, you must enable the Request email from users option in the App permissions section.
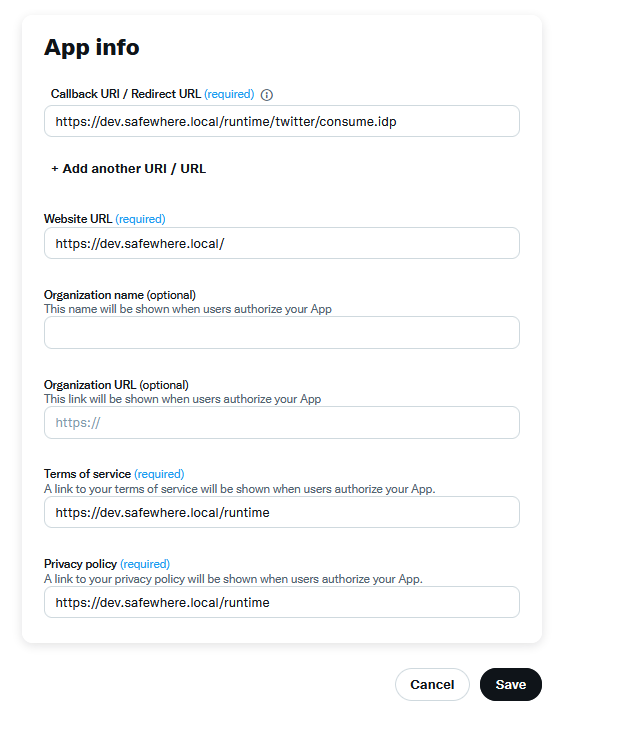
In the App info section, you must enter the following details:
Callback URI / Redirect URL
https://<your_identify_domain>/runtime/twitter/consume.idpWebsite URL
https://<your_identify_domain>Terms of service
https://<your_identify_domain>/runtimePrivacy policy
https://<your_identify_domain>/runtime
Finally, click the Save button to apply all settings.
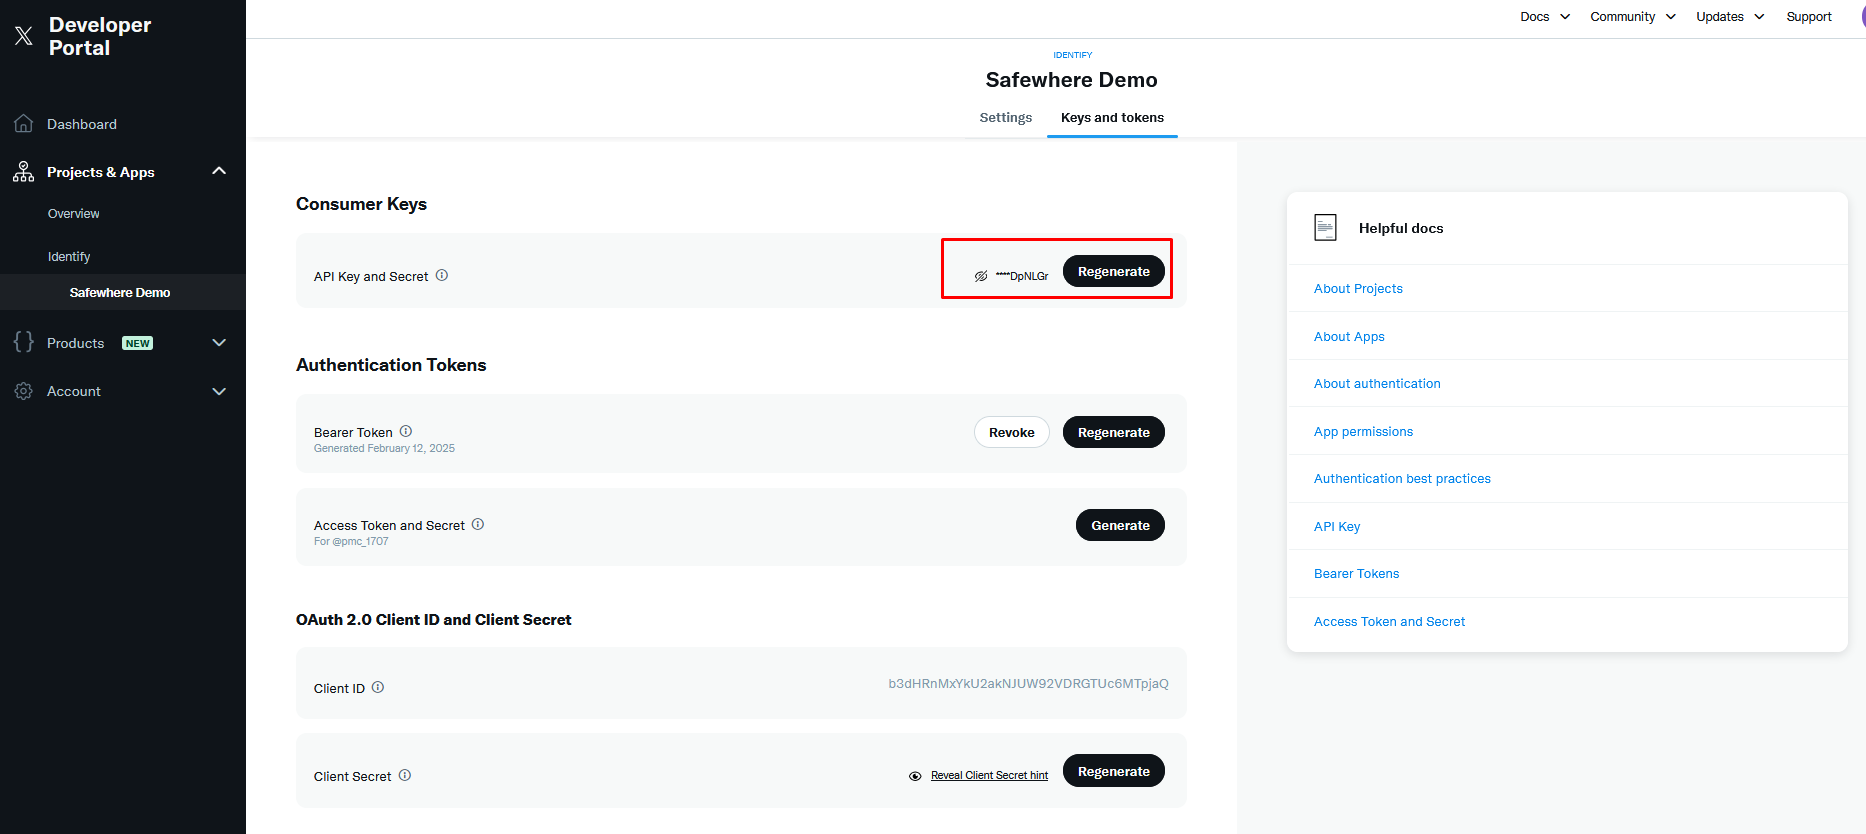
- You can collect the info about API key and its secret key on the
Keys and tokenstab.
X identity provider setup
Now that you have Safewhere Identify registered with X, you can continue to create a new X authentication in Safewhere Admin.
- After saving the new connection, access its connection tab and update the settings:
- Client id (App id): The App Id automatically generated by X.
- Client secret: The secret code automatically generated by X.

- There is no required permission as well as the additional permission, the settings at its Permissions tab is read-only
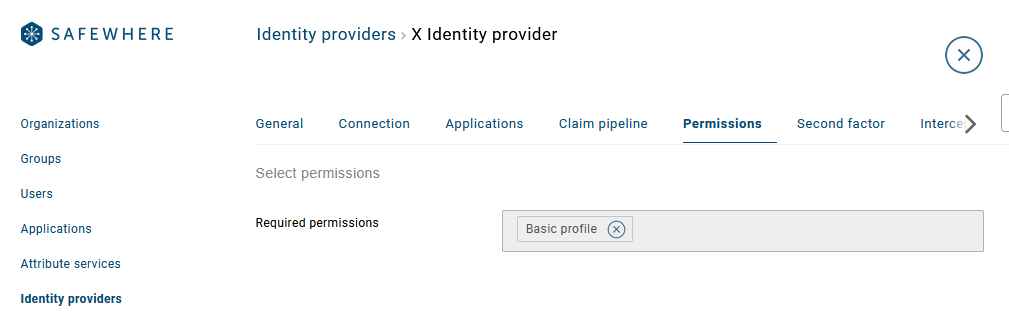
- Required permissions: you only have "basic_profile"
Here is the mapping list from the X attributes to the Identify claims:
| X attribute | identify claim |
|---|---|
| UserId | http://schemas.xmlsoap.org/ws/2005/05/identity/claims/nameidentifier |
| UserId | urn:twitter:userid |
| ScreenName | urn:twitter:screenname |
| ScreenName | http://schemas.xmlsoap.org/ws/2005/05/identity/claims/name |
| http://schemas.xmlsoap.org/ws/2005/05/identity/claims/emailaddress |
Note: All attributes that aren’t listed in the table above are mapped to urn:twitter:[attributename] claim.
To see how the authentication page looks to the users, please click here.
LinkedIn application setup
It is possible to authenticate users into a federation using their LinkedIn account. Before it even becomes relevant to set up the LinkedIn authentication connection in Safewhere Identify, you register Safewhere Identify as an Application with LinkedIn. The link to do this is:
https://www.linkedin.com/developers/apps
After signing up as a LinkedIn developer, you can start registering Safewhere Identify as an application as follows:
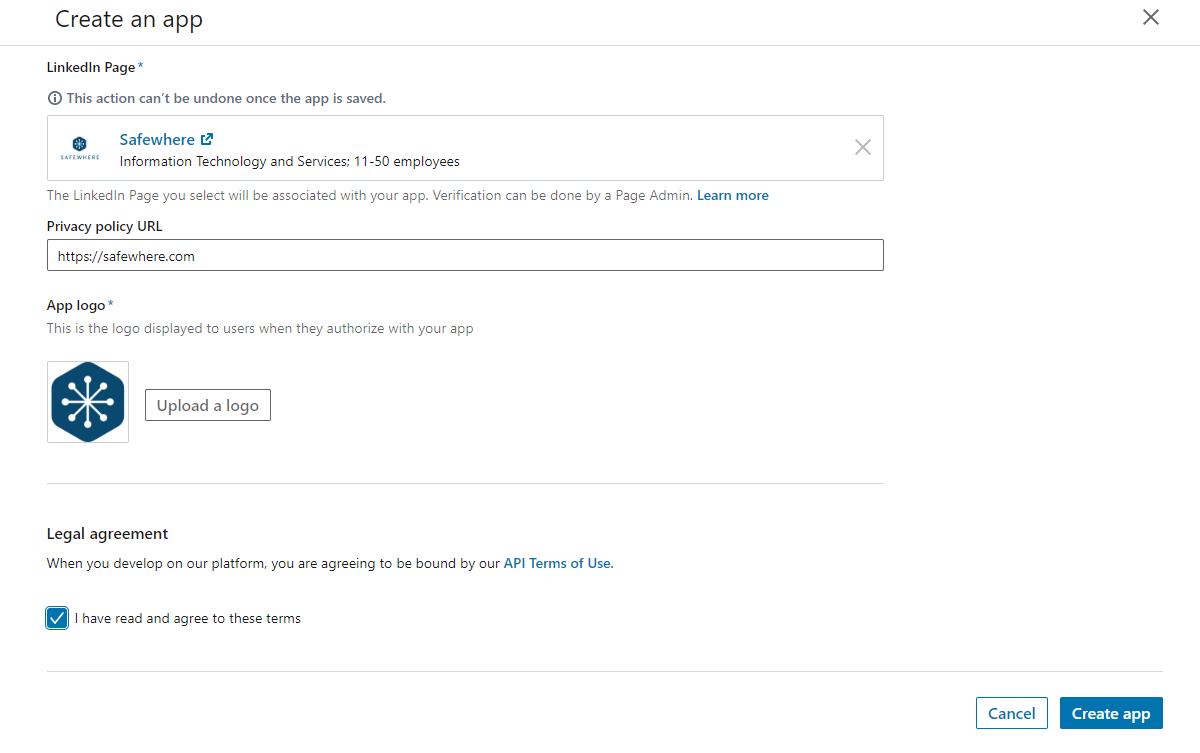
- Register your Safewhere Identify installation using the "Create app" button.

This will open a form where you can add info about the app as here shown
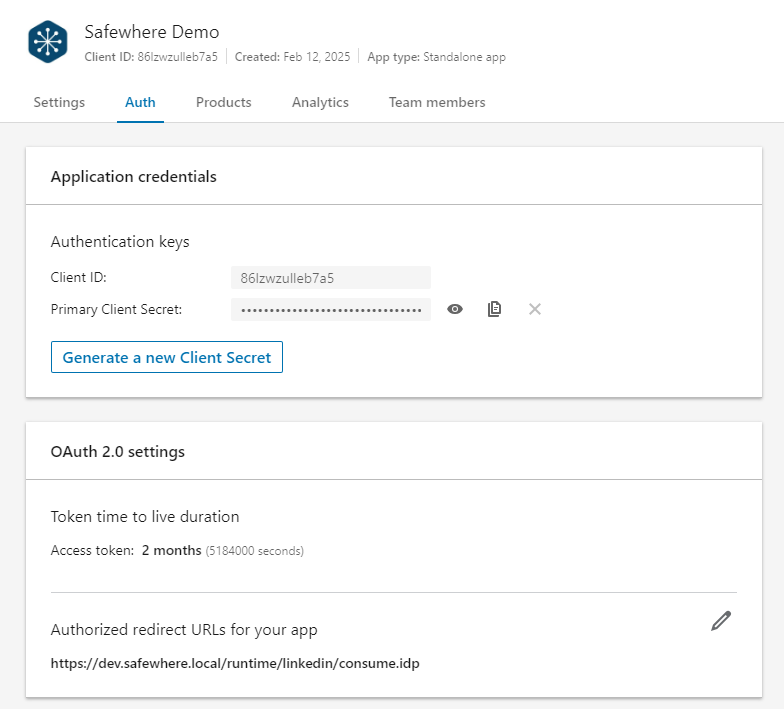
- Once registered you will be given a number of important information to set up the Linked connection in Safewhere Identify.
- At its Setting tab, you add your Identify domain on Additional settings

At its Auth tab, you have:
Client ID: The unique number that your app is given with LinkedIn.
Client Secret: A secret code that will be used to ensure that your installation of Safewhere Identify is the only one that can use the Facebook authentication app setup.
Redirect URLs: Insert the URLs using the following format:
https://<your_identify_domain>/runtime/linkedin/consume.idp
- At its Products tab, you add the "Sign In with LinkedIn using OpenID Connect " product
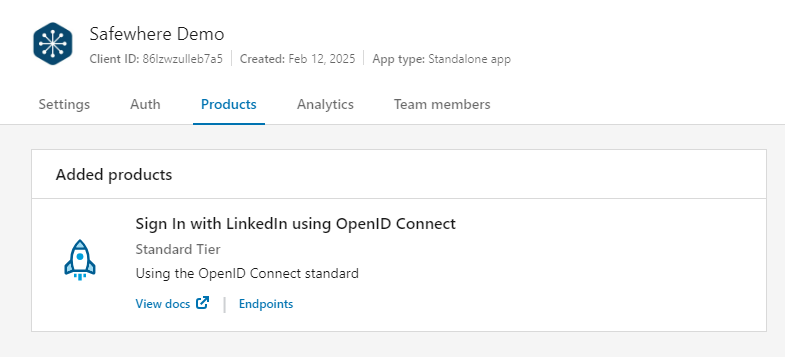
- After the product is approved, additional OAuth 2.0 scopes become available in its Auth tab

LinkedIn identity provider setup
Now that you have Safewhere Identify registered with LinkedIn, you can continue to create a new LinkedIn authentication in Safewhere Admin.
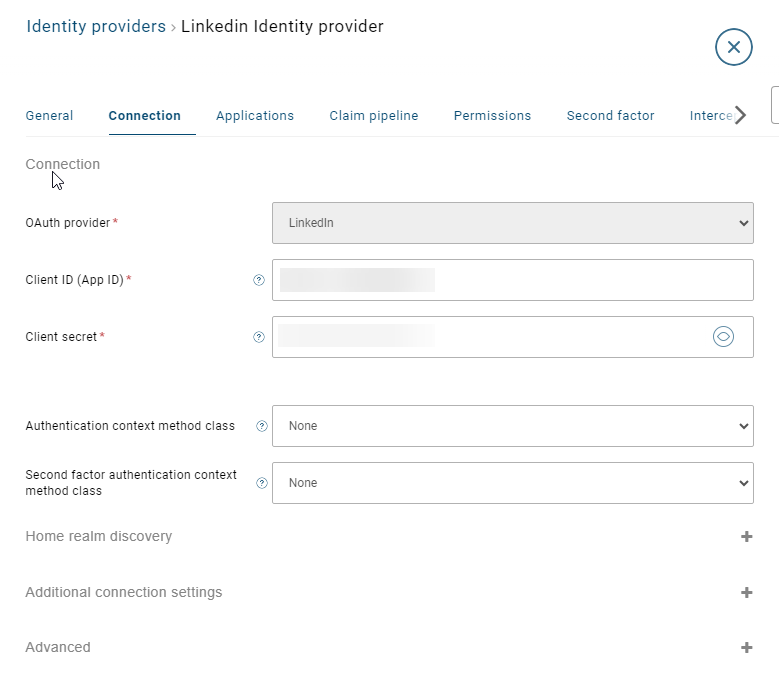
- After saving the new connection, access its connection tab and update the settings:
- Client id (App id): The App Id automatically generated by LinkedIn.
- Client secret: The secret code automatically generated by LinkedIn.
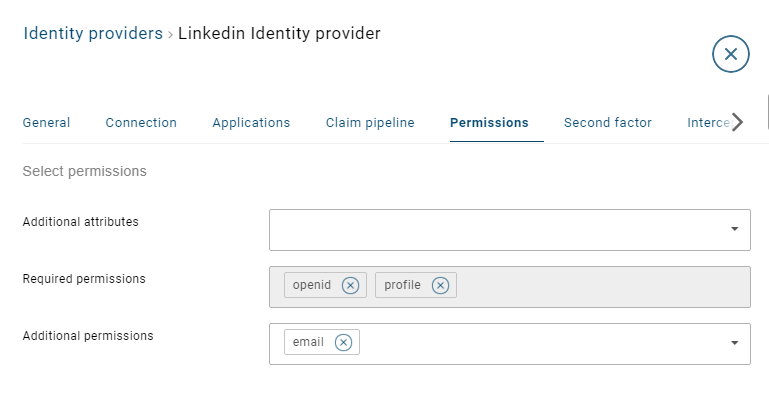
- You can also access its Permission tab to grant more additional permissions
- Additional attributes: You can add "headline", "birthDate", "address", "associations", "certifications", "contactInstructions", "educations", ims", "languages", "maritalStatus", "organizations", "phoneNumbers", "skills", "supportedLocales", "websites", "testScores", "projects", volunteeringExperiences", "honors", "courses". When a attribute is selected on additional attributes input, its corresponding permission will be selected on additional permissions input.
- Required permissions: There are default values: "openid", "profile"
- Additional permissions: You can add "email"
Here is the mapping list from the LinkedIn attributes to the Identify claims:
| LinkedIn attribute | identify claim |
|---|---|
| Id | http://schemas.xmlsoap.org/ws/2005/05/identity/claims/nameidentifier |
| vanityName (if vanityName value doens't return, it uses emailAddress value) | http://schemas.xmlsoap.org/ws/2005/05/identity/claims/name |
| emailAddress | http://schemas.xmlsoap.org/ws/2005/05/identity/claims/emailaddress |
| localizedFirstName | http://schemas.xmlsoap.org/ws/2005/05/identity/claims/givenname |
| localizedLastName | http://schemas.xmlsoap.org/ws/2005/05/identity/claims/surname |
| birthDate | http://schemas.xmlsoap.org/ws/2005/05/identity/claims/dateofbirth |
Note: All attributes that aren’t listed in the table above are mapped to urn:linkedin:[attributename] claim.
To see how the authentication page looks to the users, please click here.
Microsoft Live
Microsoft Live application setup
It is possible to authenticate users into a federation using their Microsoft account. Before it even becomes relevant to set up the Microsoft Live authentication connection in Safewhere Identify, we must register Safewhere Identify as an Application. The link to do this is:
After signing up as a Microsoft account, you can start registering Safewhere Identify as an application:
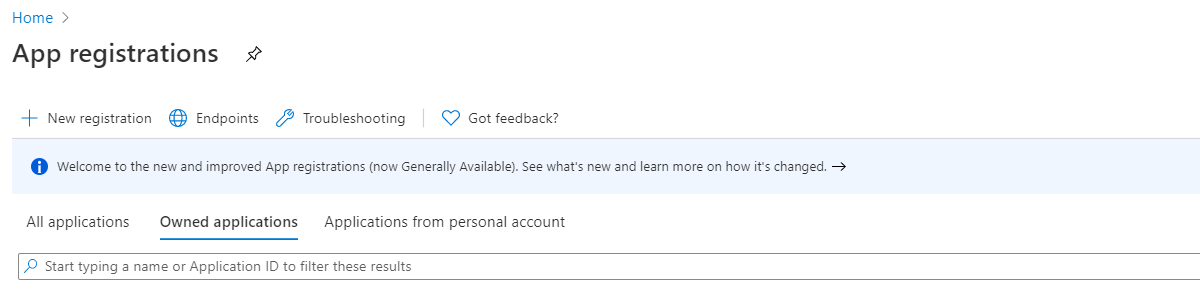
- Choose "App registrations"...
...and register your Safewhere Identify installation using the "New registration" button at "App registrations".
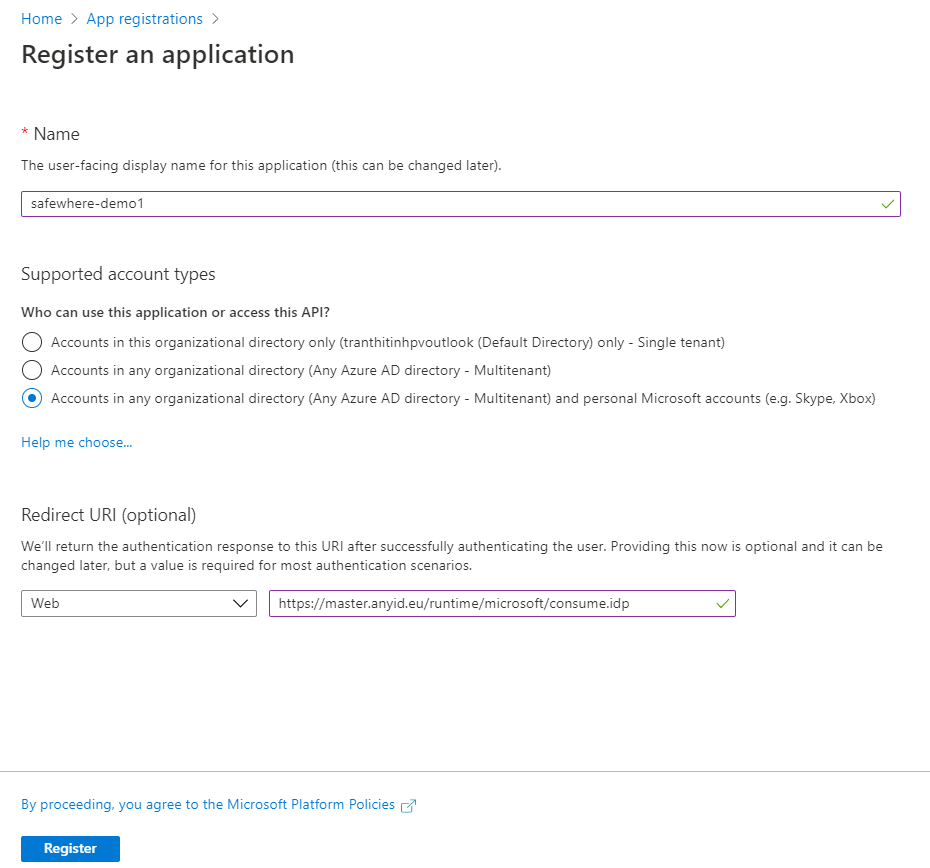
- When the new application form displays, you input the following information,,,
- Name: A name identifying the application (could e.g. be the Safewhere Identify site name).
- Supported account types: Specifies who can use this application or access this API
- Redirect URI: Selects "Web"option and insert the URLs using the following format:
https://identifydomain/runtime/microsoft/consume.idp
,,,and click "Register".
- Choose "Authentication" on the left panel of the app you just created and input the Logout URL using the following format...
https://identifydomain/runtime/OAuthProvider/signoff.idp
... and click Save.
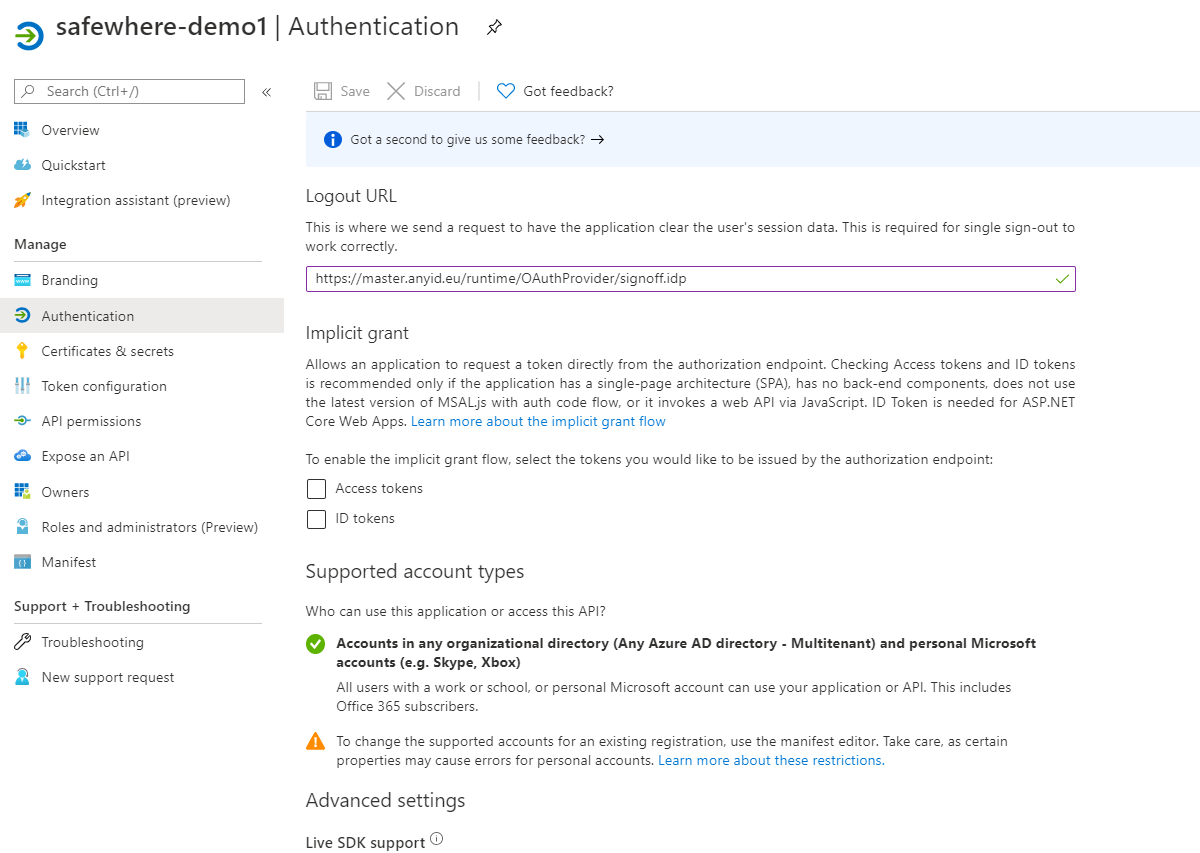
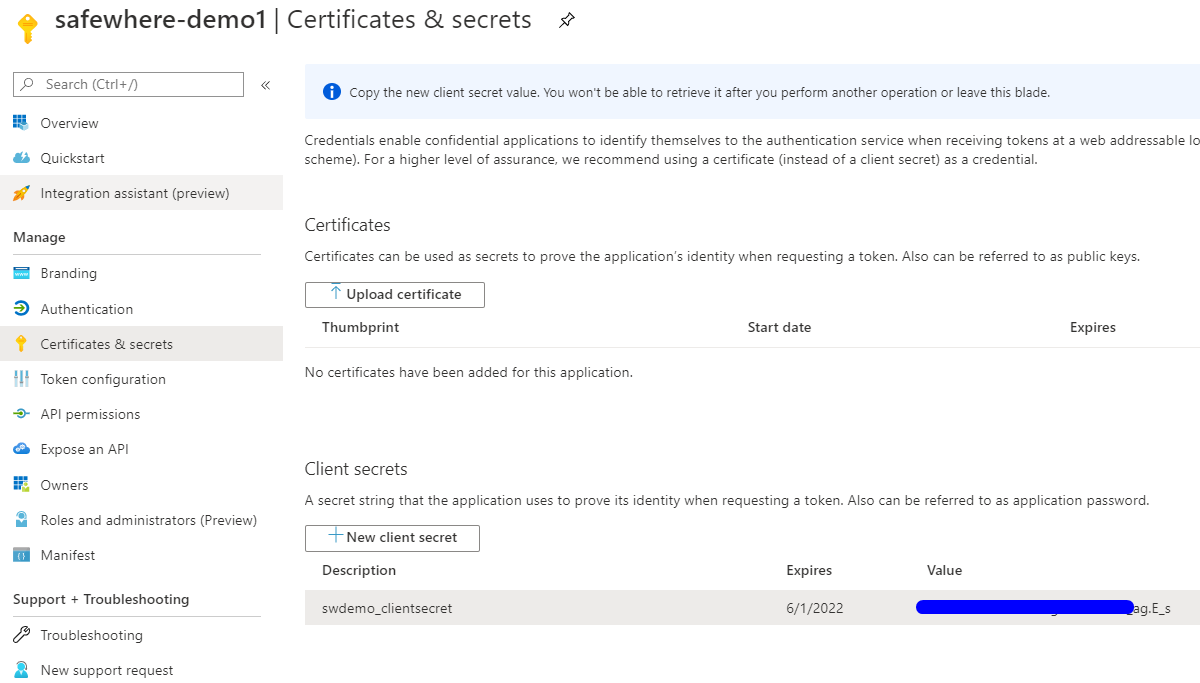
- Choose "Certificates & secrets" on the left panel of the app you created and generate a new client secret.
Microsoft Live identity provider setup
Now that you have Safewhere Identify registered with Microsoft, you can continue to create a new Microsoft Live authentication in Safewhere Admin.
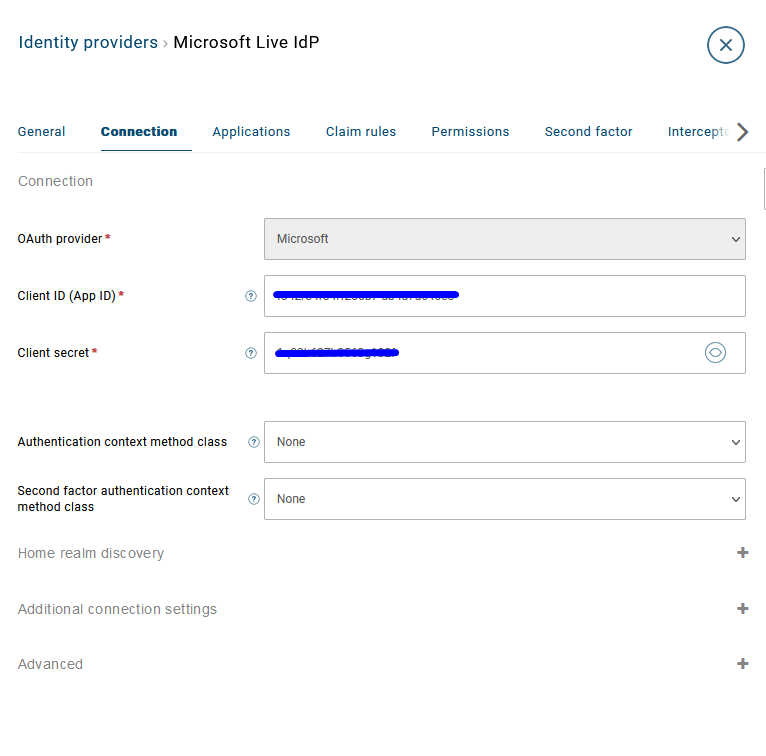
- After saving the new connection, access its connection tab and update the settings:
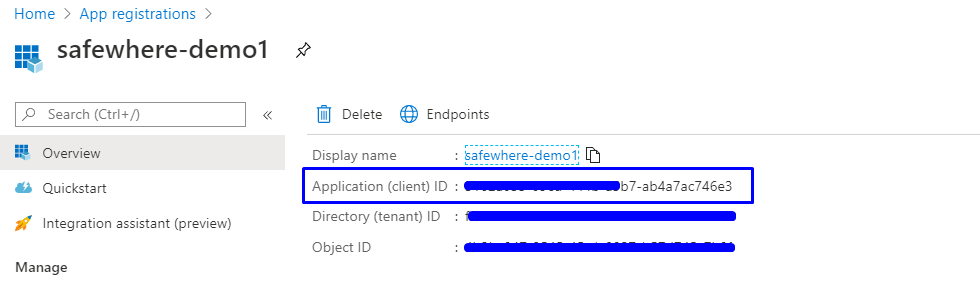
- Client id (App id): The App Id automatically generated by Microsoft. You can find its info at Overview setting of your Microsoft app.
- Client secret: The secret code automatically generated by Microsoft.
- There are no additional permissions to set. The settings on the Permissions tab are read-only
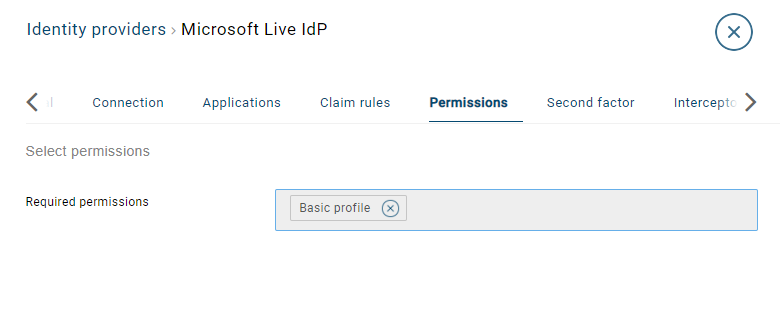
- Required permissions: You only have "Basic profile"
Here is the mapping list from the Microsoft attributes to the Identify claims:
| Microsoft attribute | identify claim |
|---|---|
| id | http://schemas.xmlsoap.org/ws/2005/05/identity/claims/nameidentifier |
| displayName | http://schemas.xmlsoap.org/ws/2005/05/identity/claims/name |
| http://schemas.xmlsoap.org/ws/2005/05/identity/claims/emailaddress | |
| userPrincipalName | http://schemas.xmlsoap.org/ws/2005/05/identity/claims/upn |
| mobilePhone | http://schemas.xmlsoap.org/ws/2005/05/identity/claims/mobilephone |
| givenName | http://schemas.xmlsoap.org/ws/2005/05/identity/claims/givenname |
| surname | http://schemas.xmlsoap.org/ws/2005/05/identity/claims/surname |
| birthday | http://schemas.xmlsoap.org/ws/2005/05/identity/claims/dateofbirth |
| country | http://schemas.xmlsoap.org/ws/2005/05/identity/claims/country |
Note: All attributes that aren’t listed in the table above are mapped to urn:microsoft:[attributename] claim.
To see how the authentication page looks to the users, please click here.
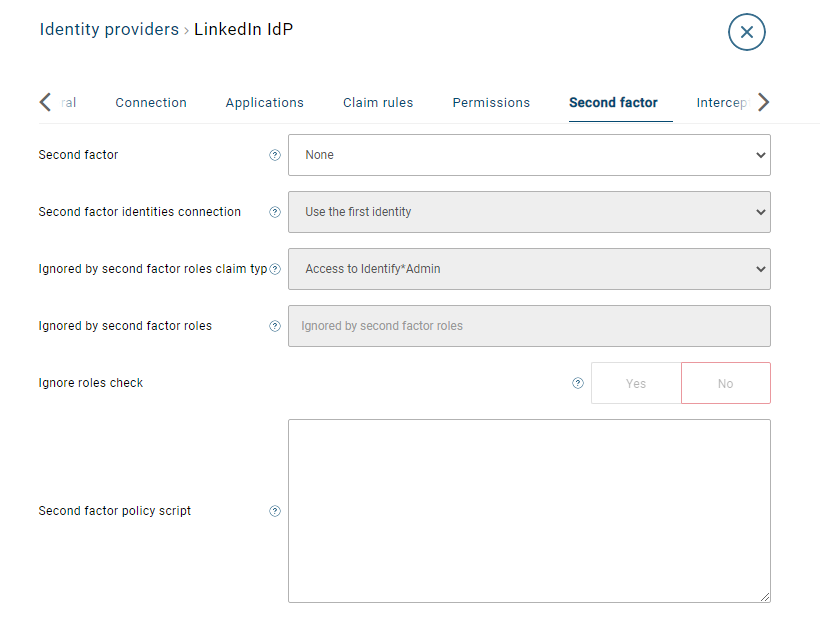
Common settings
Besides the actual provider-specific configuration settings, there are a whole range of fields that will help you set up a two factor authentication process. Below, each of these are explained in turn.
- Second factor authentication connection: If you want this Facebook Authentication Connection to have a second factor, you must choose this second factor among the different Authentication Connections that have been set up in the system. This includes all the One Time Password Connections.
- Two factor identities condition: When using two different Authentication Connections together which is basically what you are doing when setting up two-factor authentication, then the two may try to Safewhere Identify the incoming user based on two different identity bearing claims. This dropdown is activated when a user has chosen, that the connection will have a second factor. Options in the dropdown are:
- Use the first identity: System will disregard the "Identity bearing claim" value of the second factor and just focus on identifying the user based on the first one.
- Two identities must be the same: The user will not be allowed to log in unless the identity of the user for the first factor is identical to that of the second factor.