How to set up and use Azure Key Vault for Safewhere Identify
This document outlines all the steps that you need to do to use Azure Key Vault for Identify's signing certificate.
Set up Azure Key Vault
App registration
Safewhere Identify currently only has support for using Azure Active Directory for authentication. To access the Azure Key Vault, you need to create a service principal in your Azure Active Directory using Azure AD app registration.
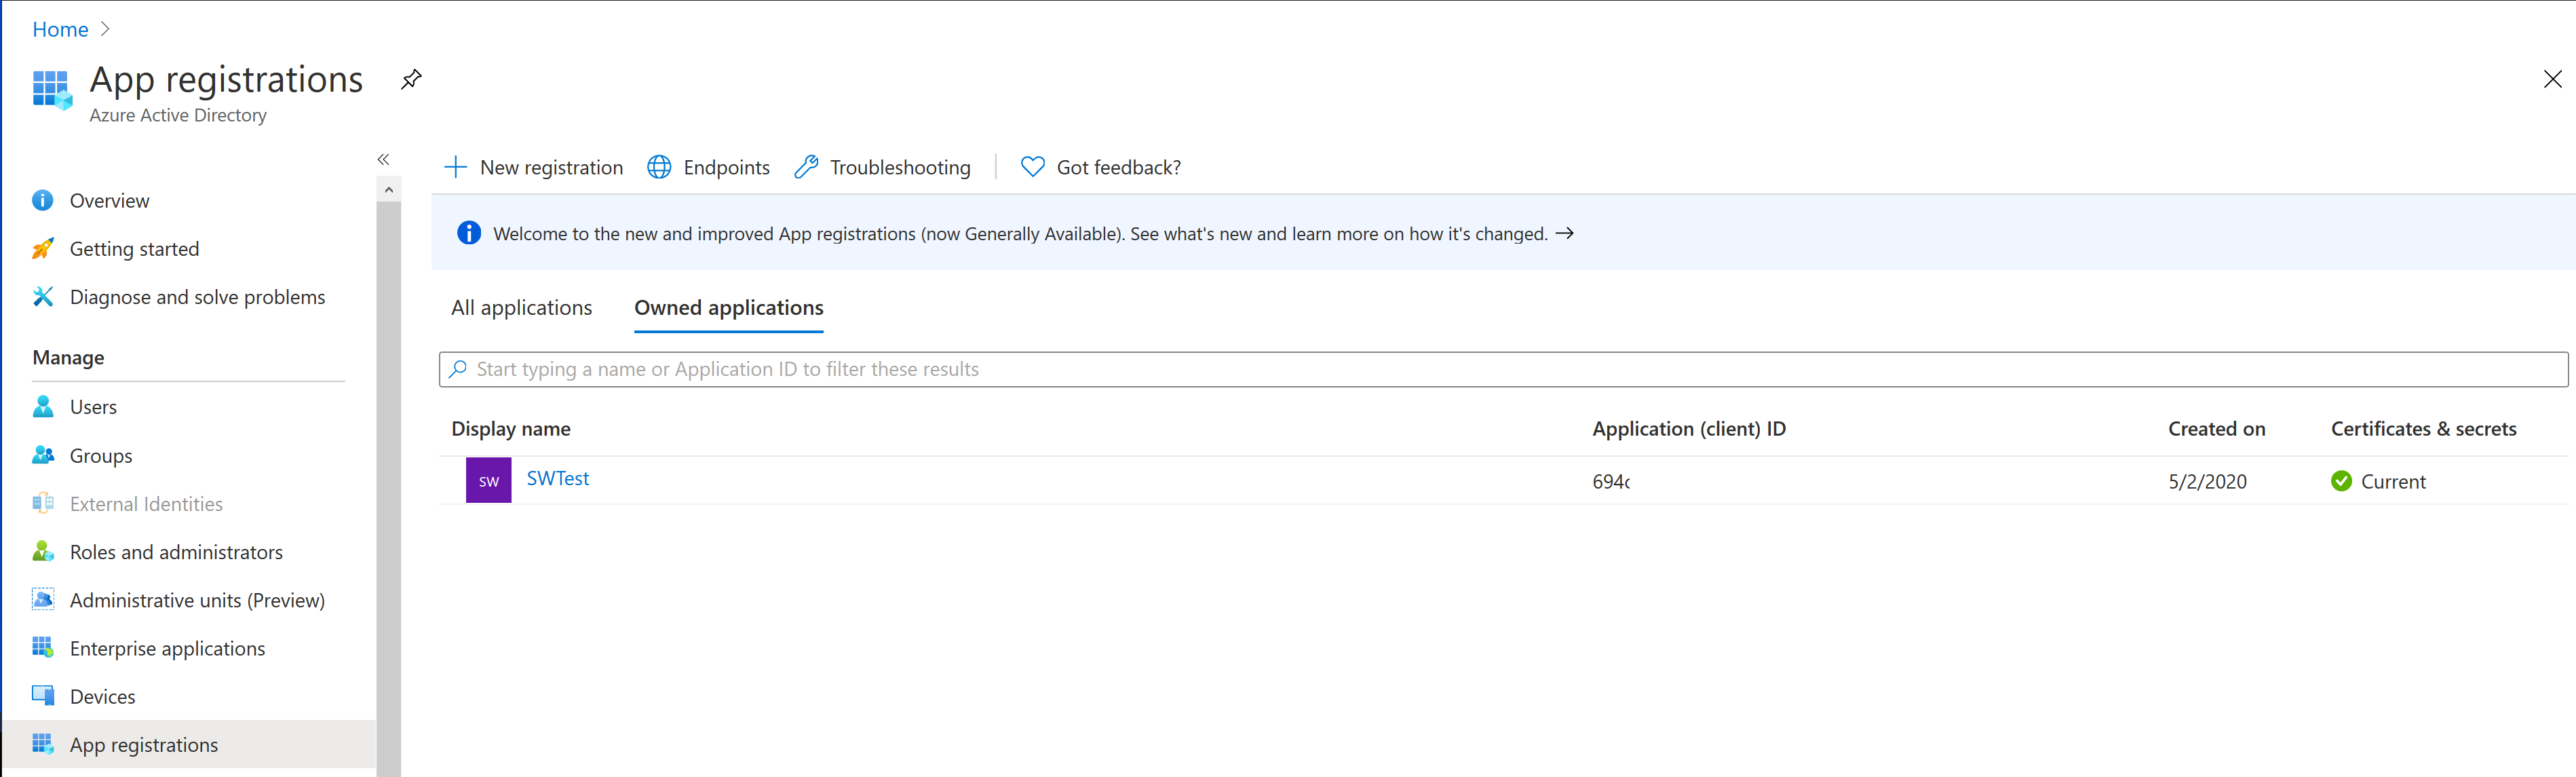
Steps to register an app:

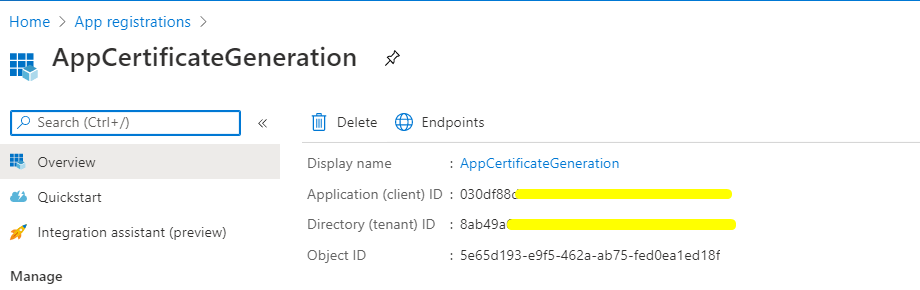
After finishing the app registration step, pay attention to the tenant ID and the client ID. You will need them to configure Identify:
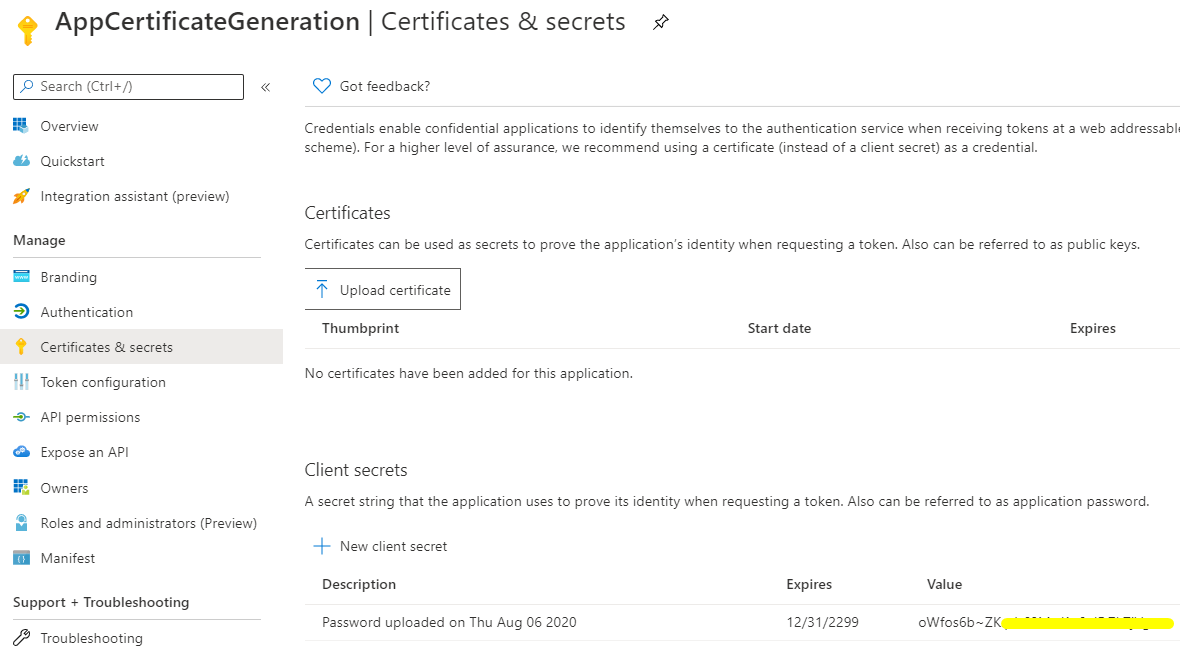
You also need to create a secret for your app:
Now you have finished registering an app that you can use to access your Azure Key Vault.
Note: Please consider creating two different applications - one application to be used for certificate generation on the Key Vault and another to be used for granting an Identify instance access to the certificate on the Key Vault.
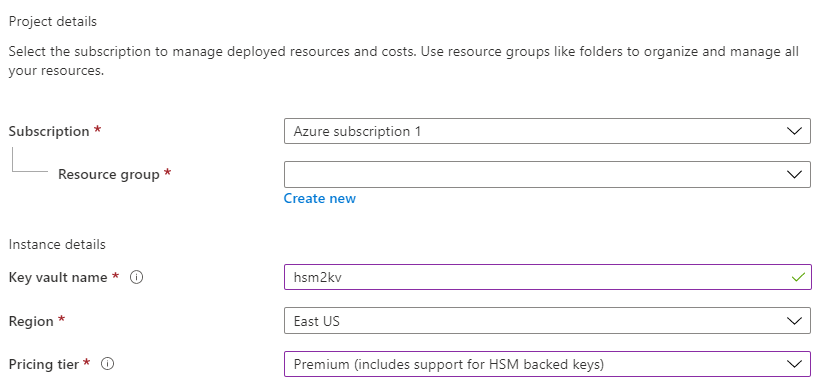
Create an Azure Key Vault
An Azure Key Vault can be created from the Azure Portal (you need to select the Premium plan to have HSM support):
After it is created, you need to grant your applications permission to the Key Vault.
Permission to generate a certificate on Azure Key Vault
Go to the Access policies and add a new access policy as follows:
- Choose all options under Key Management Operations of the Key Permissions dropdown list
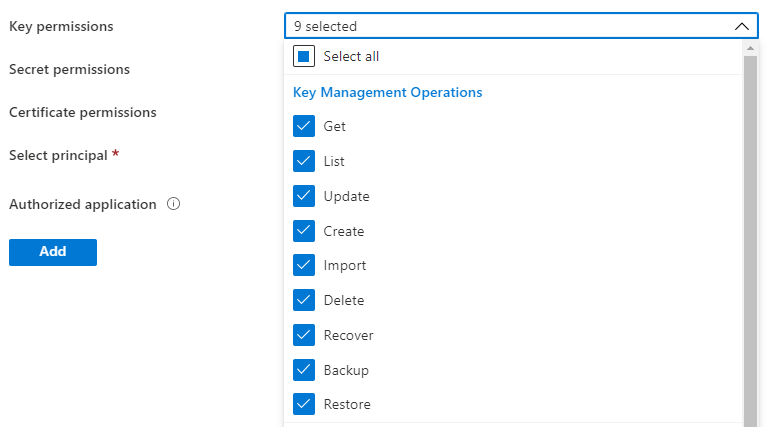
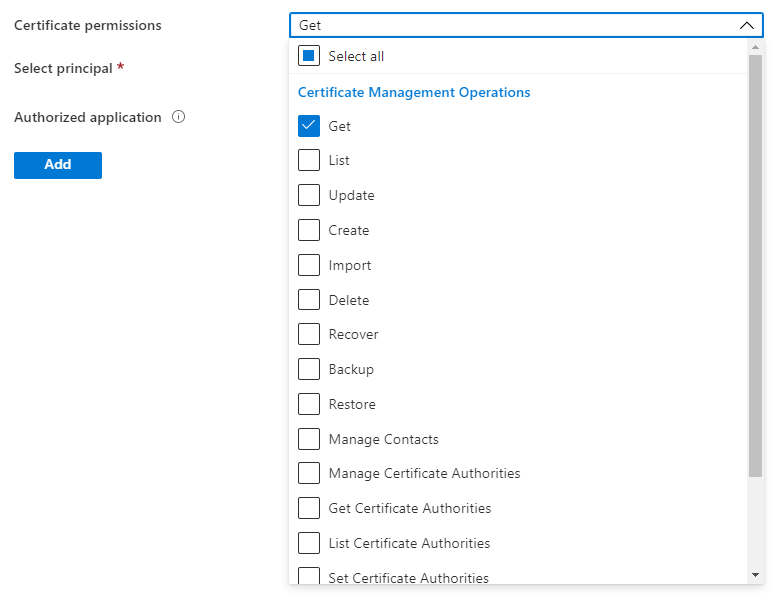
- Choose all options under Certificate Management Operations of the Certificate Permissions dropdown list
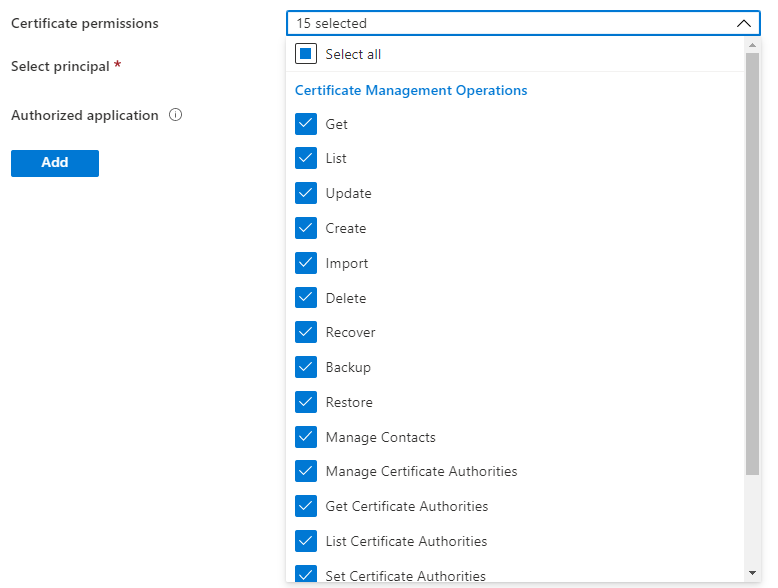
- Select your app in the Select principal setting
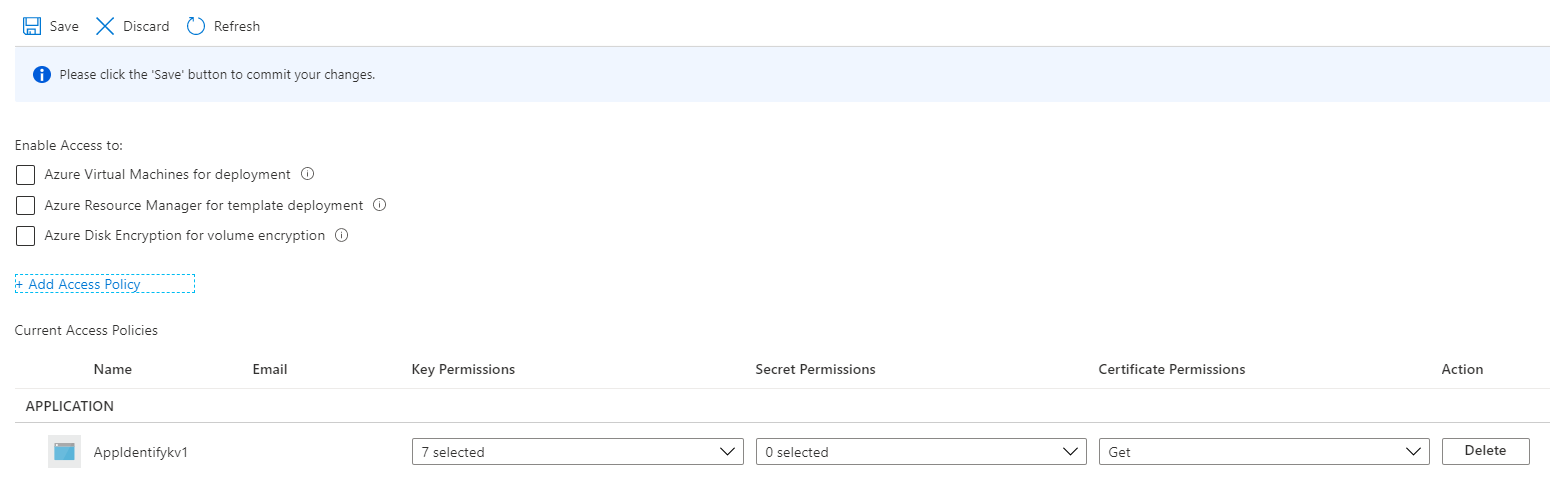
- Click the Add button to go back to the Access policies page. You can see your newly added policy there:
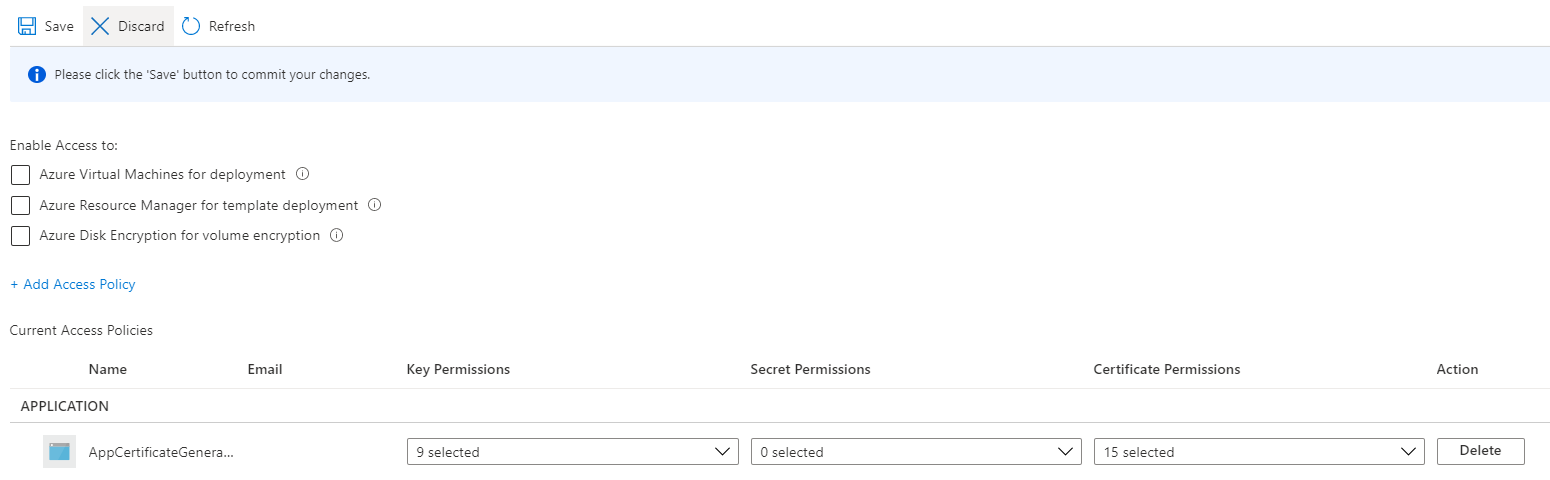
- Save the policy
Permission to access a certificate on Azure Key Vault
Go to the Access policies and add a new access policy as follows:
- Choose Get under Key Management Operations and all options under Cryptographic Operations of the Key Permissions dropdown list
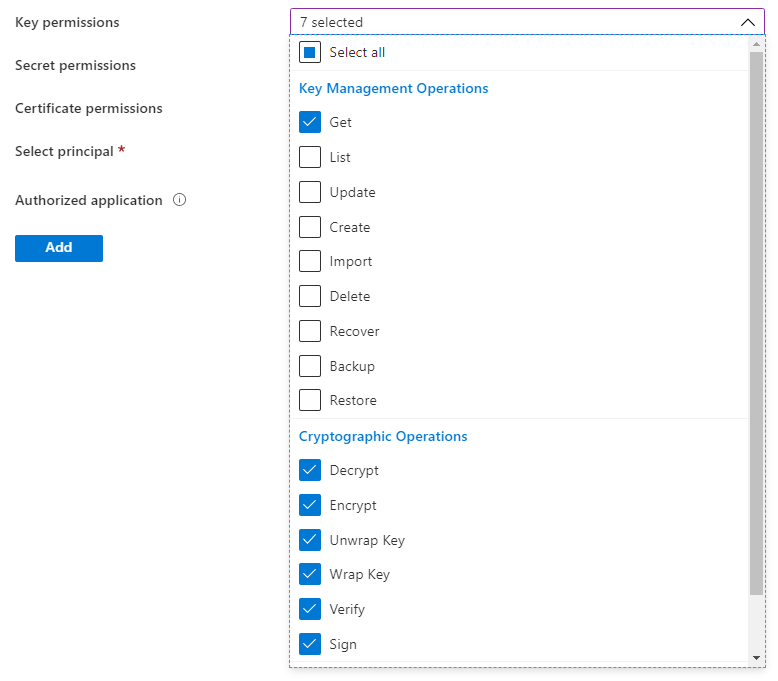
- Choose Get under Certificate Management Operations of the Certificate Permissions dropdown list
- Select your app in Select principal
- Choose Add button to go back to Access policies. You can see your newly added policy there:
- Choose Save to save the policy
Generate/Import Certificate in Azure Key Vault
Portal UI
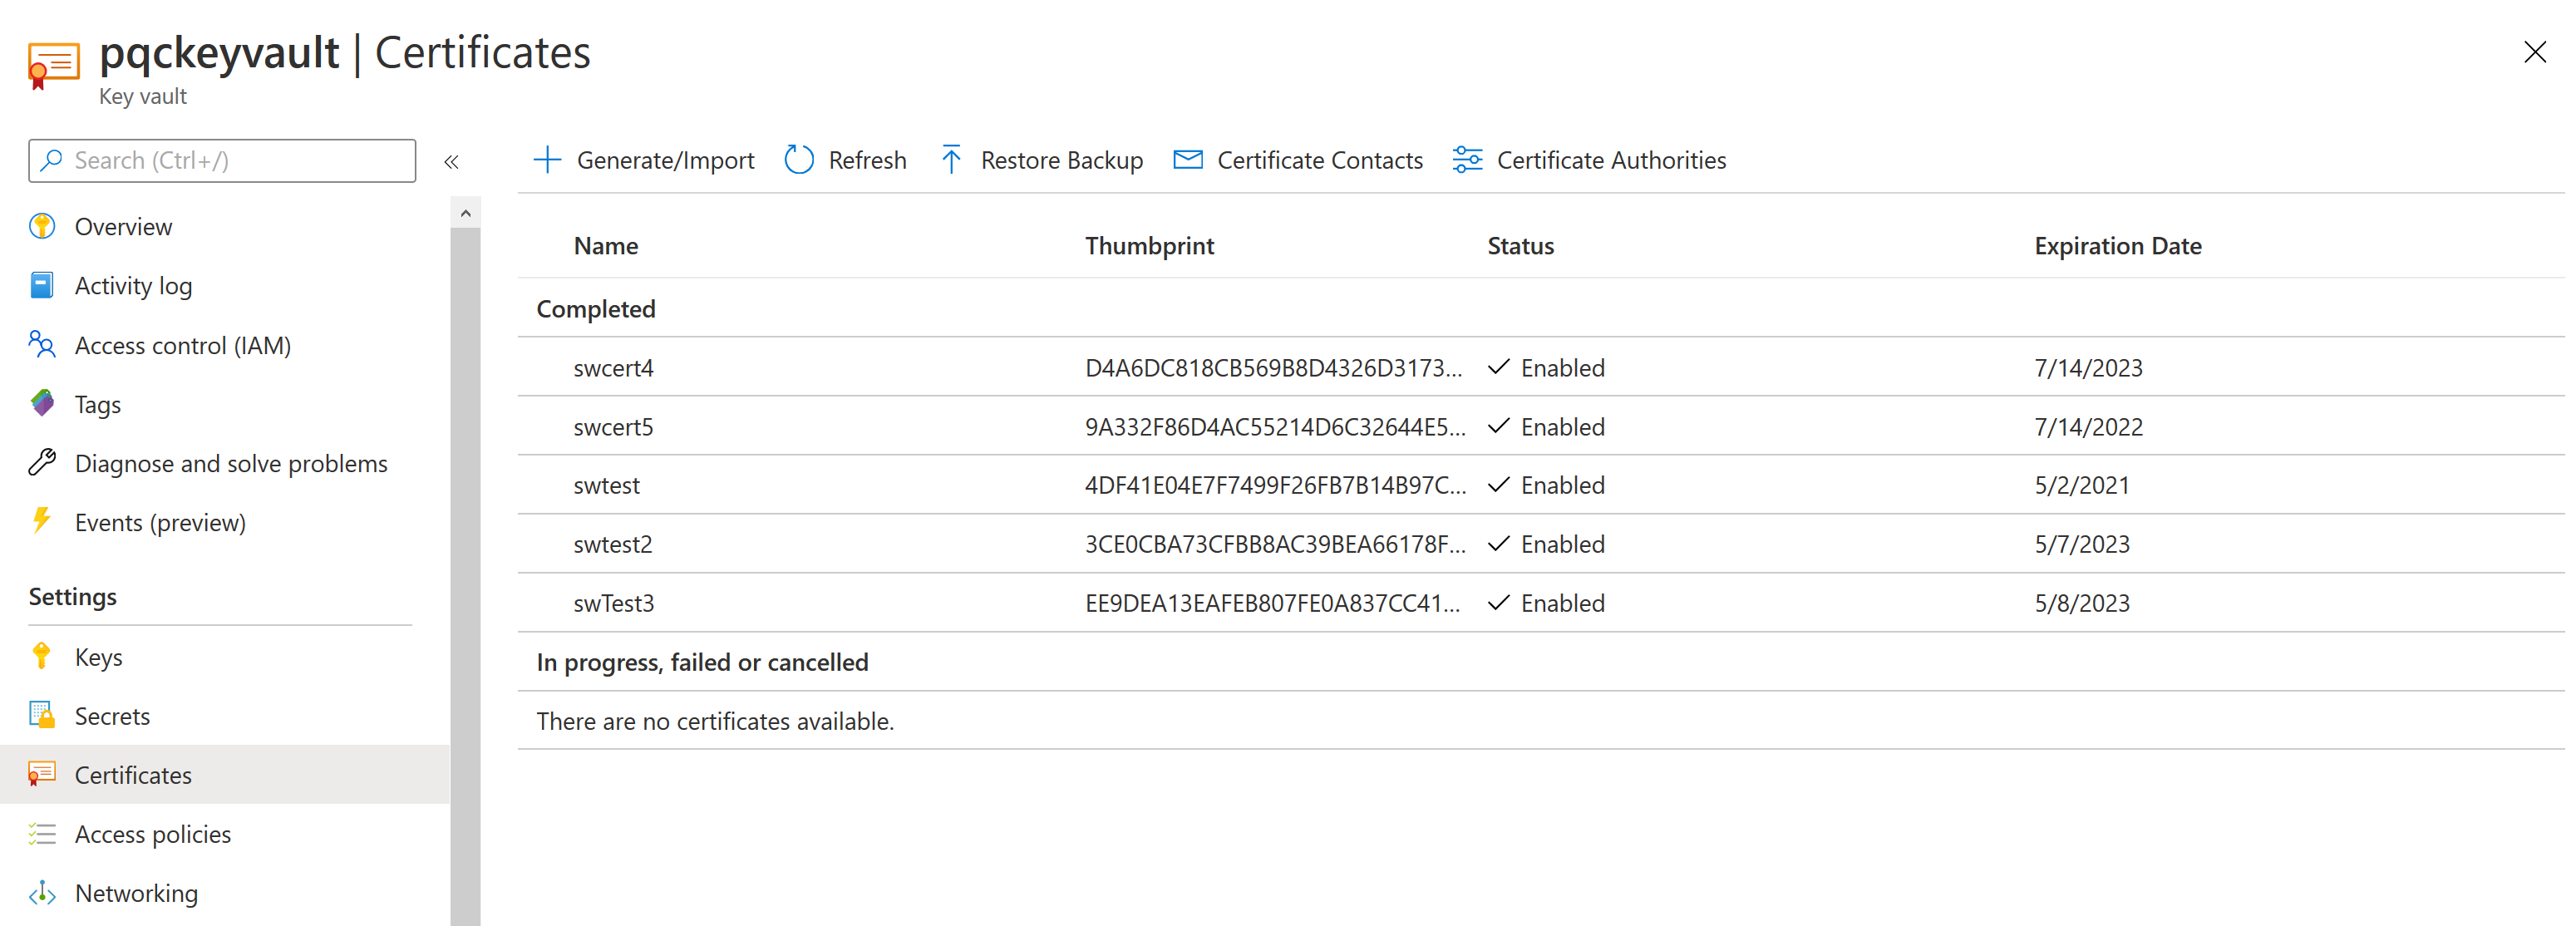
You can generate or import a certificate from the Certificates list on the Azure Portal:
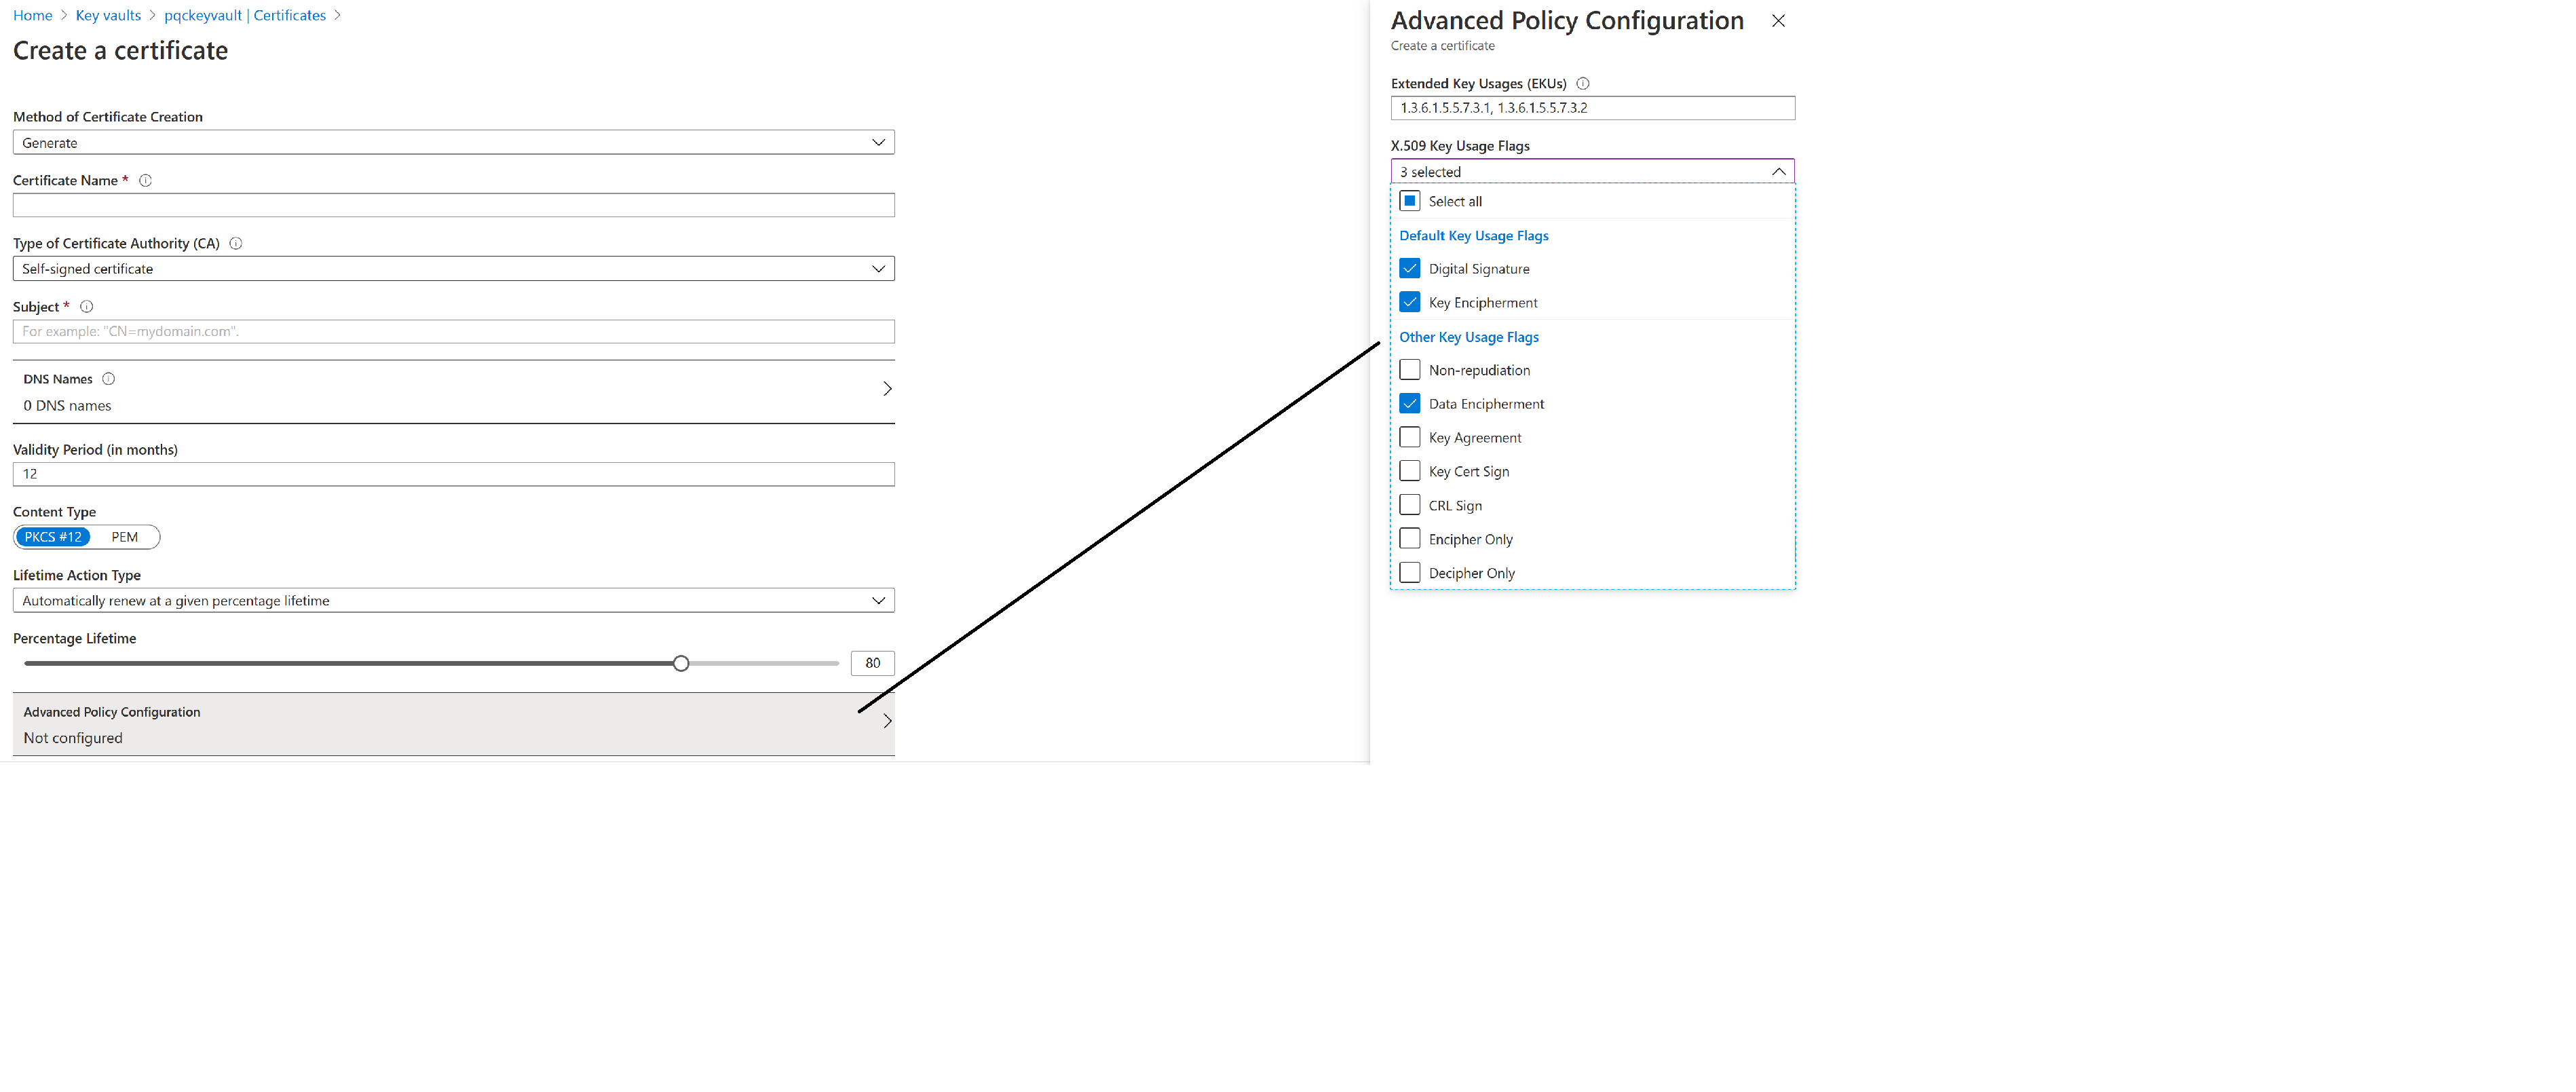
Note that the certificate will be used for both signing and encryption operations, so you have to select all necessary issuance policies. Besides, generated certificates can only use the RSA algorithm.
The final setting should look like this:
Now you have a certificate ready to use as a signing/encryption certificate on Identify.
REST API
Azure Key Vault has support for creating RSA-HSM certificates using REST API.
Request an access token
Request URL
POST https://login.microsoftonline.com/{tenantid}/oauth2/v2.0/token
Content-Type: application/x-www-form-urlencoded

client_id=f92a92ba-11b5-445e-...&client_secret=_7gSdu6syJ_...&scope=https%3A%2F%2Fvault.azure.net%2F.default&grant_type=client_credentials
URI parameters:
| Name | Description |
|---|---|
| tenantid | The tenant ID, for .e.g. "8ab49a6d-1635-..." |
Request Body
| Parameter | Description |
|---|---|
| client_id | The application client_ID |
| client_secret | The application client_secret |
| scope | the value must be "https://vault.azure.net/.default" |
| grant_type | the value must be client_credentials |
Note: the in use application must have permission to create the certificate on the KeyVault.
Sample Response
{
    "token_type": "Bearer",
    "expires_in": 3599,
    "ext_expires_in": 3599,
    "access_token": "eyJ0eXAiOiJKV1 ... XqZfZvcRcDTDHDVqHZdwDlg"
}
Use the access token to generate the certificate using RSA-HSM signing
Request URL
POST {vaultBaseUrl}/certificates/{certificate-name}/create?api-version=7.0
Content-Type: application/json
Authorization: Bearer eyJ0eXAiOiJKV1 ... XqZfZvcRcDTDHDVqHZdwDlg
URI parameters:
| Name | Description |
|---|---|
| vaultBaseUrl | The vault name, for .e.g. "https://myvault.vault.azure.net" |
| certificate-name | The name of the certificate |
Request Body
{
  "policy": {
    "key_props": {
      "exportable": false,
      "kty": "RSA-HSM",
      "key_size": 2048,
      "reuse_key": false
    },
    "x509_props": {
      "subject": "CN=Your HSM signing certificate",
      "key_usage":["digitalSignature", "keyEncipherment", "dataEncipherment"],
      "validity_months":60
    },
    "issuer": {
      "name": "Self"
    }
  }
}
Sample Response
{
    "id": "https://myvault.vault.azure.net/certificates/selfidentifyhsm9/pending",
    "issuer": {
        "name": "Self"
    },
    "csr": "MIICtzCCAZ8CAQAwJzElMCMGA1 ... 6KoA4s3WnCnb",
    "cancellation_requested": false,
    "status": "inProgress",
    "status_details": "Pending certificate created. Certificate request is in progress. This may take some time based on the issuer provider. Please check again later.",
    "request_id": "b4836abc40a34888b7249ebbe02f9731"
}
You need to wait for a moment for the certificate to be generated.
Configurator
We support configuring Azure Key Vault using the Identify Configurator and the Configurator CLI.
Configuration CLI:
- To use a signing certificate stored in Azure Key Vault for a new Identify instance, you can check the section Instance's certificates configuration of schema-cli.md out.
- To use a signing certificate stored in Azure Key Vault for an existing Identify instance, you can use the Reconfigure command
Similarly, you can select a signing certificate in Azure Key Vault when creating or reconfiguring an instance using the Identify Configurator:
- By selecting the option Select from Azure key vault when creating a new instance:
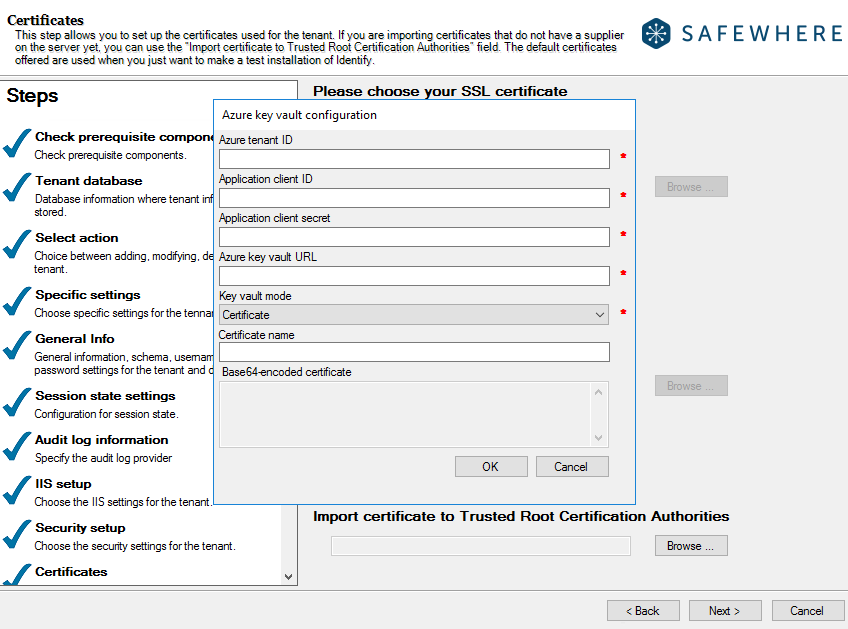
Azure tenant ID: Use the value of setting Directory (tenant) ID, which you can find in the App registration section.
Application client ID: Use the value of setting Application (client) ID, which you can find in the App registration section.
Application client secret: Use a client secret, which you created in the App registration section.
Azure key vault URL: Use the value of the DNS Name setting, which you can find in the Create Azure Key Vault section.
Key vault mode: The two supported modes are Certificate and Key.
Certificate name: Use the name of a certificate which you created in the Generate/Import Certificate in Azure Key Vault section.
Key name: Specify the name of a private key in Azure Key Vault or a Managed HSM key that you want to use. This option is only applicable when you choose the Key mode for the Key vault mode setting.
Base64-encoded certificate: contains the public key. When you select the Key mode, you must provide the public key here in addition to the a private key (name) above.
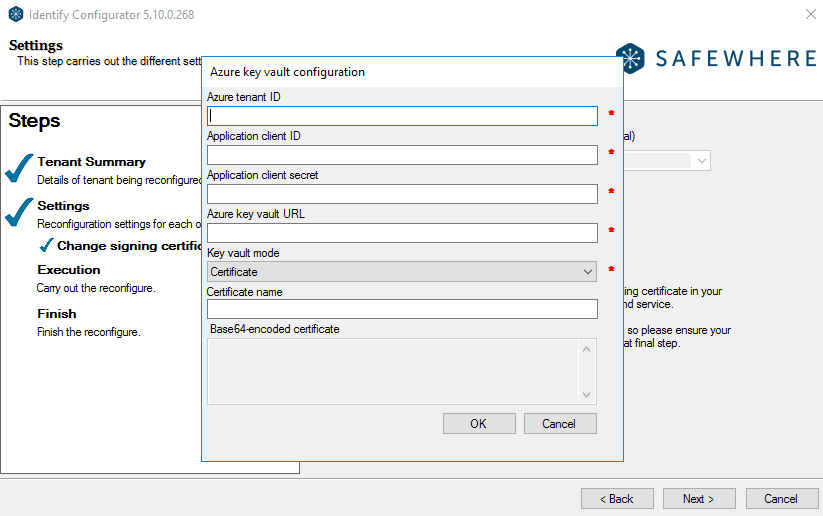
- When reconfiguring the signing certificate of an existing instance by selecting the option Select from Azure key vault.
Azure Key Vault settings on Safewhere Admin
When your Identify instance uses a signing certificate stored in Azure Key Vault, it shows up on the Admin interface as in the image below:
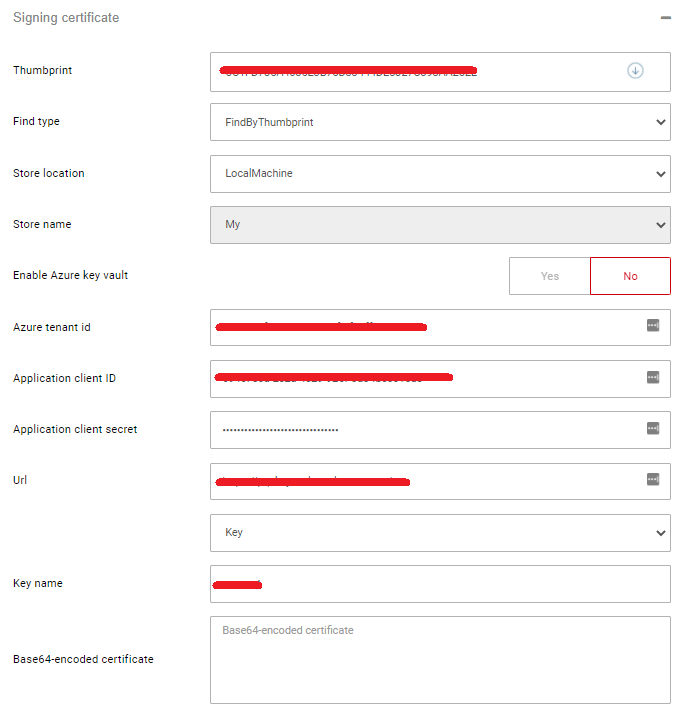
We recommend that you should not change any settings of the signing certificate directly via the Admin interface. Instead, you must use the Reconfigure feature of the Configurator UI or CLI.
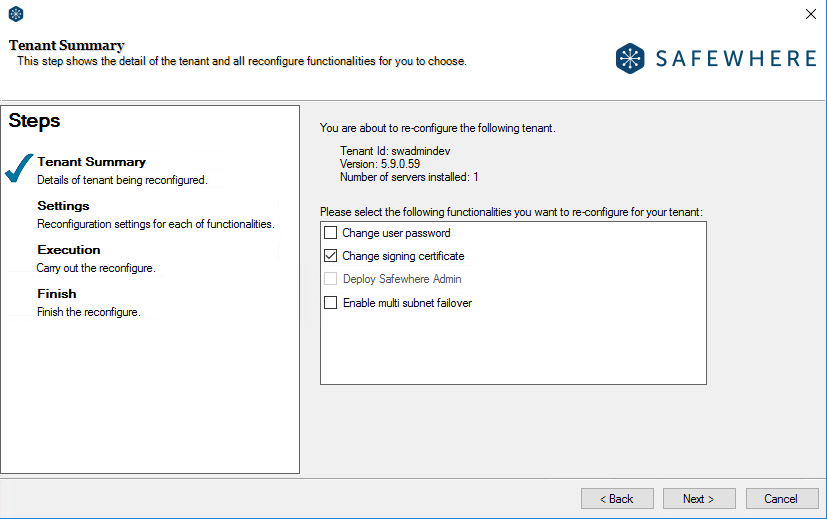
Change the signing certificate
You can change the signing certificate, either to another one stored in the same store or in a different store, by using the Reconfigure feature of the Configurator UI or CLI.
Select Change signing certificate to configure a signing certificate
Select a local machine certificate
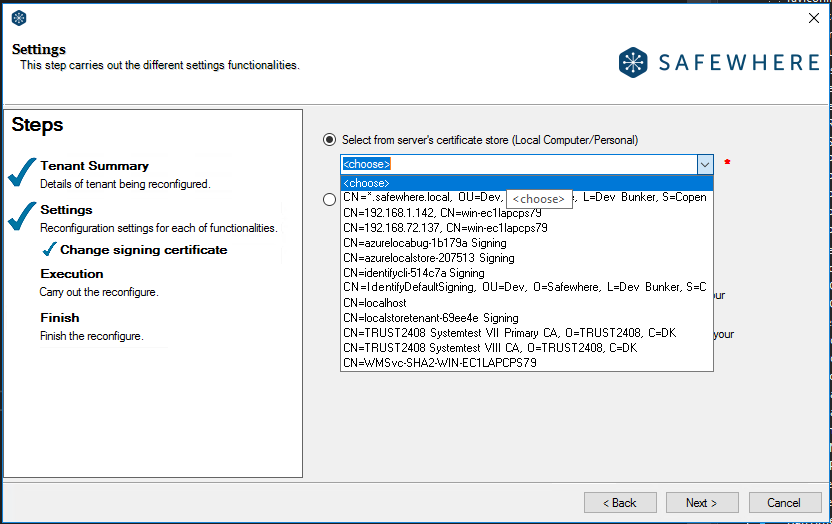
Select the first option to use a certificate from the local machine.
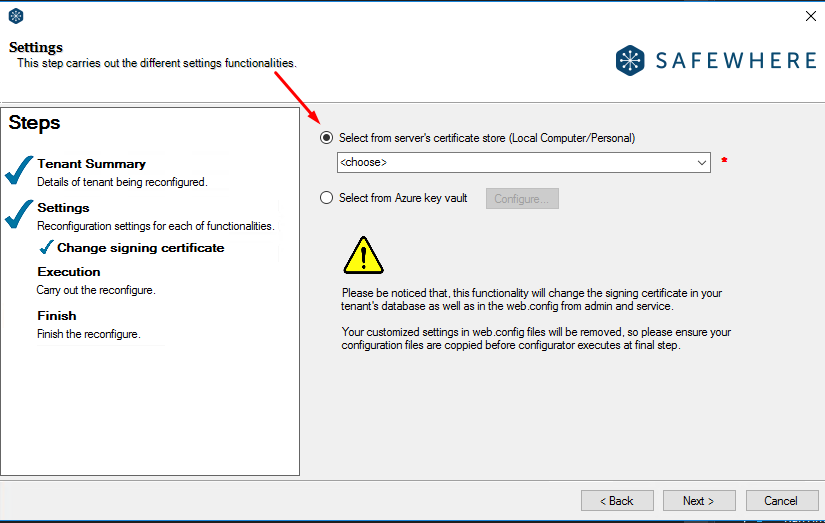
Select a certificate from the dropdown list, then click Next to execute the action.
If your new certificate is not in the store yet, you need to import it first:
- Open the Windows' certificate store:
- Import the new certificate file (usually a .pfx or .p12 file) to LocalMachine\My.
- Import the new certificate’s CA to LocalMachine\Trusted Root Certificate Authorities if necessary.
- Import the public key of the new certificate to LocalMachine\Trusted People.
- Grant the Read permission to the private key of the new certificate to the identity user of the application pool used for Identify.
Select an Azure Key Vault certificate
Select the second option to configure a certificate from the Azure Key Vault.
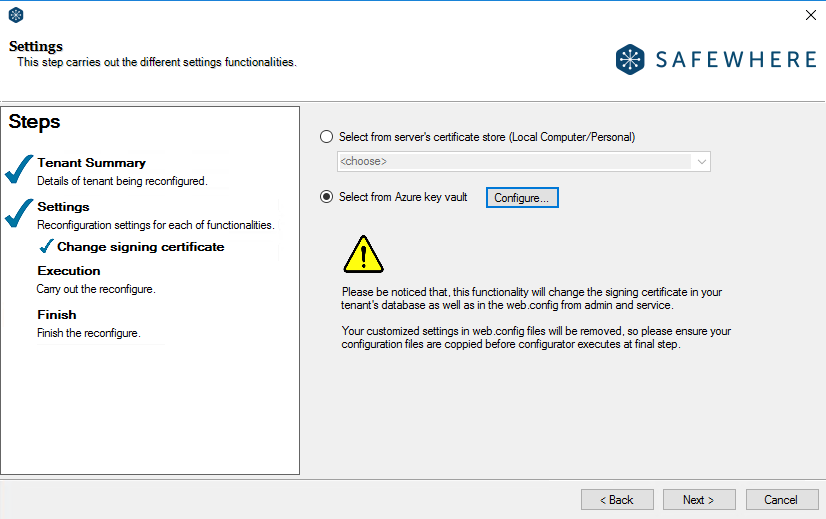
Click Configure, fill in all the required fields, then click OK.
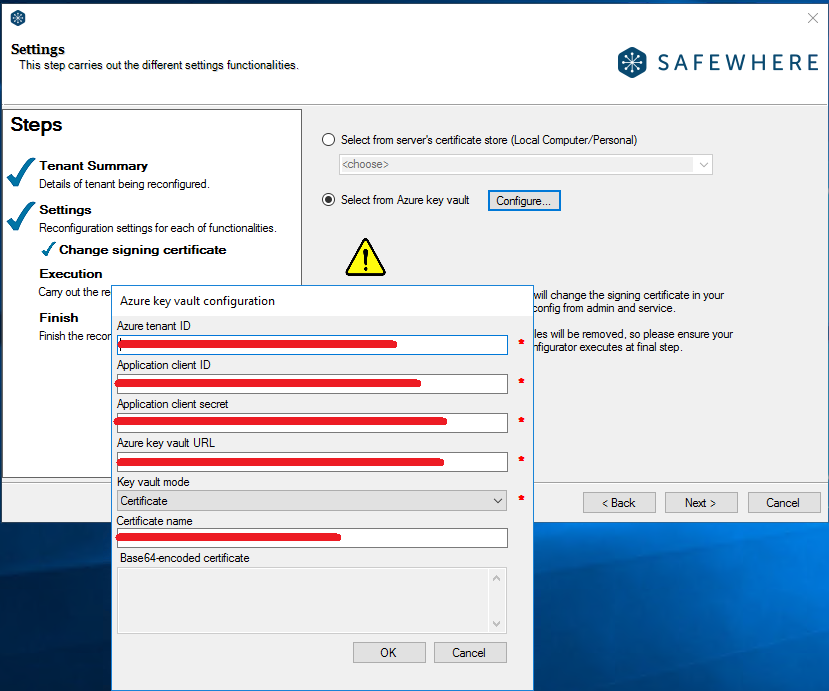
If any errors occur, please check the inserted data again or open the Identify Configurator's log file to see more details.
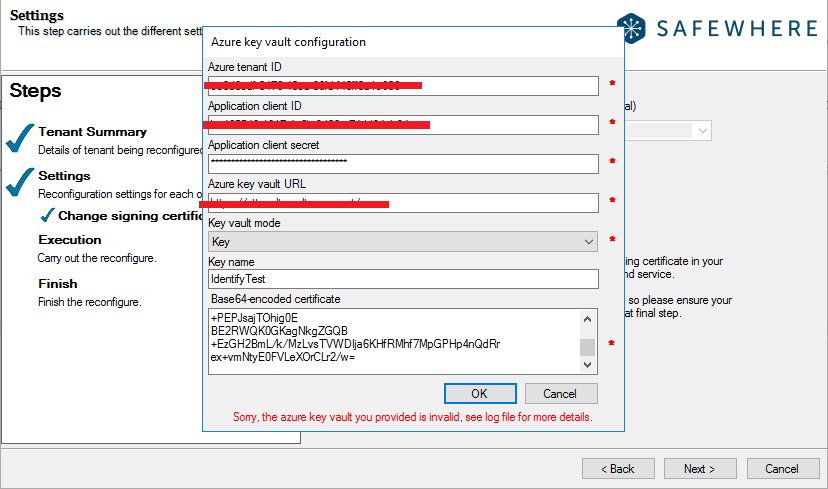
If all required fields are valid, the Azure key vault configurator dialog will automatically close. Finally, you can click Next to execute the action.
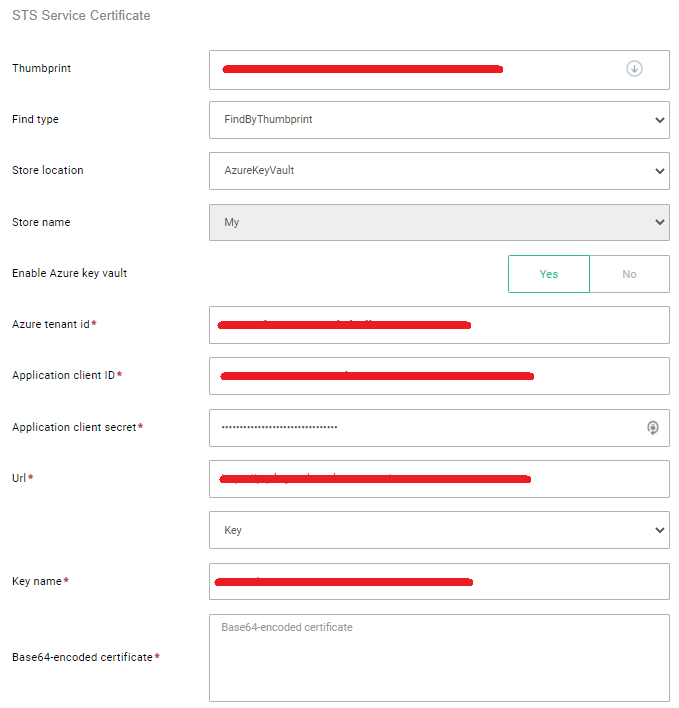
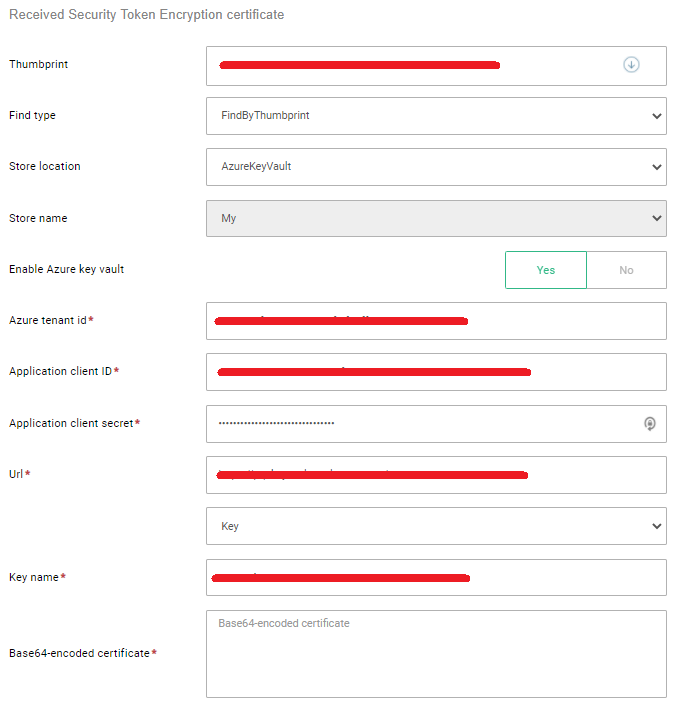
Other features that can use certificates from Azure Key Vault
In addition to the main signing certificate, you can also use certificates from the Azure Key Vault for:
System Setup's STS service certificate
WS Trust service application's received security token encryption certificate
Limitation
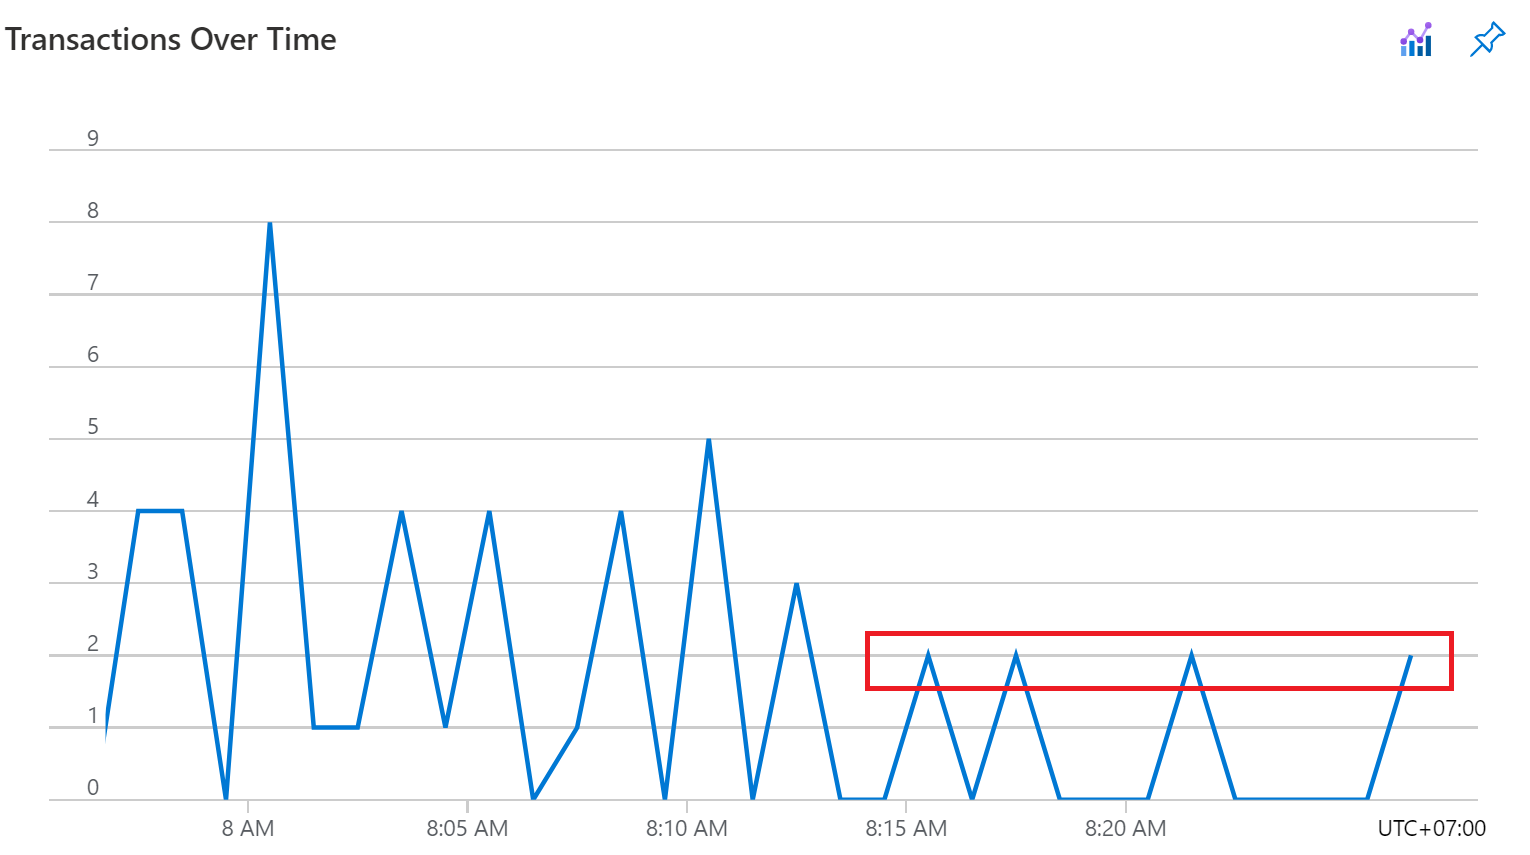
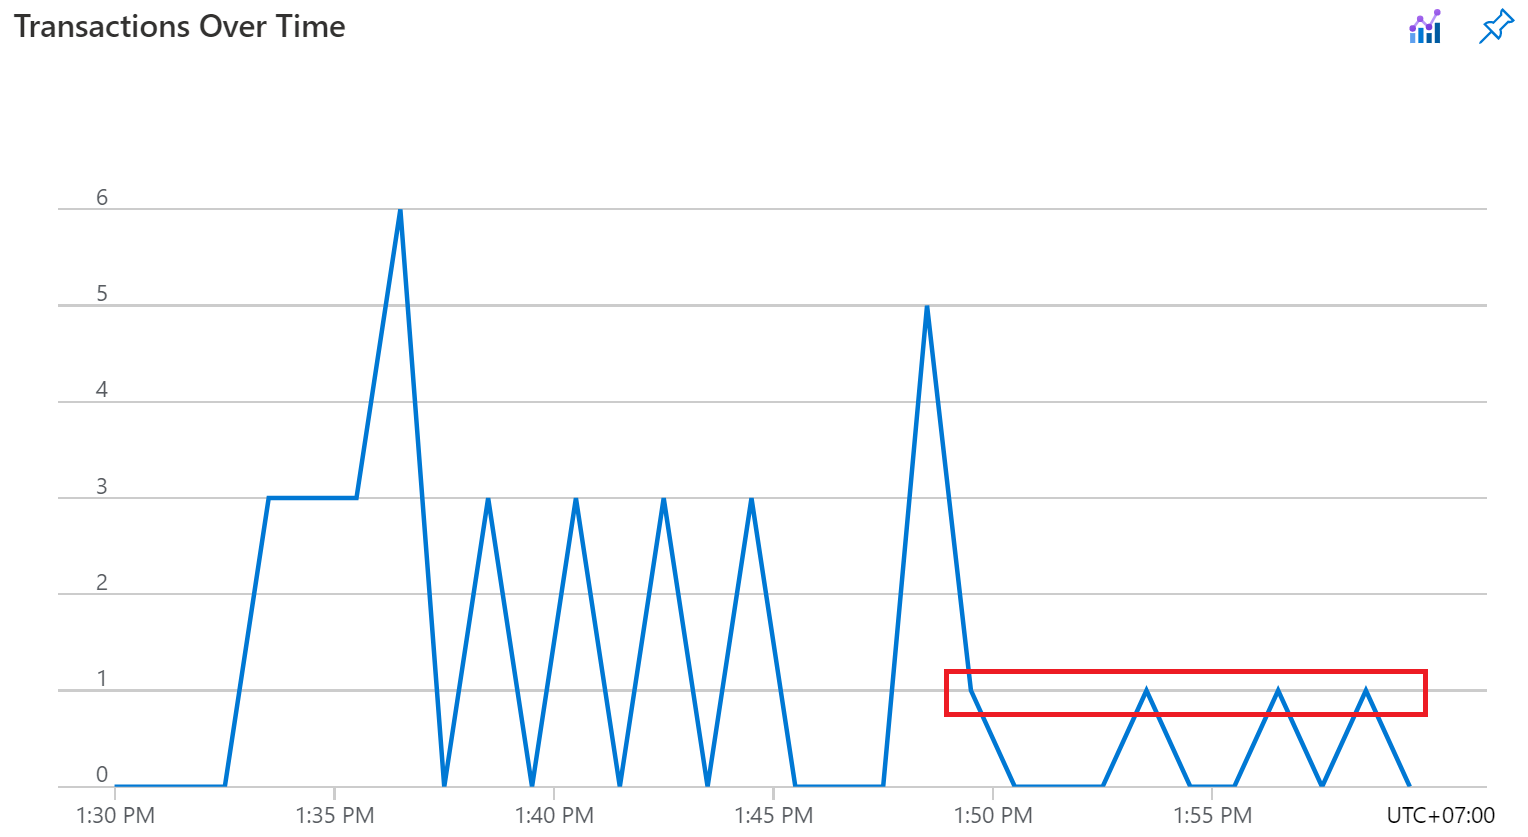
Azure Key Vault has service limits on maximum transactions allowed in 10 seconds. When the number of requests is larger than the maximum allowed number in 10 seconds, Azure Key Vault returns HTTP status code 429 to indicate that it is throttling requests. In turn, Azure Key Vault throttle has a significant impact on Identify's token issuance's latency and throughput. Below, we have examined some typical login flows and the impact that Azure Key Vault's throttle has on them.
Use case 1: SAML 2.0 SP => Identify => upstream SAML 2.0 Identity Provider
Identify signs both the response message and the assertion, the upstream Identity Provider does not encrypt its assertion
In this setup, Identify needs to request the Azure Key Vault 4 times.
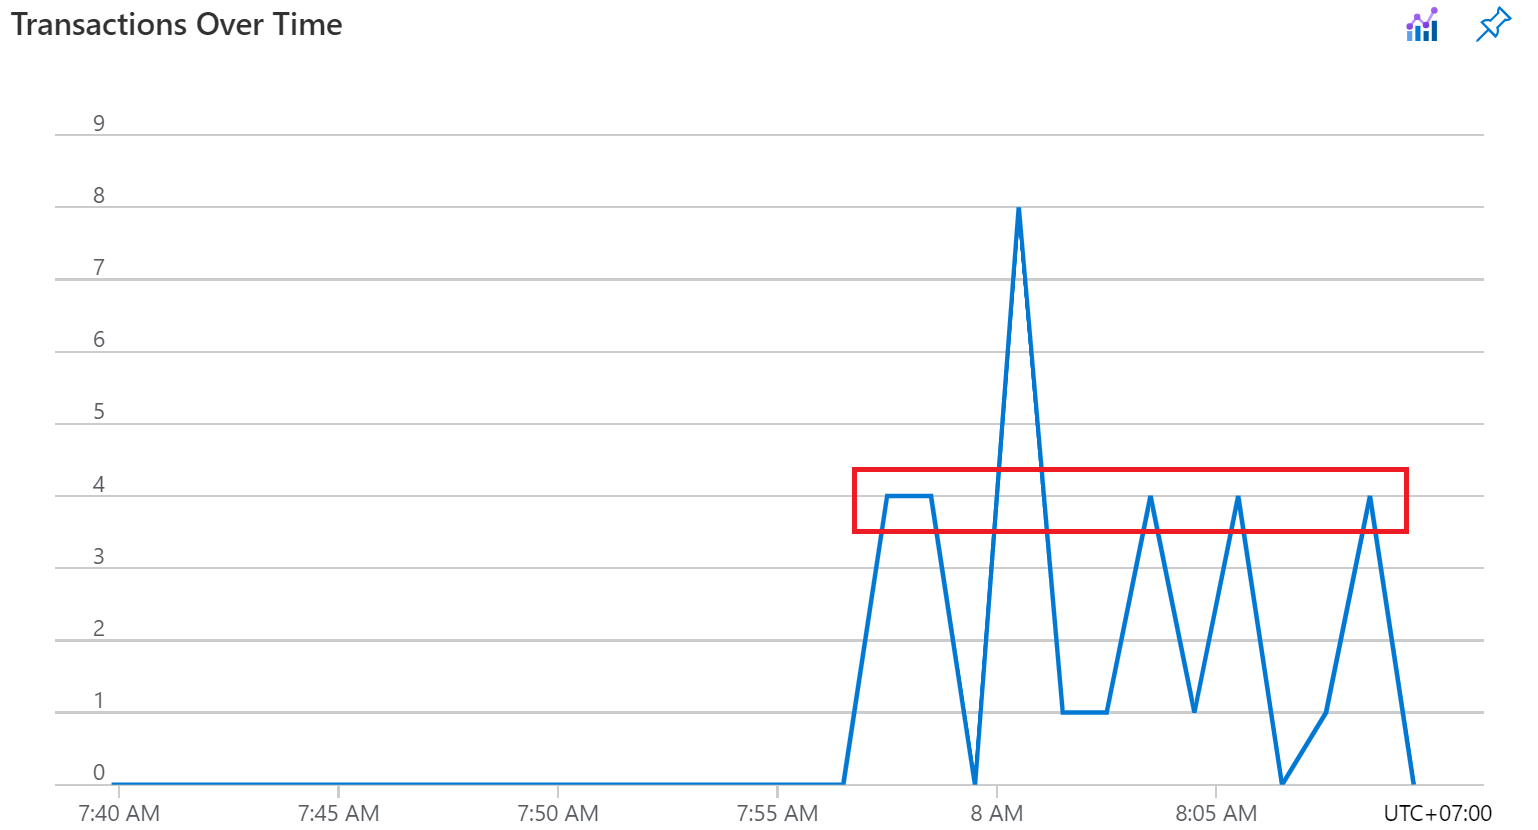
So, Identify is capped at around 50 logins per second.
Identify signs both the response message and the assertion, the upstream Identity Provider encrypts its assertion
In this setup, Identify needs one more request to Azure Key Vault to decrypt the assertion which raises the total number of requests to 5. Therefore, Identify is capped at 40 logins per second.
Identify signs the assertion only, the upstream Identity Provider does not encrypt its assertion
In this setup, Identify needs to request the Azure Key Vault 2 times. Therefore, Identify is capped at 100 logins per second.
Use case 2: SAML 2.0 SP => Identify => Username & password
This use case replaces the SAML 2.0 Identity Provider with a Username & password login. In this setup, because Identify does not need to send a request to an upstream Identity Provider or to decrypt a assertion, Identify is able to save another request to Azure Key Vault. In the best case, where Identify only needs to sign assertions, it only needs to request Azure Key Vault once for every login.
More on performance
As-is, in a setup where Identify is capped at, for example, 50 logins/s due to Azure Key Vault throttle, in reality throughput is lower. The reason is that calling Azure Key Vault does consume server resources such as threads and I/O and thus impacts overall performance of Identify. We are actively testing and tweaking server settings to find the best configuration and will release updates to Identify and guidelines in due course.