TOTP Authenticator
In this guideline, we will go through the following sections:
Set up TOTP Authenticator as second factor authentication
Prerequisites
It is required that Google Authenticator, Microsoft Authenticator, or Authy app is installed on your mobile device.
Setup OTP connection
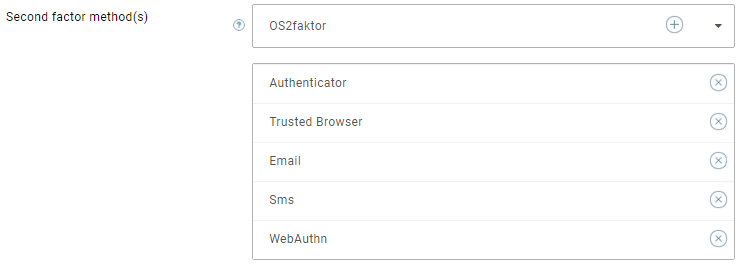
Second factor method(s): Set value to Authenticator. You can also add more methods: Sms, Email, WebAuthn, OS2faktor , Trusted Browser to let OTP fallback to them if error happens with the Authenticator method.
Max input attempts: Set values base on your security requirement.
Encrypt secret code: Whether secret code in database (which is used for communicating between Identify and the time-base one time password provider e.g. Google Authenticator, Microsoft Authenticator etc.) is encrypted.
Notice that the OTP connection's name is used to identify this connection in authenticator apps. Thus, you should give it a name that is short yet unique and meaningful. Once this is done, you can assign the OTP connection to act as second factor authentication connection. See this article for additional instructions.
Note: If you want to configure Authenticator OTP for non-local users (login via upstream identity provider), it is required to enable Update unknown users from login in the connection setting to allow Identify to update user's OTP secret code.
Registration
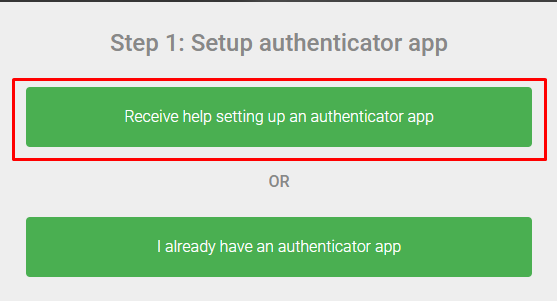
The registration process starts with offering your users two options:
- Receive help setting up an authenticator app before enrollment
- Already have an authenticator app
Receive help setting up an authenticator app
If a user does not know how to set up an authenticator app on a mobile device, the user can select the first option:
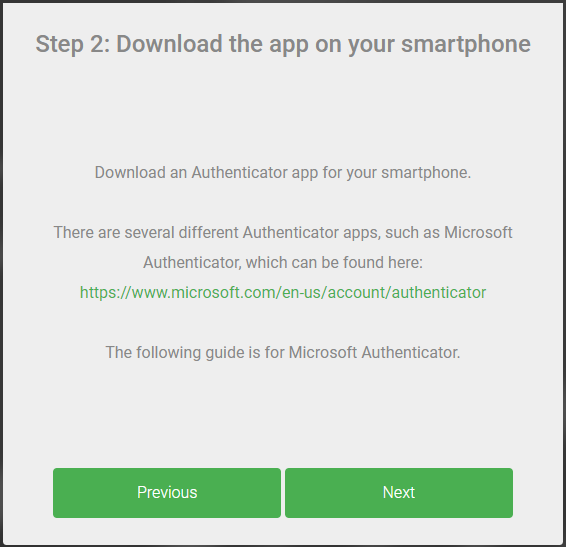
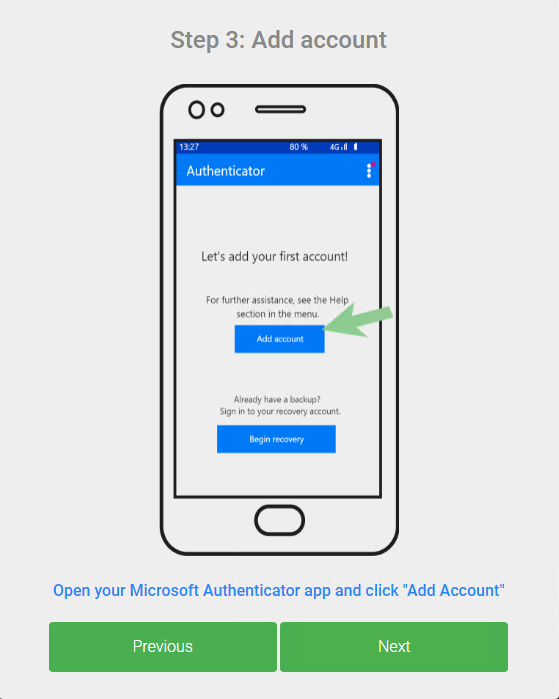
The next step asks to download the Microsoft Authenticator app to the user's mobile device. You can customize it to use your recommended Authenticator app such as Google Authenticator or Authy.
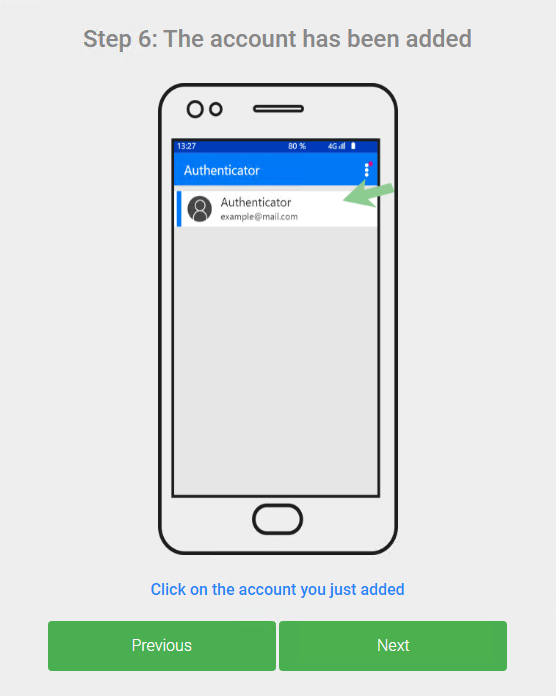
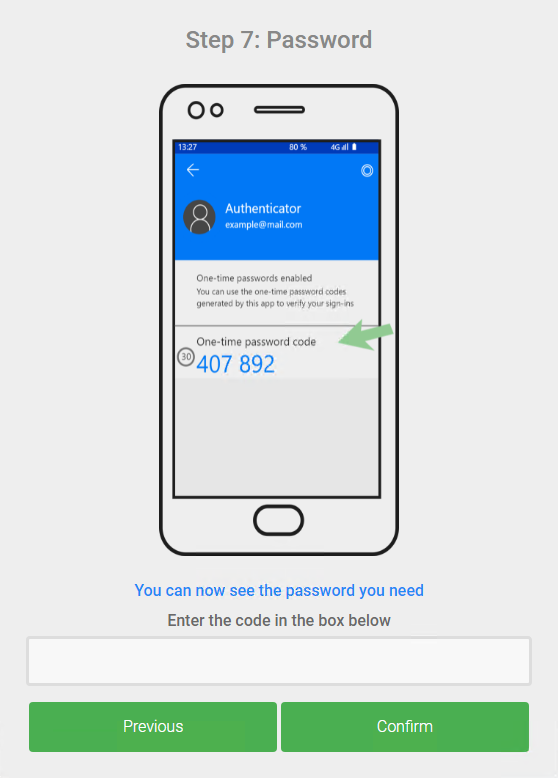
Subsequent steps guide the user through all necessary steps to finish registration.

Already have an authenticator app
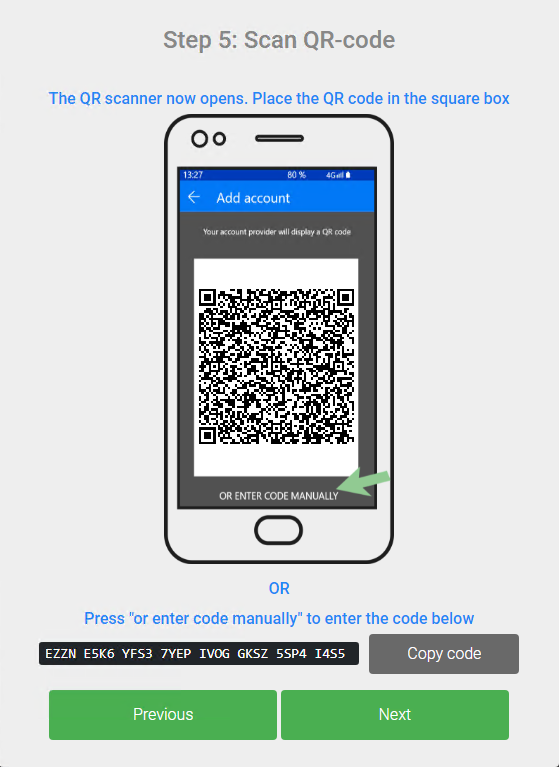
Alternatively, if a user already has an authenticator app installed, the user can select the second option:
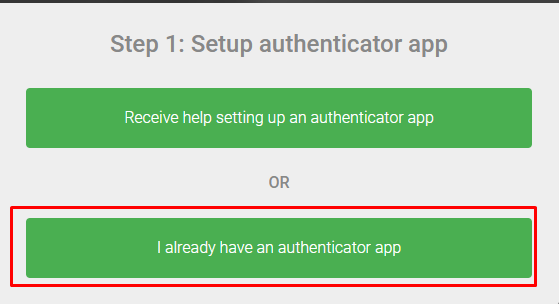
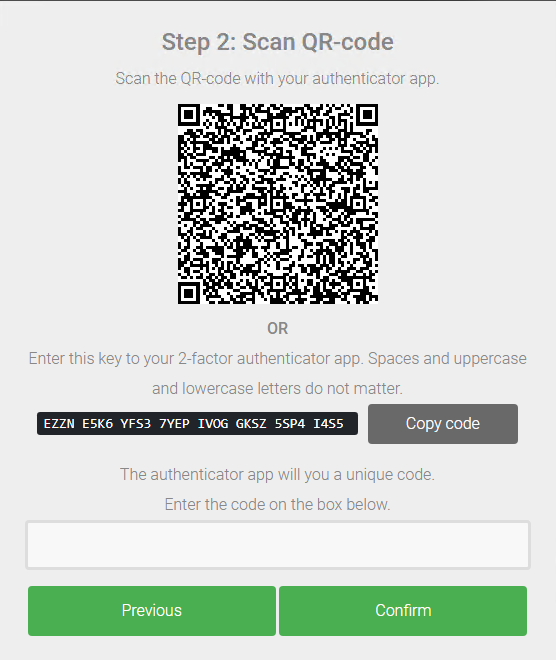
which leads him or her to the QR-code scanning step immediately:
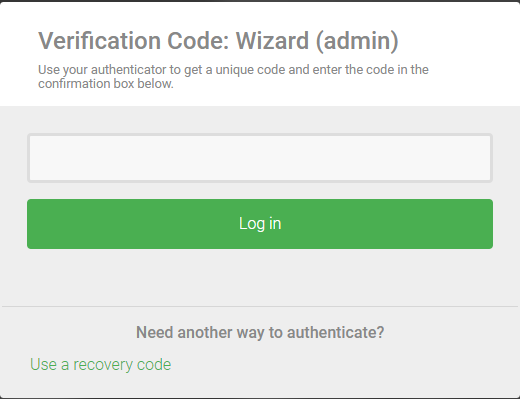
Authentication
After registering successfully, the user can use the registered TOTP Authenticator app as second factor authentication for future logins.
Customization
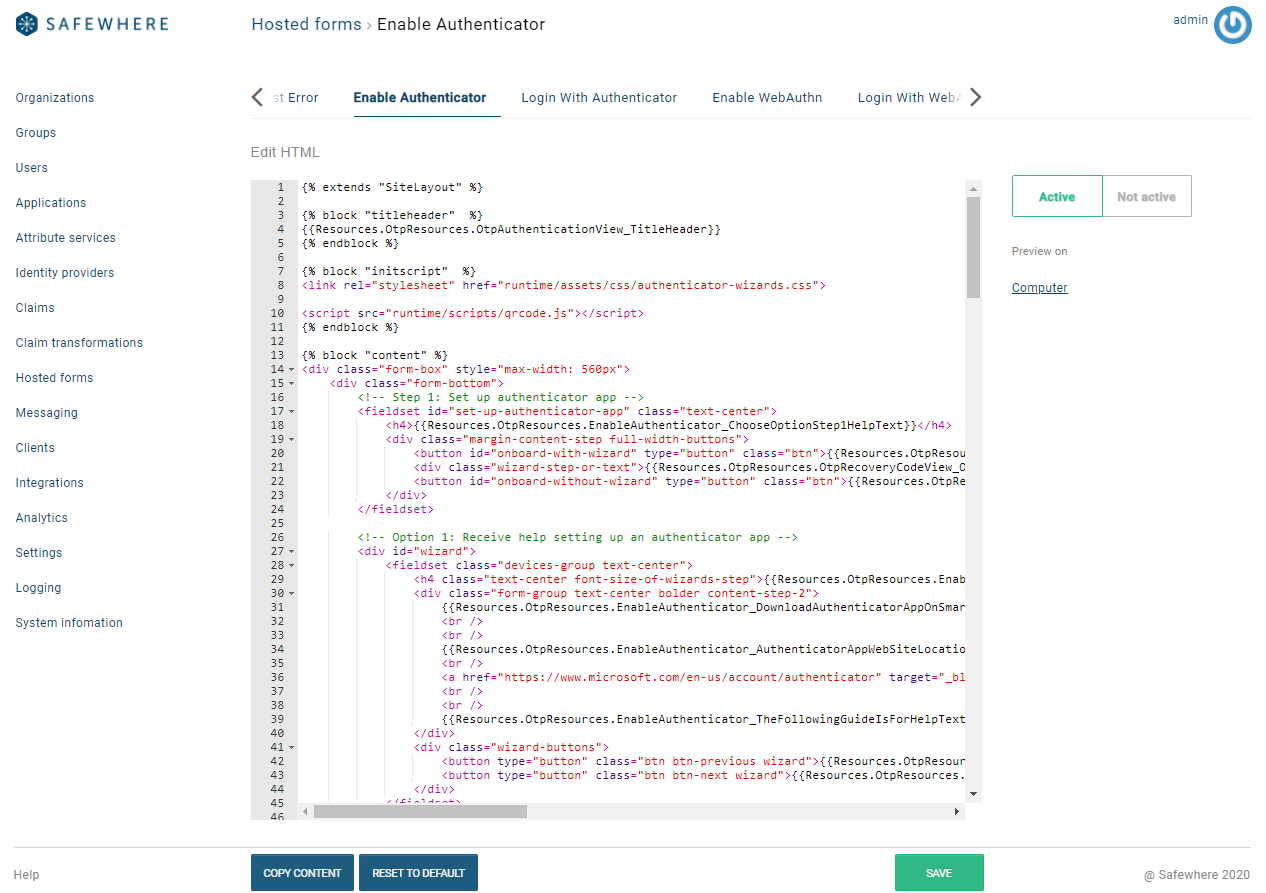
We designed our wizards with customization capability in mind. You can easily customize content of the Authenticator registration wizard to meet your specific requirements. You can do that either by editing its Razor view file or by editing the Hosted form. Even though this section focuses on the Hosted form option, you can find necessary information about where the Razor file is and can apply guidance of this section to it.
Firstly, you can open the Hosted forms menu in the Admin portal, select the Enable Authenticator tab, and set its status to Active.
There can be 3 types of customization:
- Change content of a step
- Add a new step
- Or remove the whole wizard and only keep the QR-scanning step as in previous versions.
Customize a step
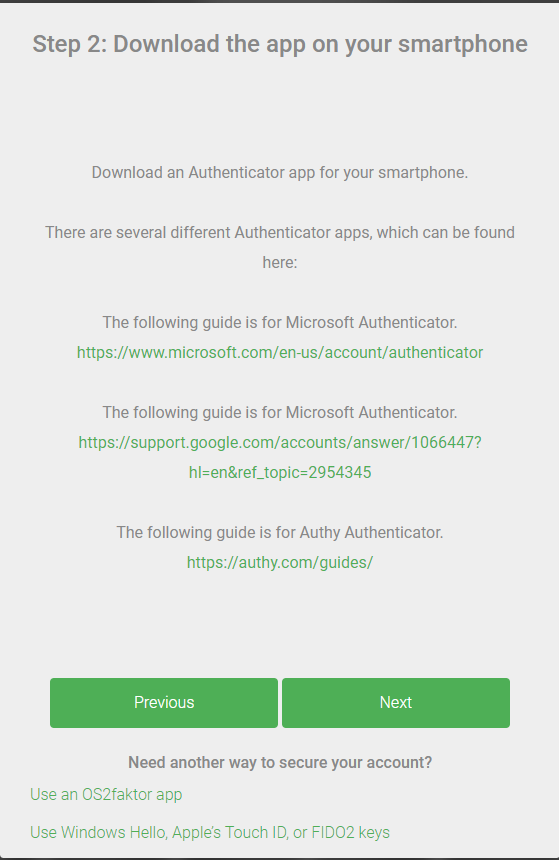
Let's assume that you want to customize the second step: "Step 2: Download the app on your smartphone".
Its HTML section is:
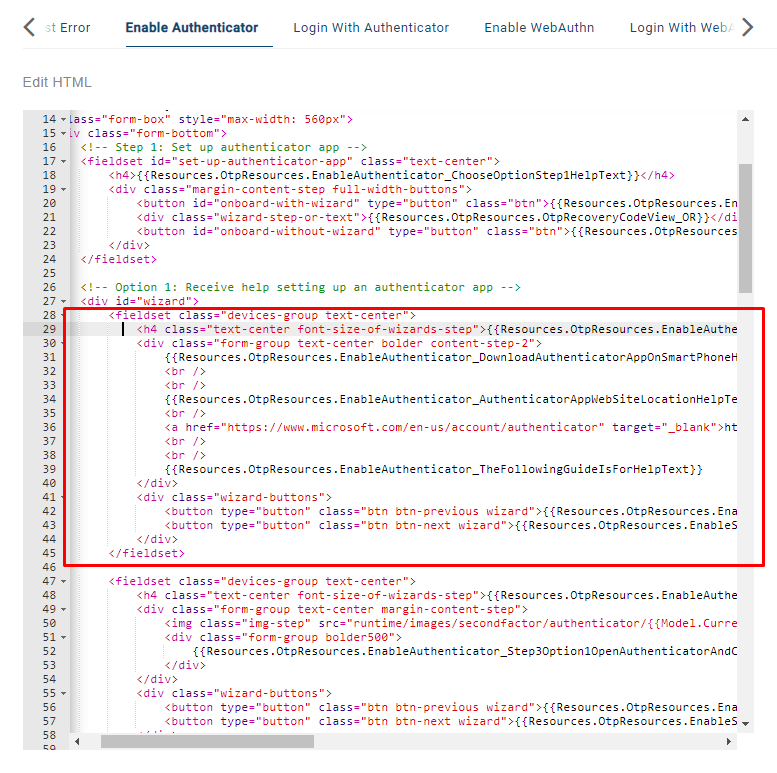
You want to add links to download Google Authenticator and Authy apps:
    <fieldset class="devices-group text-center">
                    <h4 class="text-center font-size-of-wizards-step">{{Resources.OtpResources.EnableAuthenticator_Option1Step2HelpText}}</h4>
                    <div class="form-group text-center bolder content-step-2">
                        {{Resources.OtpResources.EnableAuthenticator_DownloadAuthenticatorAppOnSmartPhoneHelpText}}
                        <br />
                        <br />
                        There are several different Authenticator apps, which can be found here:
                        <br />
                        <br />
                        {{Resources.OtpResources.EnableAuthenticator_TheFollowingGuideIsForHelpText}}
                        <a href="https://www.microsoft.com/en-us/account/authenticator" target="_blank">https://www.microsoft.com/en-us/account/authenticator</a>
                        <br />
                        <br />
                        The following guide is for Microsoft Authenticator.
                        <a href="https://support.google.com/accounts/answer/1066447?hl=en&ref_topic=2954345" target="_blank">https://support.google.com/accounts/answer/1066447?hl=en&ref_topic=2954345</a>
                        <br />
                        <br />
                        The following guide is for Authy Authenticator.
                        <a href="https://authy.com/guides/" target="_blank">https://authy.com/guides/</a>

                    </div>
                    <div class="wizard-buttons">
                        <button type="button" class="btn btn-previous wizard">{{Resources.OtpResources.EnableSecondFactorMethod_WizardPreviosButton}}</button>
                        <button type="button" class="btn btn-next wizard">{{Resources.OtpResources.EnableSecondFactorMethod_WizardNextButton}}</button>
                    </div>
    </fieldset>
The result is:
Add a new step
Instead of editing the second step, let's assume that you want to add a new "Step 3: Some alternative app" step to show users about alternative TOTP apps. To do that, you need to insert a new <fieldset> at the position in the screenshot below:
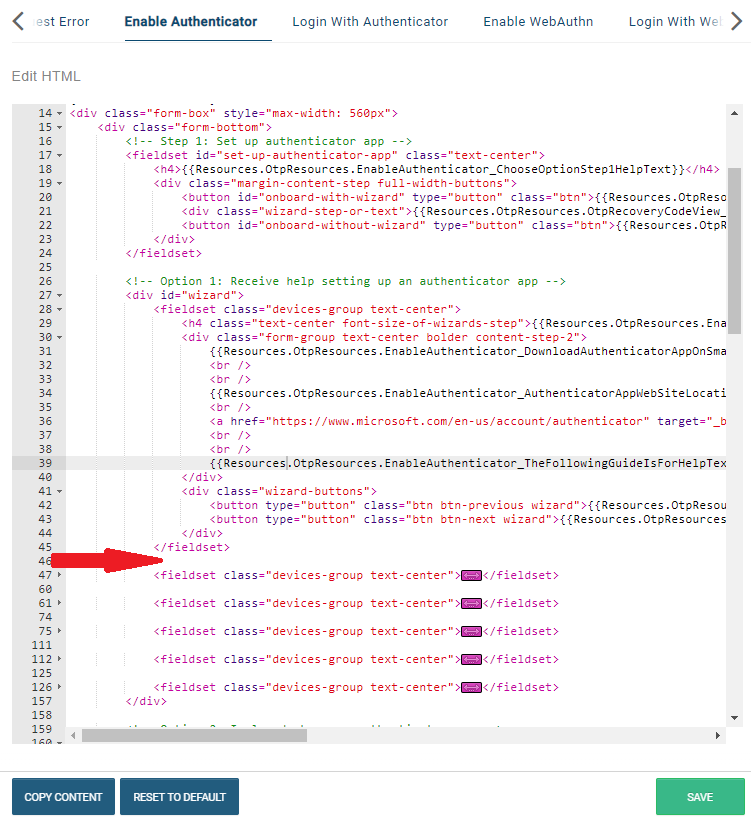
The template for a single step is:
    <fieldset class="devices-group text-center">
                    <h4 class="text-center font-size-of-wizards-step"></h4>
                    <div class="form-group text-center bolder">
                    </div>
                    <div class="wizard-buttons">
                        <button type="button" class="btn btn-previous wizard">{{Resources.OtpResources.EnableSecondFactorMethod_WizardPreviosButton}}</button>
                        <button type="button" class="btn btn-next wizard">{{Resources.OtpResources.EnableSecondFactorMethod_WizardNextButton}}</button>
                    </div>
    </fieldset>
Using this template, you can add a title and content for it:
    <fieldset class="devices-group text-center">
                    <h4 class="text-center font-size-of-wizards-step">Step 3: Some alternative app</h4>
                    <div class="form-group text-center bolder">
                        There are several different Authenticator apps, which can be found here:
                        <br />
                        <br />
                        The following guide is for Microsoft Authenticator.
                        <a href="https://support.google.com/accounts/answer/1066447?hl=en&ref_topic=2954345" target="_blank">https://support.google.com/accounts/answer/1066447?hl=en&ref_topic=2954345</a>
                        <br />
                        <br />
                        The following guide is for Authy Authenticator.
                        <a href="https://authy.com/guides/" target="_blank">https://authy.com/guides/</a>
                    </div>
                    <div class="wizard-buttons">
                        <button type="button" class="btn btn-previous wizard">{{Resources.OtpResources.EnableSecondFactorMethod_WizardPreviosButton}}</button>
                        <button type="button" class="btn btn-next wizard">{{Resources.OtpResources.EnableSecondFactorMethod_WizardNextButton}}</button>
                    </div>
    </fieldset>
The result is:

Non-wizard customization
Authenticator
If you are using customized views of TOTP Authenticator and your Identify instances are using version 5.10 or older and you want to keep using them (aka do not want to use the wizarding versions), after upgrading to version 5.11, you will need to update your views to fix a QR code display issue.
- Razor view: replace the red-highlighted lines with the green-highlighted lines:
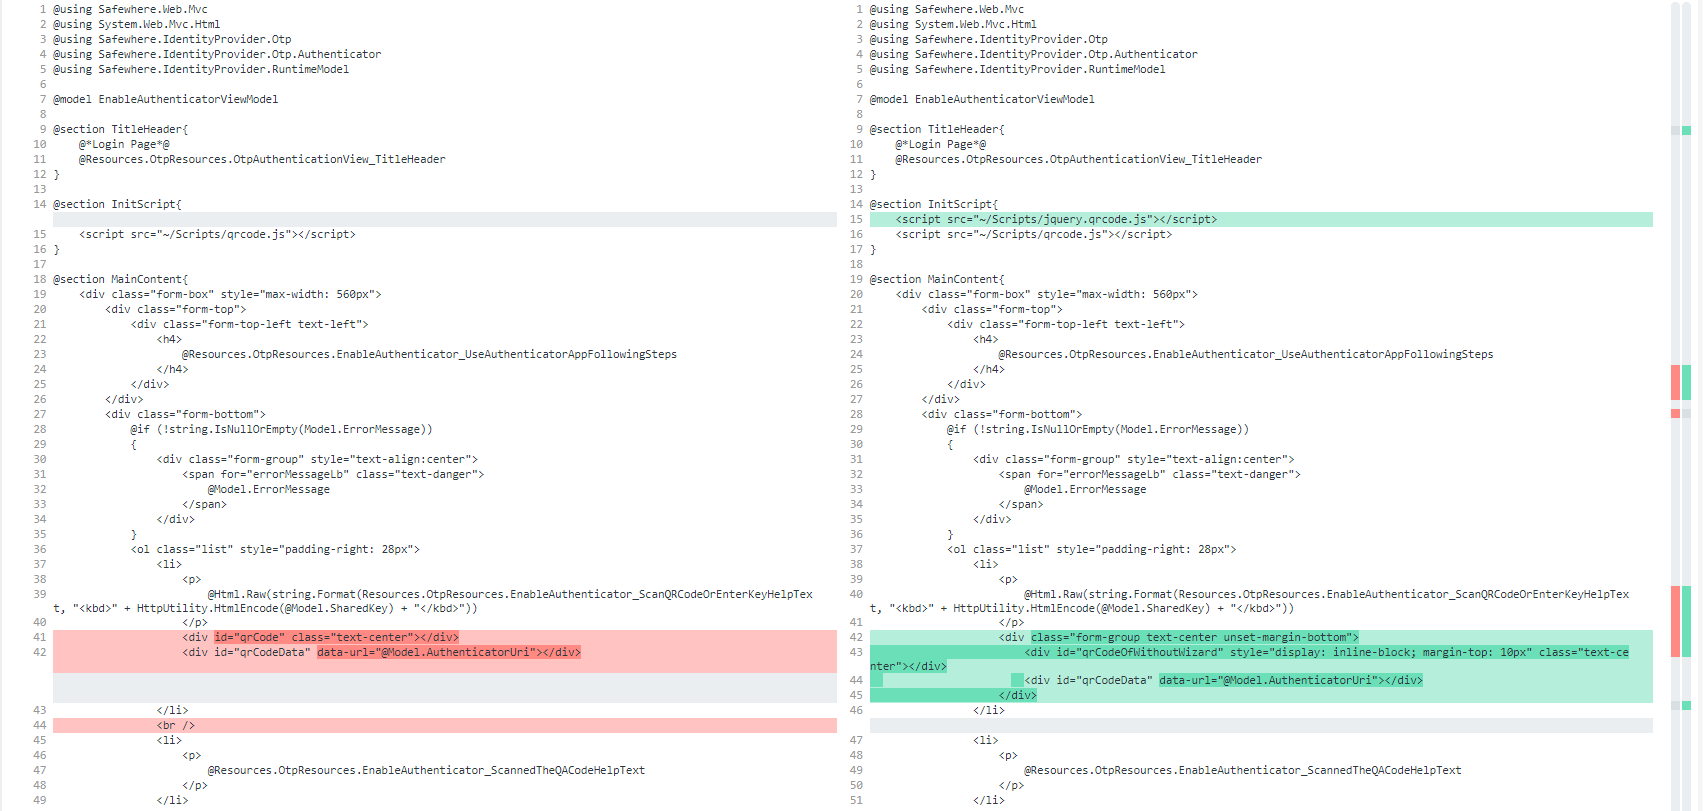
HTML code:
<script src="~/Scripts/jquery.qrcode.js"></script>
and
<div class="form-group text-center unset-margin-bottom">
      <div id="qrCodeOfWithoutWizard" style="display: inline-block; margin-top: 10px" class="text-center"></div>
      <div id="qrCodeData" data-url="@Model.AuthenticatorUri"></div>
  </div>
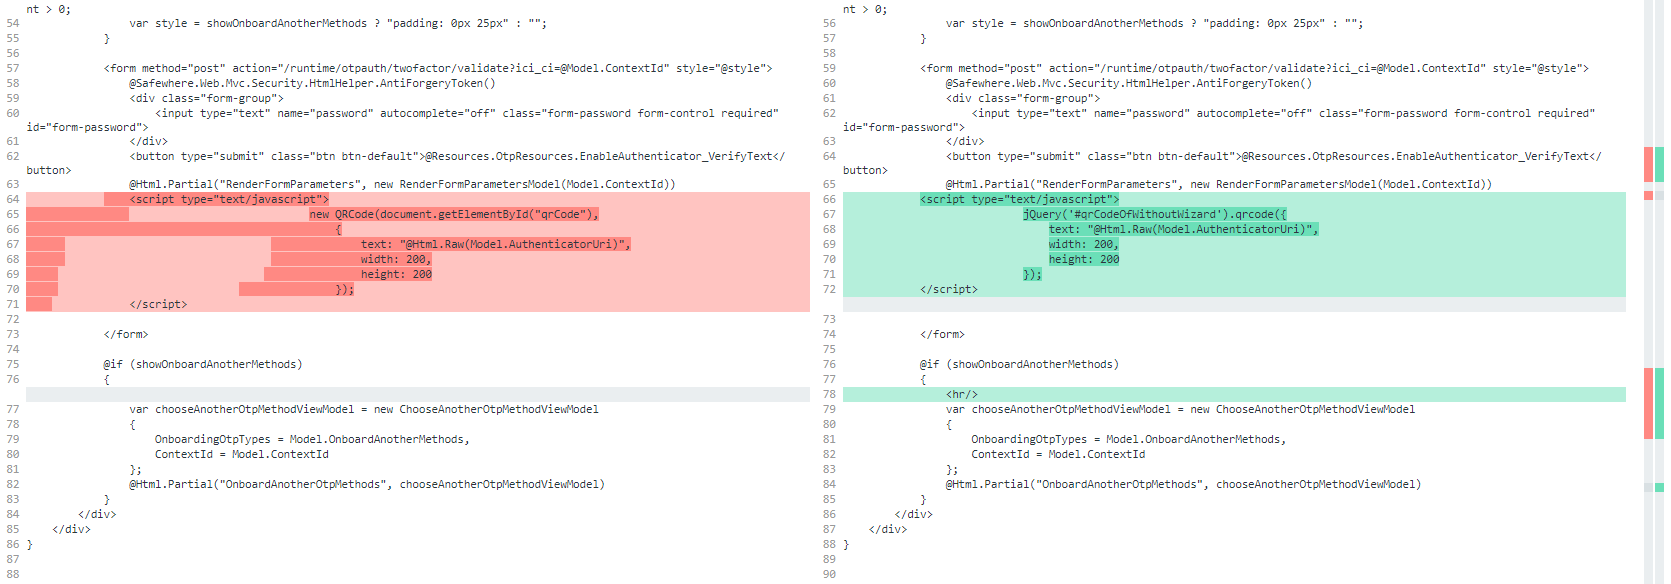
HTML code:
jQuery('#qrCodeOfWithoutWizard').qrcode({
      text: "@Html.Raw(Model.AuthenticatorUri)",
      width: 200,
      height: 200
  });
and
<hr/>
- Hosted form: replace the red-highlighted lines with the green-highlighted lines:
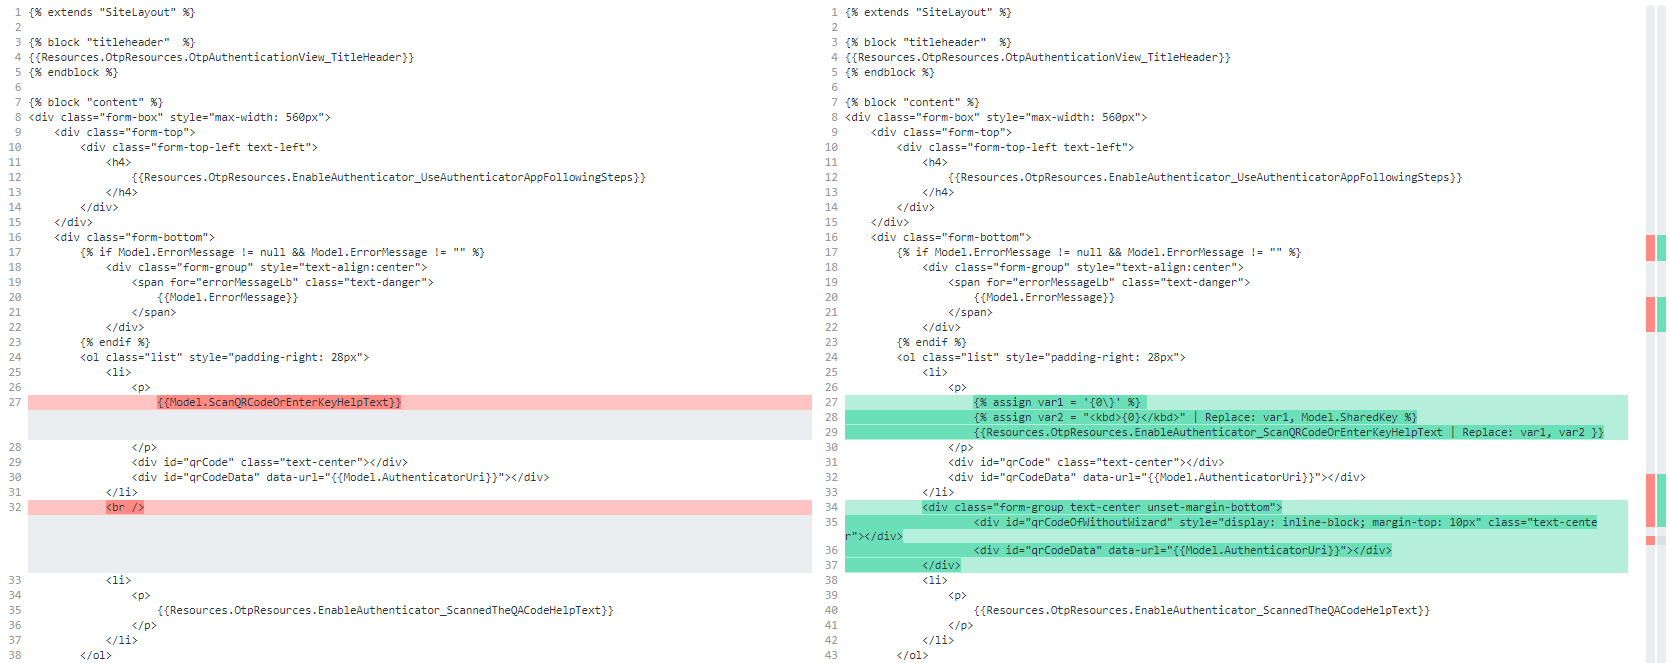
Liquid code:
    {% assign var1 = '{0\}' %}
    {% assign var2 = "<kbd>{0}</kbd>" | Replace: var1, Model.SharedKey %}
    {{Resources.OtpResources.EnableAuthenticator_ScanQRCodeOrEnterKeyHelpText | Replace: var1, var2 }}
and
<div class="form-group text-center unset-margin-bottom">
        <div id="qrCodeOfWithoutWizard" style="display: inline-block; margin-top: 10px" class="text-center"></div>
        <div id="qrCodeData" data-url="{{Model.AuthenticatorUri}}"></div>
    </div>
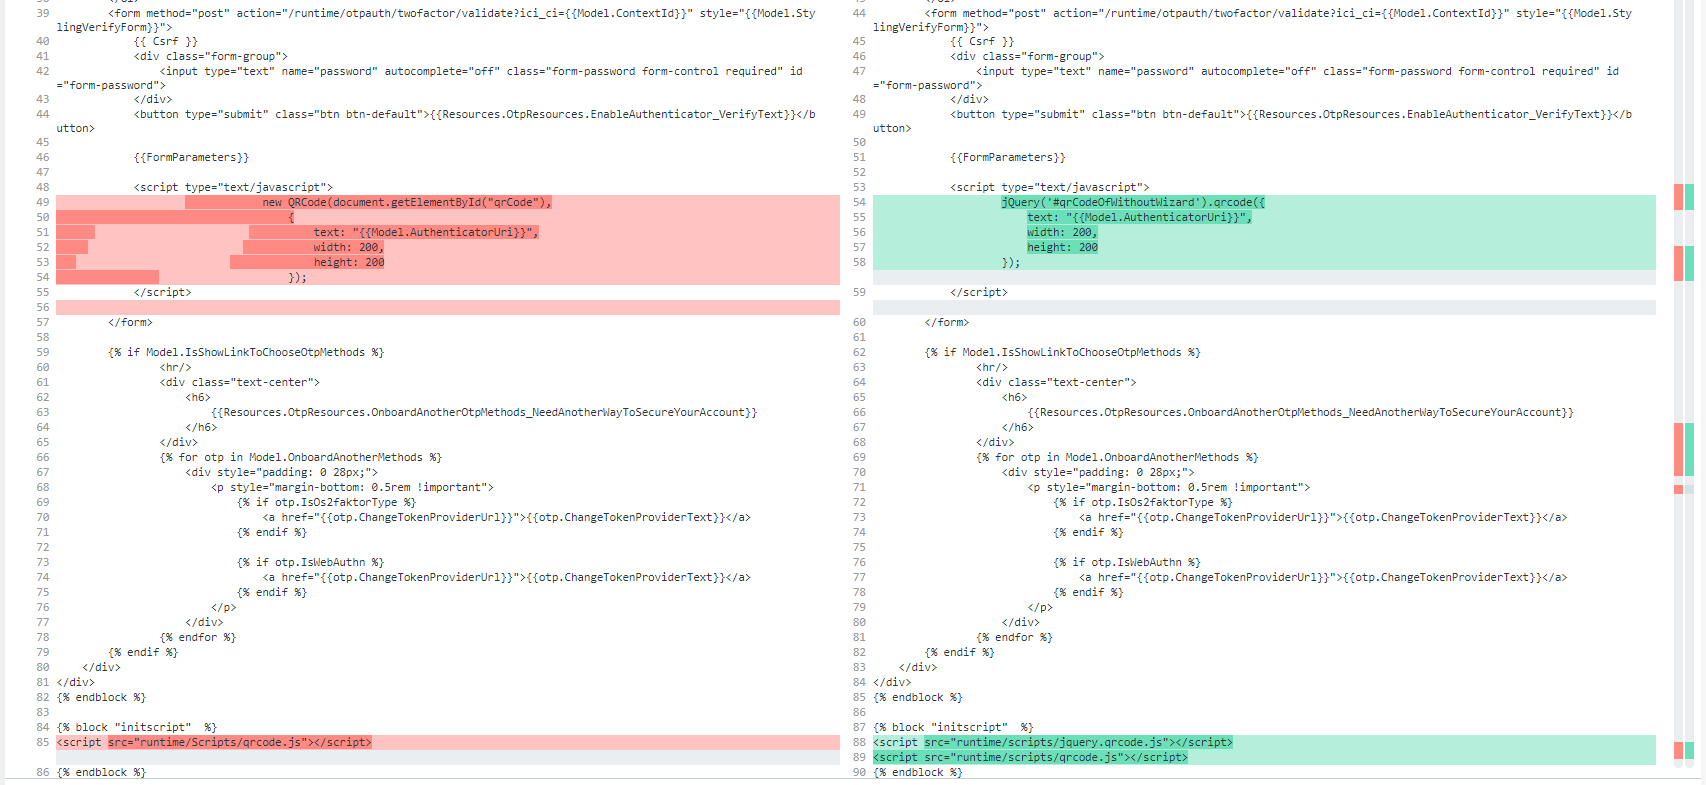
Liquid code:
    jQuery('#qrCodeOfWithoutWizard').qrcode({
        text: "{{Model.AuthenticatorUri}}",
        width: 200,
        height: 200
    });
and
    <script src="runtime/scripts/jquery.qrcode.js"></script>
    <script src="runtime/scripts/qrcode.js"></script>
You can find the fixed versions of the old non-wizarding views at:
Web Authentication
WebAuthn's views do not have any breaking changes. Your customized views will just work.
You can find the old versions of those views at:
Hosted form: https://github.com/Safewhere/Safewhere-Identify-samples/blob/master/Non-wizards%20customization/EnableWebAuthn.html
Custom images
You may want to show custom images on the wizard. Depending on where you put your images, you can use one of the following 3 options.
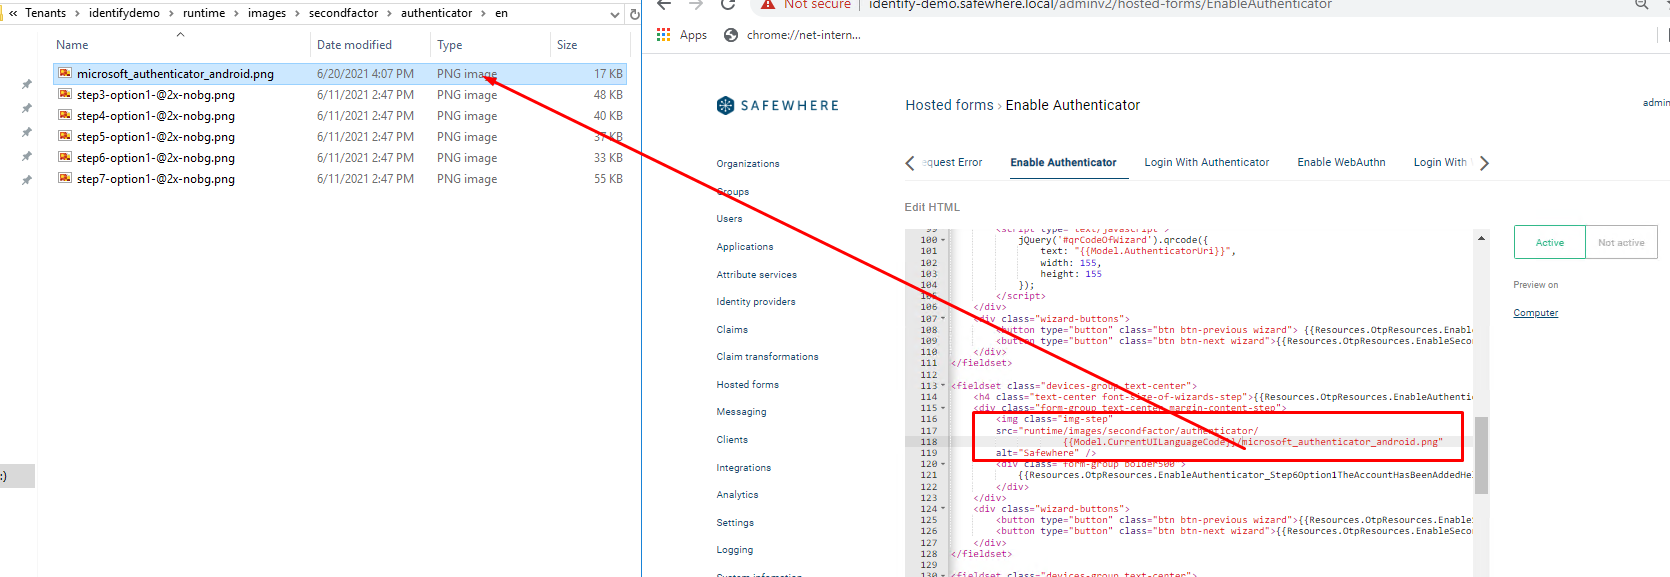
Option 1: Images are deployed to sub folders of your Identify instance
To use this option, you need to copy your images to runtime\images\secondfactor\authenticator\da and runtime\images\secondfactor\authenticator\en. This means that this option supports localization (but the other two do not). Currently, only 'da'(Danish) and 'en'(English) languages are supported.
After deploying images to those folders, you can use the following HTML syntax:
- For hosted-form:
<img class="img-step" src="runtime/images/secondfactor/authenticator/{{Model.CurrentUILanguageCode}}/[img_file_name]" alt="Safewhere" />
- For razor view:
<img class="img-step" src="@Url.Content(imgPath + "/[img_file_name]")" alt="Safewhere" />
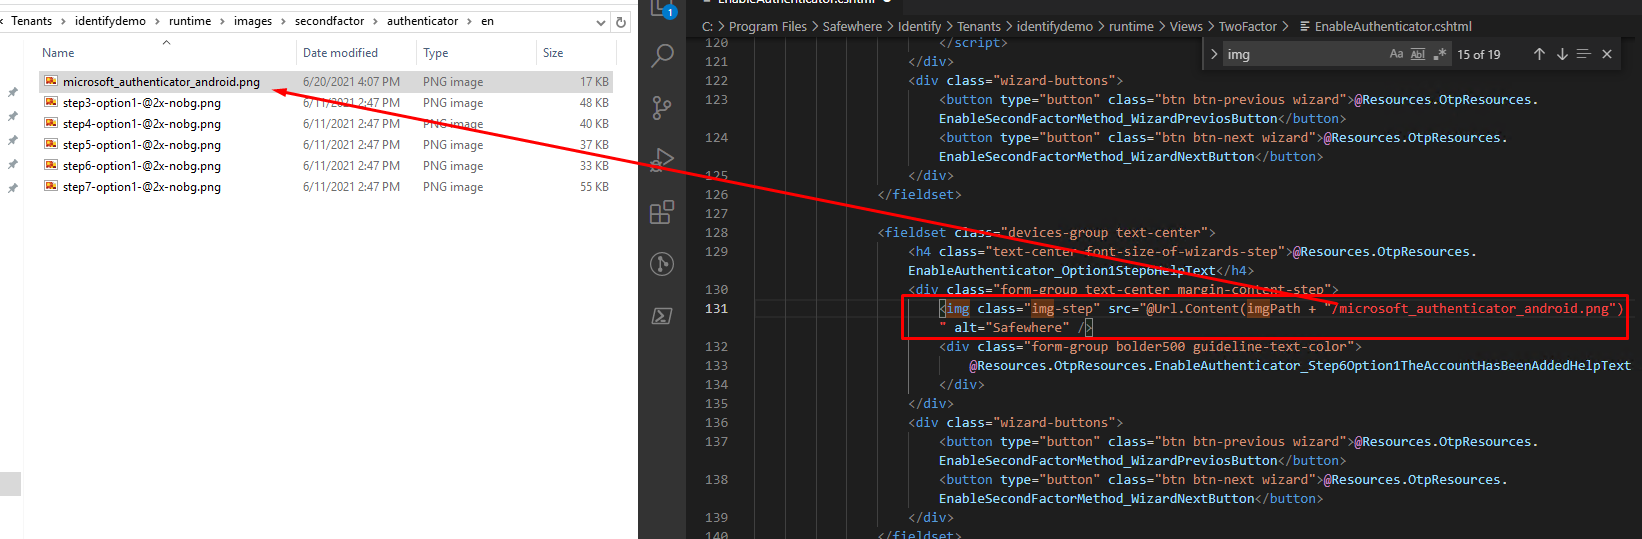
Replace [img_file_name] with your real image file name.
Similarly, folder paths for the WebAuthn MFA method are runtime\images\secondfactor\webauthn\da
and runtime\images\secondfactor\webauthn\en
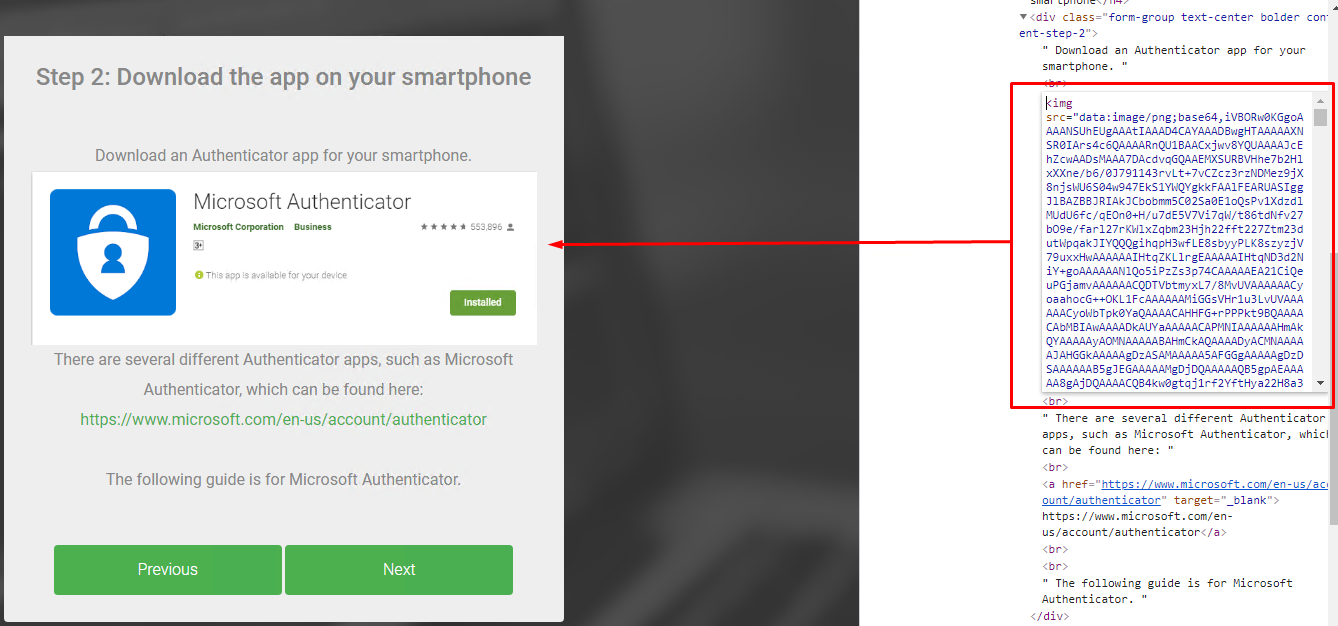
Option 2: Use base64-encoded images
A disadvantage of the first option is that your images are removed after each upgrade. This means that you need to redeploy them afterwards. The second option uses base64-encoded images to overcome that disadvantage.
You can use this tool: https://codebeautify.org/image-to-base64-converter to convert your images to the base64-encoded format.
After doing this, you can use the following HTML syntax which works for both Hosted forms and Razor views:
<img src='data:image/png;base64, [base64_encoded_img]'/>
Replace [base64_encoded_img] with your real base64 encoded image.
Result:
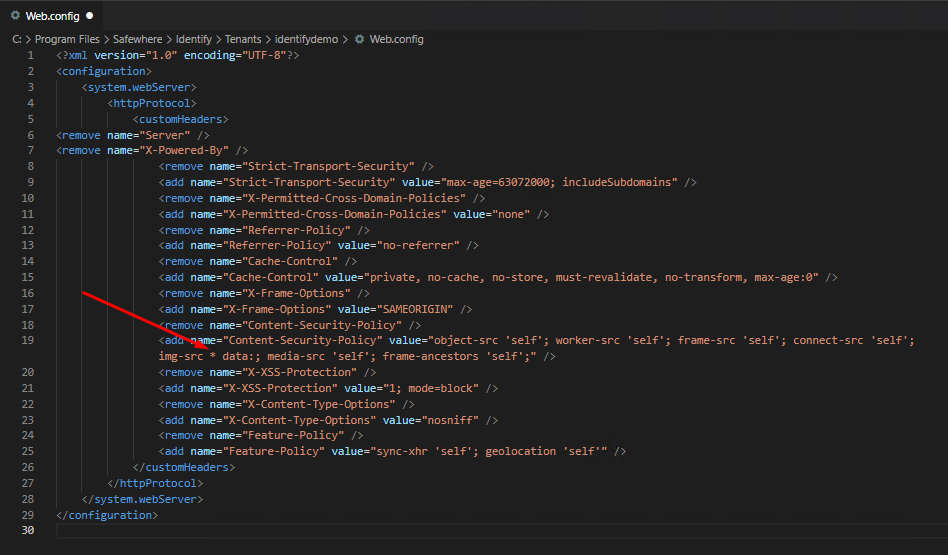
- If your Identify instance uses the default security HTTP headers policy, please make sure that the
img-srcof theContent-Security-Policyelement has thedata:value specified.

Option 3: Use image's URLs from another domain
This is similar to the first option. However, instead of deploying images to folders under the Identify's Runtime application, you can:
- Create a new application under the Identify's website to store custom images.
- Or store custom images in another website on the same server or somewhere else. This approach is usually used when you want to deploy images in a CDN and use them for many different web applications.
Please note that if you use the second approach and the images are hosted in a different domain from that of your Identify instance and if the instance has default security headers on, it will not be able to load external resources. In this case, you need to edit the Web.config of your Identify instance to overwrite the img-src of the Content-Security-Policy element:
- Allow image URLs only from a list of specific domains
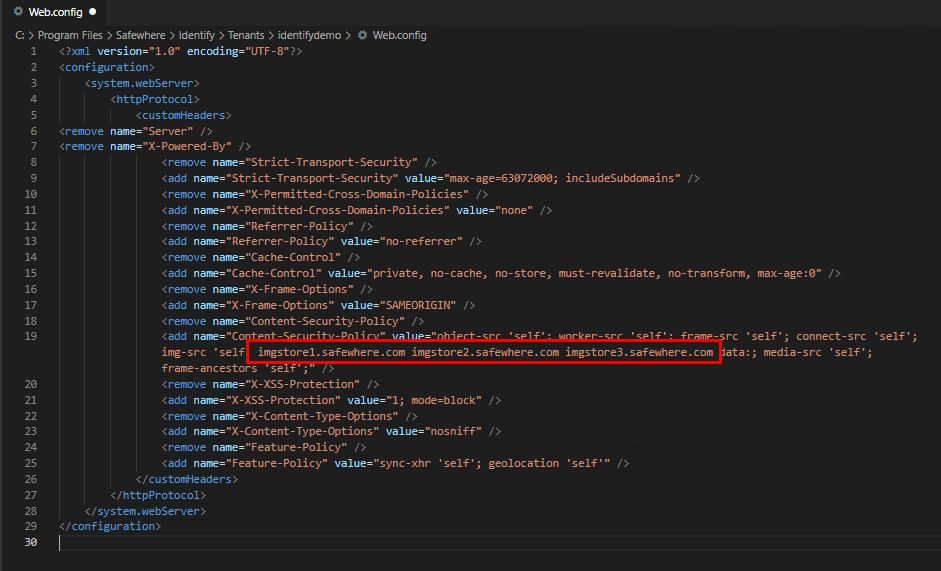
- Allow image URLs from all domains