Deploy Safewhere Identify manually on Azure app service
Update: We have been trying to make the CLI support deploying to Azure App Service.
As-is, because the Configurator tool doesn't support deploying to Azure app service, this document will explore how to do that semi-manually as well as what we need to do next.
The use case is:
- Deploy an instance on a local machine but use Azure SQL database.
- Migrate the websites to Azure app service.
- Because Identify Admin and Runtime are running on .NET framework runtime while Safewhere Admin (adminv2) is using .NET core runtime, you will need to deploy them in two separate app services.
- In this guide, the domain name of Admin and Runtime will be
https://azureapp.safewhere.com/and that of Safewhere Admin will behttps://azureapp-admin.thuannguy.com/. - Need to use an Identify build from the branch
experiment-66077-azureappservice. - No need to purchase a valid SSL certificate because we can use the ones provisioned by Azure.
Creating an Identify instance and preparing a deploying package
You will need to create an instance and do some changes locally:
Create a new instance on a virtual machine as usual named
azureappand run it using NetworkService (using a specific user account locally and a managed identity on Azure app service may be better security-wise).You need to create the instance using the public domain that you want to use on Azure app service. For example, if you want to make public the site at
https://azureapp.safewhere.com, you will need to use that domain when creating the instance. You don't need to use a valid SSL certificate though. The configurator tool has an option to generate one for you.Export the signing certificate to a file.
Download the PsExec tool from SysInternals and run the command below to open the MMC console:
psexec -i -u "nt authority\network service" mmc.exeImport the exported certificate to NETWORKSERVICE's My store.
Log in to the Admin site and make a bunch of changes. Firstly, go to System Setup and change the location of the signing certificate to CurrentUser.
Open the Logging page and change Log target to Text file. Uncheck the "Log user requests to Windows Event log" setting. You can also uncheck the "Log UserRequest to SQL database" setting if you want to reduce SQL database load due to using a low Azure SQL plan.
Decrypt all encrypted sections in web.config files because Azure app service won't be able to decrypt them:
C:\Program Files (x86)\Microsoft Visual Studio\2019\Community>aspnet_regiis.exe -pdf "system.web/sessionState" "C:\Program Files\Safewhere\Identify\Tenants\azureapp\runtime"
...
Succeeded!

C:\Program Files (x86)\Microsoft Visual Studio\2019\Community>aspnet_regiis.exe -pdf "system.web/sessionState" "C:\Program Files\Safewhere\Identify\Tenants\azureapp\admin"
...
Succeeded!

C:\Program Files (x86)\Microsoft Visual Studio\2019\Community>aspnet_regiis.exe -pdf "connectionStrings" "C:\Program Files\Safewhere\Identify\Tenants\azureapp\runtime"
...
Succeeded!

C:\Program Files (x86)\Microsoft Visual Studio\2019\Community>aspnet_regiis.exe -pdf "connectionStrings" "C:\Program Files\Safewhere\Identify\Tenants\azureapp\admin"
...
Succeeded!
Change the
DefaultStoreLocationsetting toCurrentUser.DefaultStoreLocation is CurrentUser. Hack database to change the
validonlyattribute of the signing certificate in System Setup to false.Restart the website in IIS and try a login to make sure it still works.
Zip
C:\Program Files\Safewhere\Identify\Tenants\azureapp\admin,C:\Program Files\Safewhere\Identify\Tenants\azureapp\runtime,Logsto a zip file.Zip
C:\Program Files\Safewhere\OneAdmin\Tenants\azureapp\to another zip file.
Deploy Admin and Runtime on Azure app service
Now you can deploy Admin and Runtime on Azure app service. In this section, you need to make all changes to the files deployed on Azure app service. In other words, do not make the following changes to the local files.
Create a new Azure Service App:
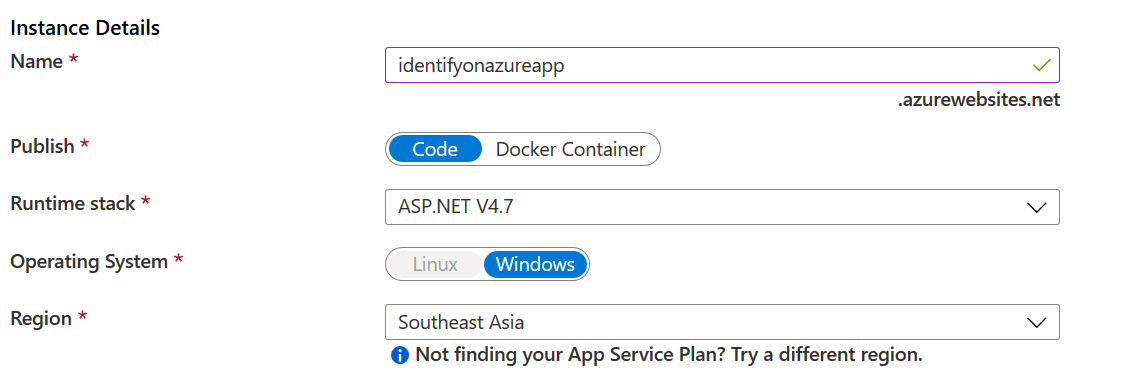
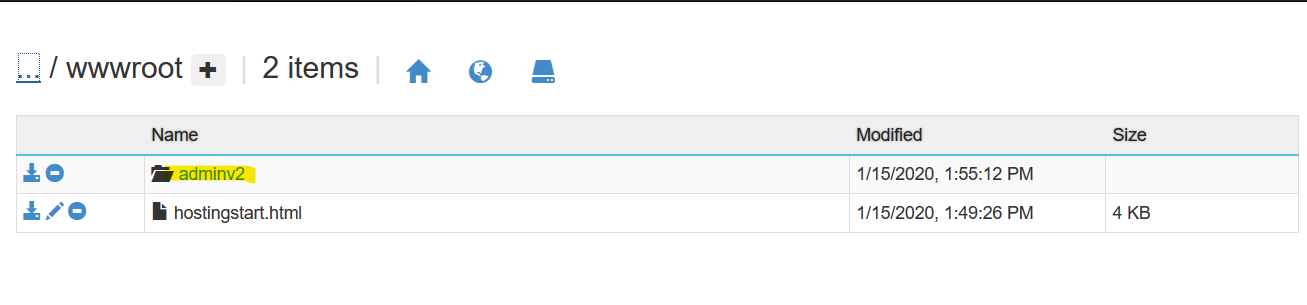
On Azure Portal, navigate to
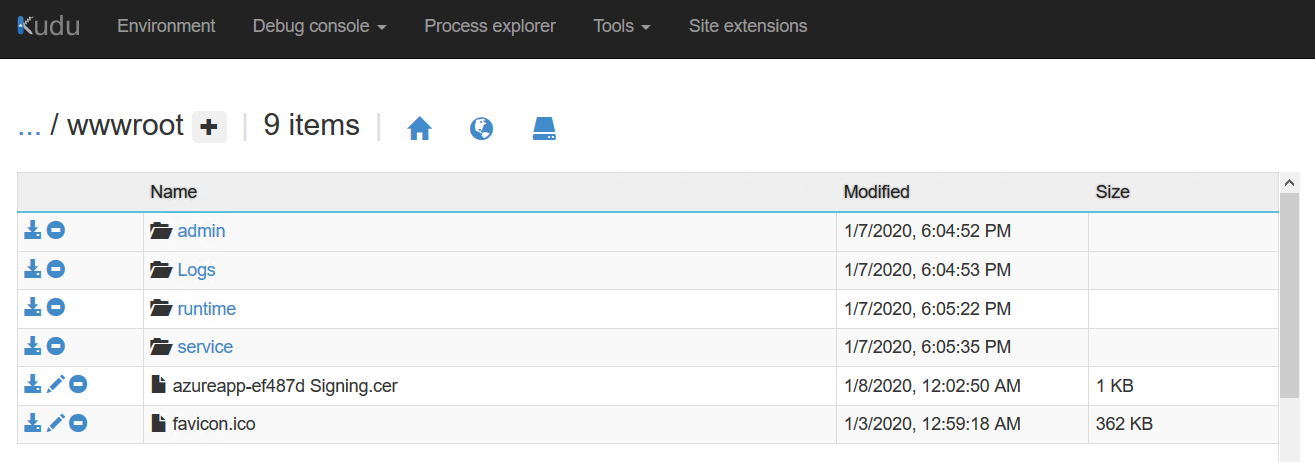
https://identifyonazureapp.scm.azurewebsites.net/ZipDeployUIand upload the zip file containing the Admin and Runtime folders to/wwwroot. Reference:https://blogs.msdn.microsoft.com/benjaminperkins/2017/12/28/deploy-to-an-azure-app-service-using-kudu-and-a-zip-file/. If that doesn't work, you can try to openDebug console->CMD, open thewwwrootfolder and try to drop your zip file again.Result:
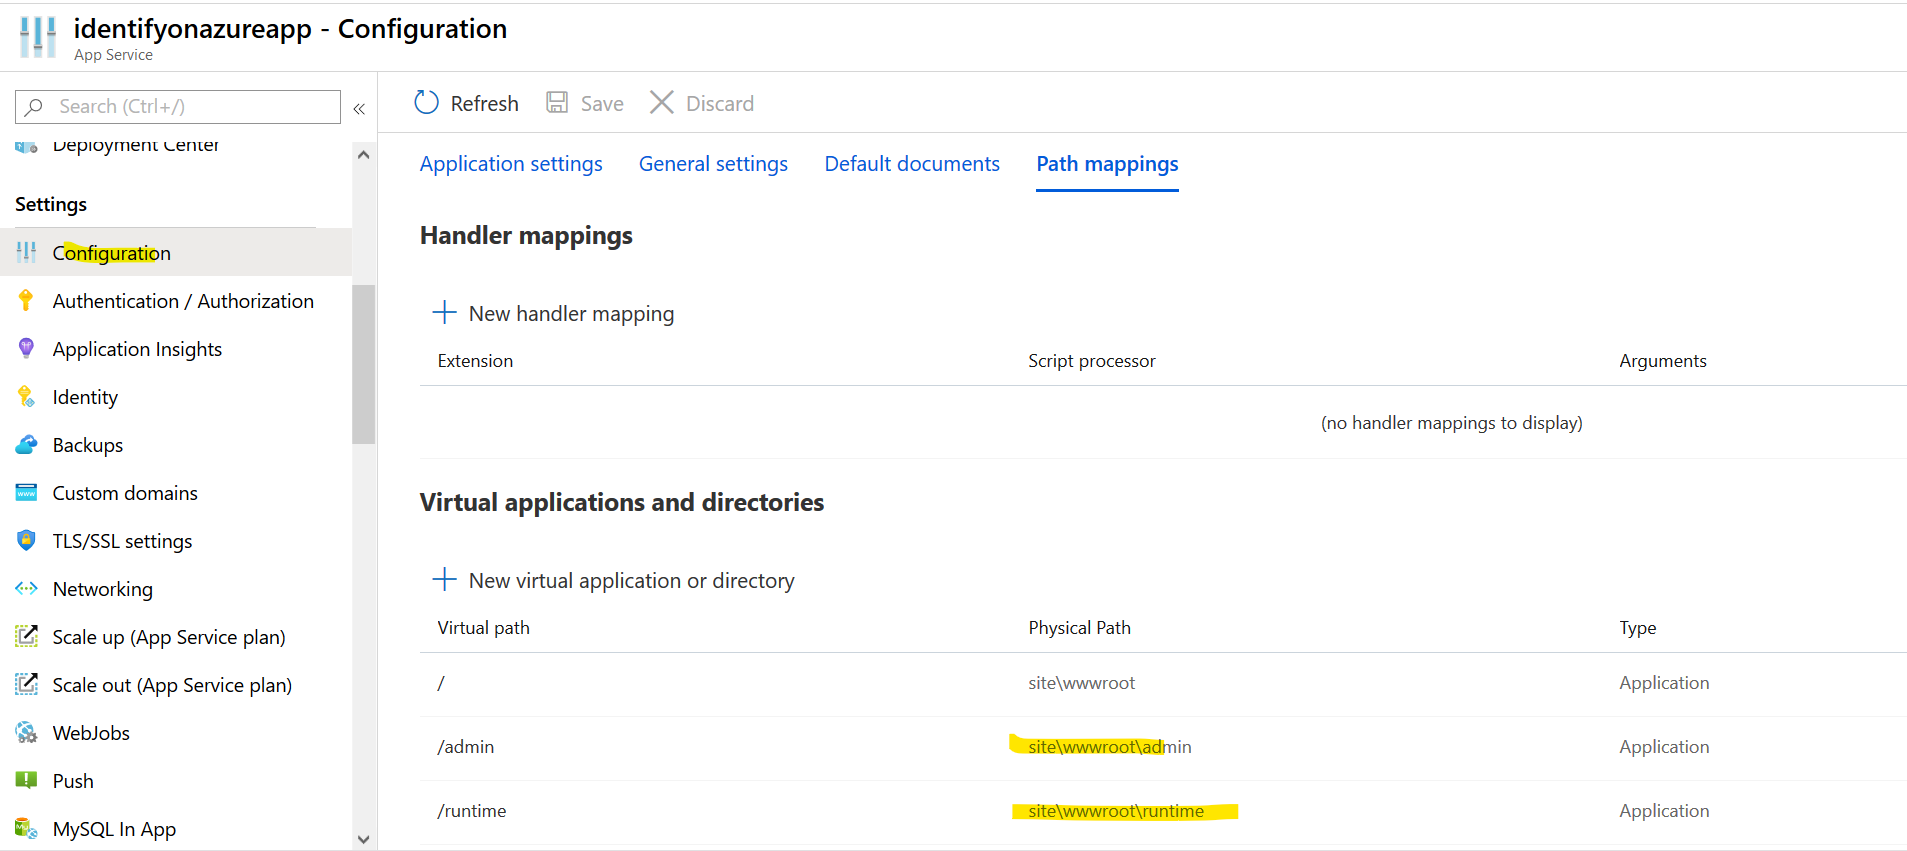
Add path mappings:
Turn on debug:
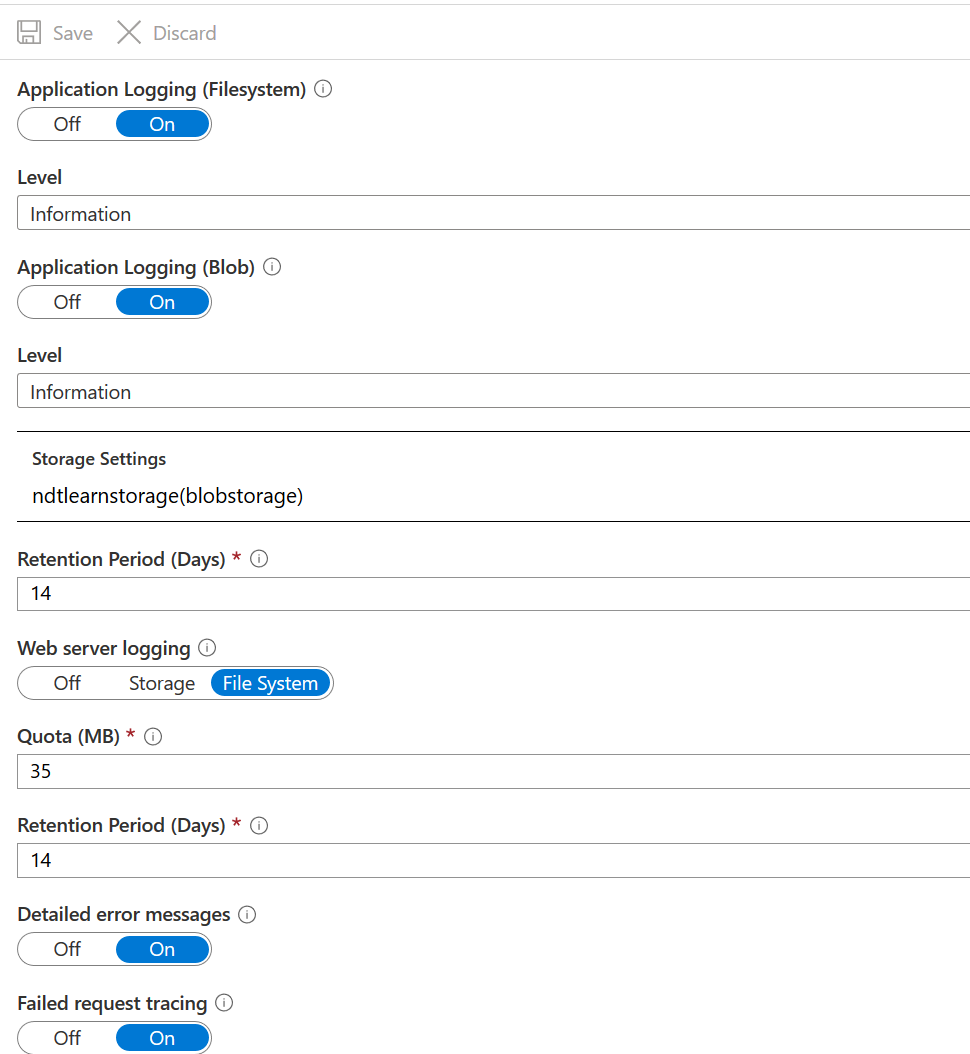
The debug log screen is
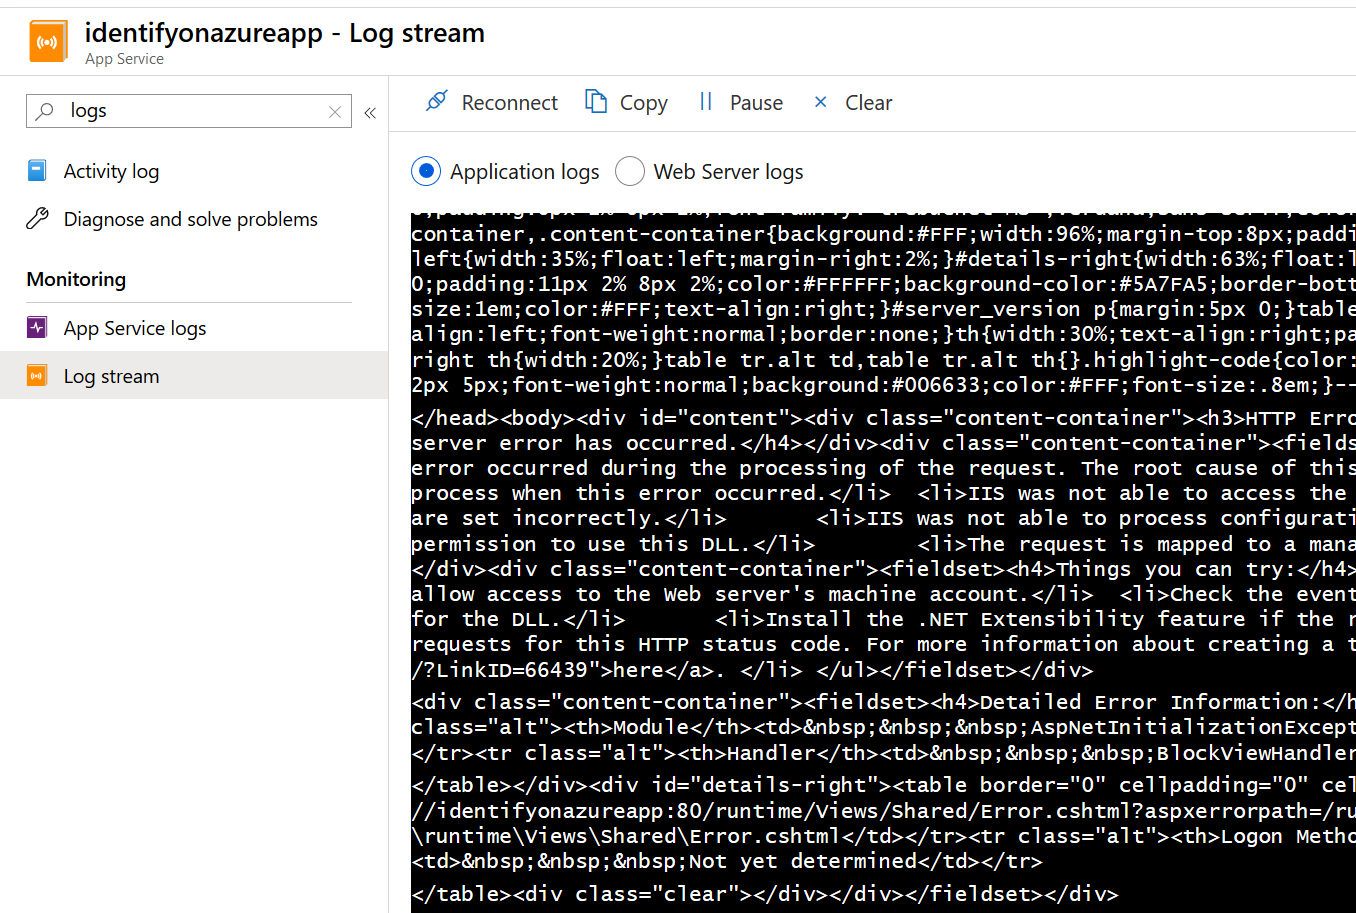
Open
WindsorAuditUserRequest.configand disableWindowsSecurityLogAuditUserRequestas well as enableNullSecurityAuditLogger:<configuration> <components> <!-- Auditing login/logout requests/responses --> <component id="CompositeAuditUserRequest" lifestyle="Singleton" service="Safewhere.IdentityProviderModel.IAuditUserRequest, Safewhere.IdentityProviderModel" type="Safewhere.IdentityProviderModel.CompositeAuditUserRequest, Safewhere.IdentityProviderModel"> <parameters> <auditUserRequests> <array> <item>${SqlAuditUserRequest}</item> <!-- Windows Security Event Log: needs to register GAD component first --> <!-- <item>${WindowsSecurityLogAuditUserRequest}</item> --> <item>${RevisionLogAuditUserRequest}</item> <!-- In case both all the loggers above are disabled, NullAudit must be enabled --> <!--<item>${NullAuditUserRequest}</item>--> </array> </auditUserRequests> </parameters> </component> <component id="SqlAuditUserRequest" lifestyle="Singleton" service="Safewhere.IdentityProviderModel.IAuditUserRequest, Safewhere.IdentityProviderModel" type="Safewhere.IdentityProvider.Audit.Sql.SqlAuditUserRequest, Safewhere.IdentityProvider.Audit.Sql"/> <!--<component id="WindowsSecurityLogAuditUserRequest" lifestyle="Singleton" service="Safewhere.IdentityProviderModel.IAuditUserRequest, Safewhere.IdentityProviderModel" type="Safewhere.IdentityProvider.RuntimeModel.WindowsSecurityLogAuditUserRequest, Safewhere.IdentityProvider.RuntimeModel"> <forwardedTypes> <add service="Safewhere.IdentityProvider.RuntimeModel.ISecurityAuditLogger, Safewhere.IdentityProvider.RuntimeModel" /> </forwardedTypes> </component>--> <component id="SecurityAuditLogger" lifestyle="Singleton" service="Safewhere.IdentityProvider.RuntimeModel.ISecurityAuditLogger, Safewhere.IdentityProvider.RuntimeModel" type="Safewhere.IdentityProvider.RuntimeModel.NullSecurityAuditLogger, Safewhere.IdentityProvider.RuntimeModel"/> <component id="RevisionLogAuditUserRequest" lifestyle="Singleton" service="Safewhere.IdentityProviderModel.IAuditUserRequest, Safewhere.IdentityProviderModel" type="Safewhere.IdentityProvider.RuntimeModel.RevisionLogAuditUserRequest, Safewhere.IdentityProvider.RuntimeModel" /> <!-- In case all the loggers above are disabled, NullAudit must be enabled --> <!--<component id="NullAuditUserRequest" lifestyle="Singleton" service="Safewhere.IdentityProviderModel.IAuditUserRequest, Safewhere.IdentityProviderModel" type="Safewhere.IdentityProviderModel.NullAuditUserRequest, Safewhere.IdentityProviderModel"/>--> </components> </configuration>Change the LogFolderPath setting of the two web.config files:
<add key="LogFolderPath" value="D:\home\site\wwwroot\Logs\Runtime" />

<add key="LogFolderPath" value="D:\home\site\wwwroot\Logs\Admin" />
If you are using a self-signed signing certificate, you need to add a certificateValidation block to the Admin's web.config file:
<system.identityModel>
    <identityConfiguration>
      <audienceUris>
        <add value="https://identify-demo.safewhere.local/admin/" />
      </audienceUris>
      <issuerNameRegistry type="...">
        <trustedIssuers>
          <add thumbprint="..." />
        </trustedIssuers>
      </issuerNameRegistry>
      <certificateValidation certificateValidationMode="None">
      </certificateValidation>
    </identityConfiguration>
  </system.identityModel>
Add a firewall rule to your Azure SQL server to allow connections from your Azure app service:
Cannot open server 'swsqlserver01' requested by the login. Client with IP address 'xxx.xxx.xxx.xxx' is not allowed to access the server. To enable access, use the Windows Azure Management Portal or run sp_set_firewall_rule on the master database to create a firewall rule for this IP address or address range. It may take up to five minutes for this change to take effect.Upload the signing certificate:
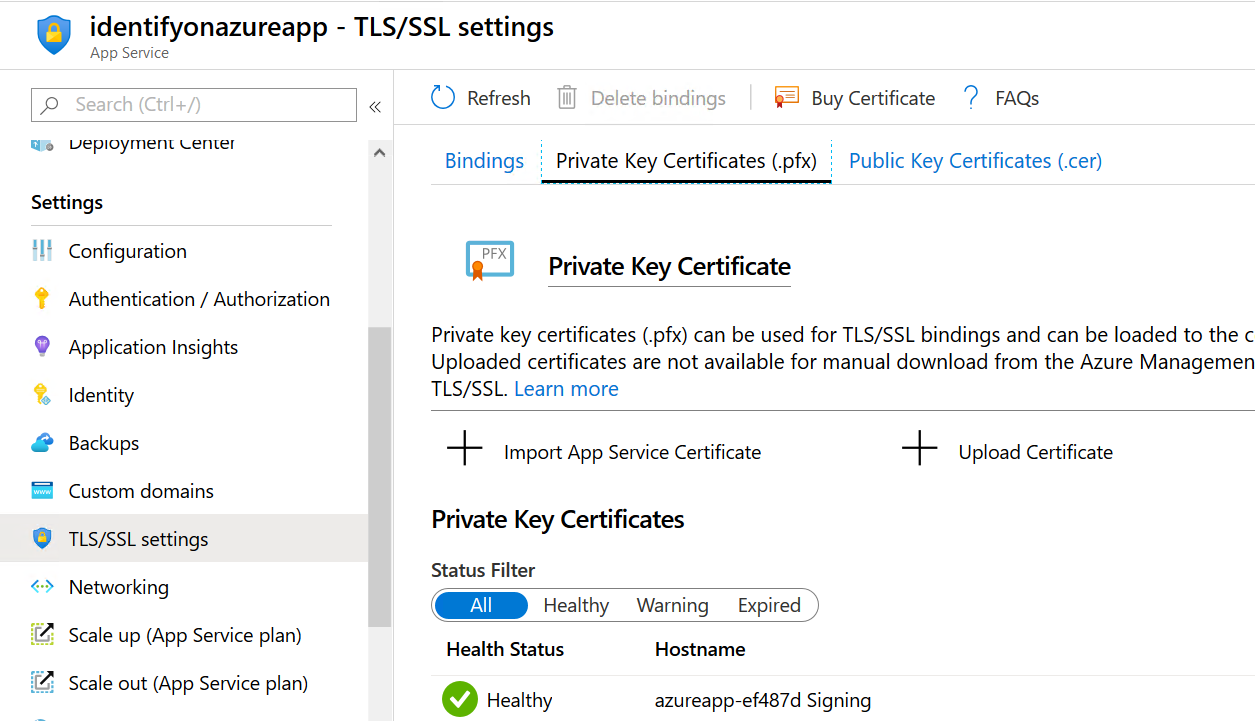
Create Custom Domain:
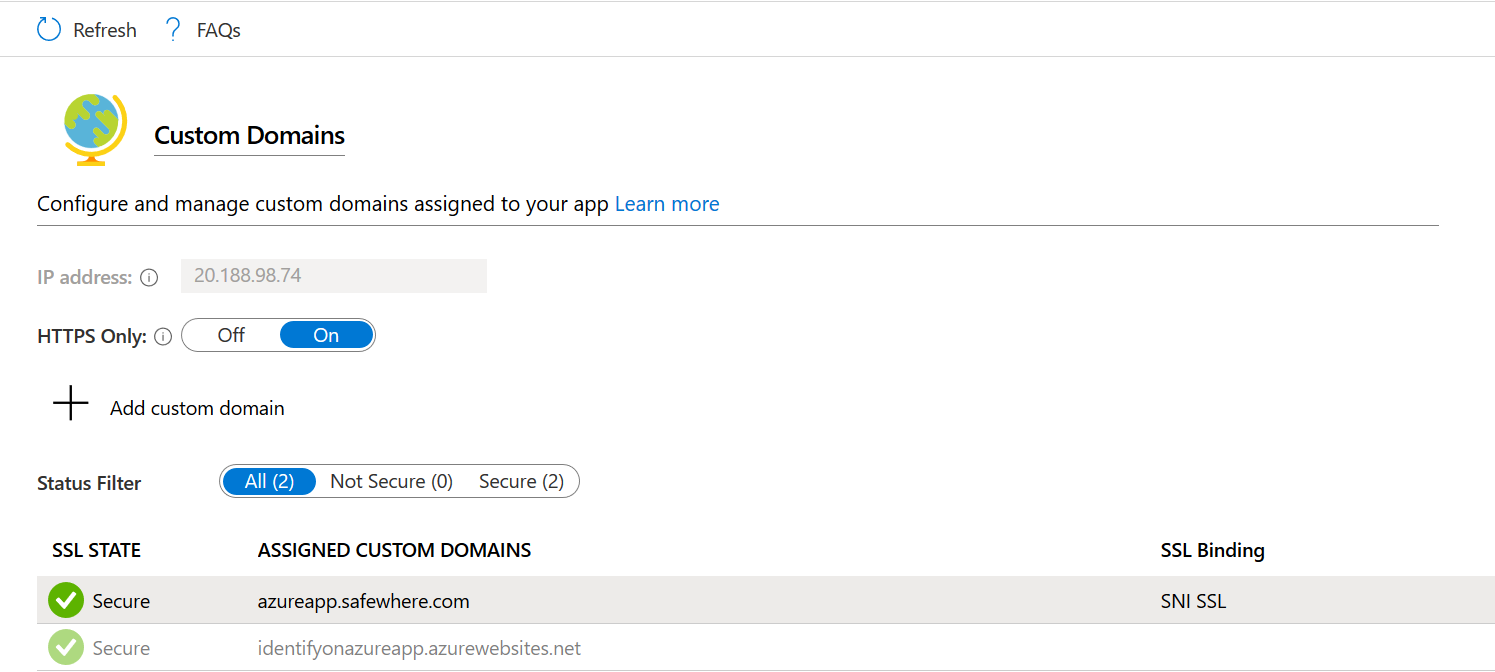
Open the
TLS/SSL settingstab, selectCreate App Service Managed Certificateprovision SSL certificates: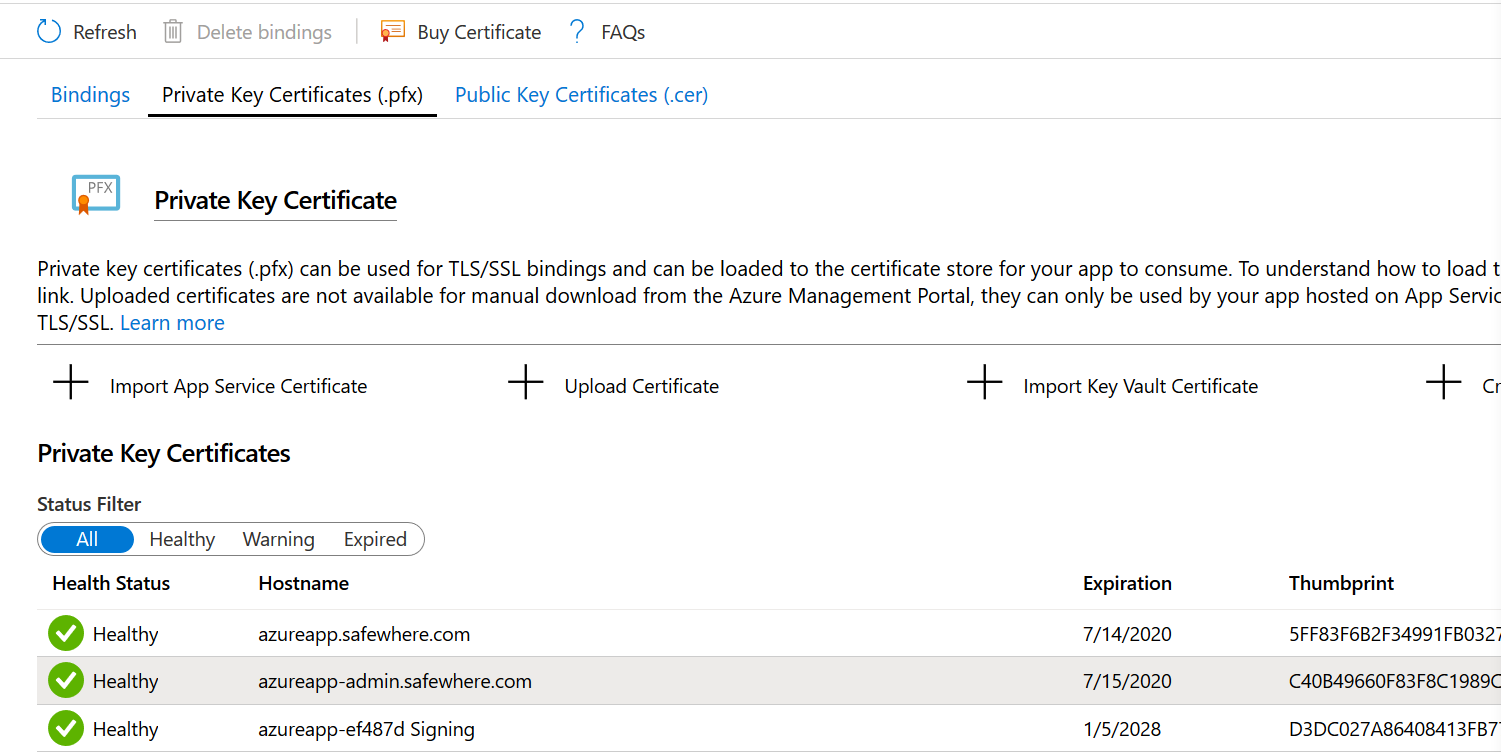
Create binding using the newly provisioned SSL cert:
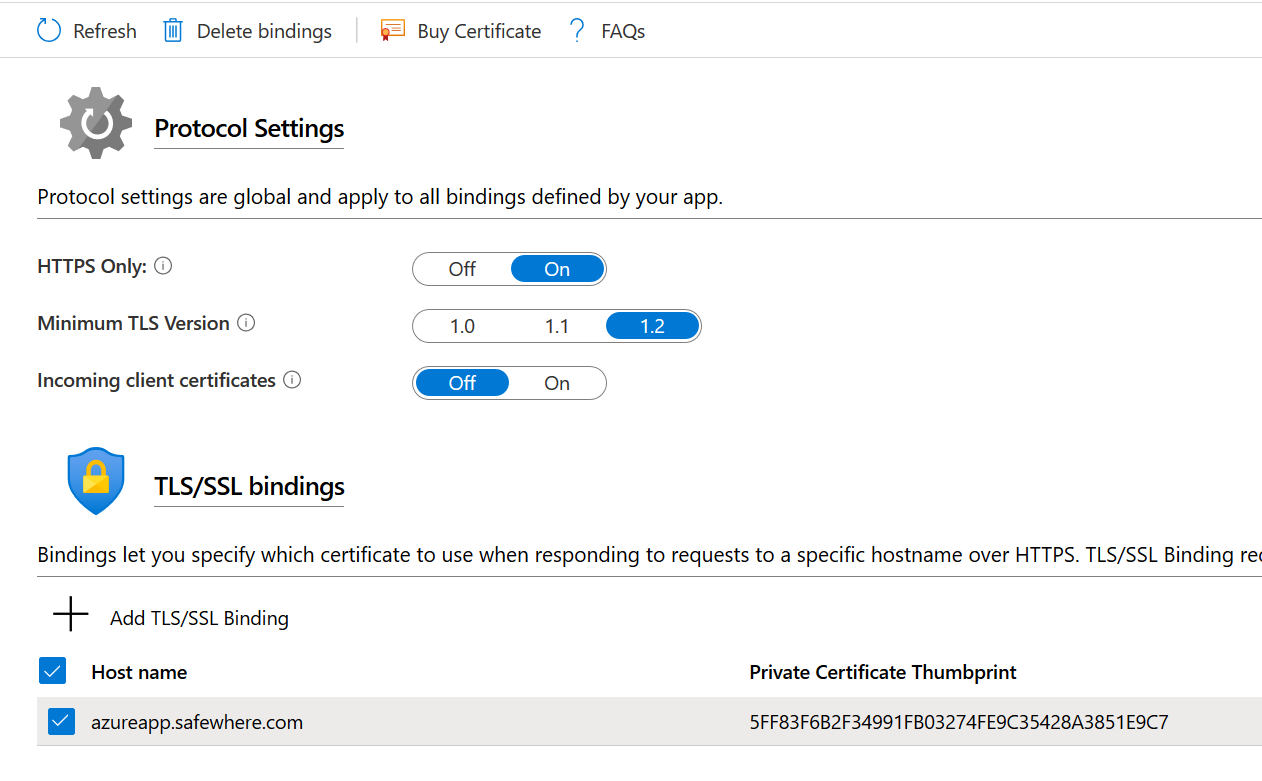
Open
Configurationand add a newWEBSITE_LOAD_CERTIFICATESwhose value is the thumbprint of the signing certificate:
Deploy Safewhere Admin
Create another Azure service app in the same Service plan because Safewhere Admin runs under Asp.Net Core.
Upload file:
Add domain mapping, provision SSL certificate, add SSL binding.
Edit the web.config file to change its
stdoutLogFilesetting tostdoutLogFile="\\?\%home%\LogFiles\stdout".Create a new OIDC connection for the site on Azure app service because the domain name is changed now.
Code changes
I made some quick code changes to get Identify work on Azure app service.
Event log
Update: Just log to Application Insights.
Azure App Service runs in a sandbox that does not have access to registry. Therefore, creating a custom event log source is not possible. Even though we can configure Identify to log to files or database, there is still an "error handler" that logs to event log. The "fix" is that I changed code to use Application for both source and application.
The source was not found, but some or all event logs could not be searched. To create the source, you need permission to read all event logs to make sure that the new source name is unique. Inaccessible logs: Security. at ...
The source was not found, but some or all event logs could not be searched. To create the source, you need permission to read all event logs to make sure that the new source name is unique. Inaccessible logs: Security. at Safewhere.ModelFoundation.Log.BitFactory.CompositeLogWriter.Write(BaseLogEntity message) in D:\Source\Products\Safewhere Identify\Released\5.6\BitFactoryModelFoundation\CompositeLogWriter.cs:line 87 at Safewhere.ModelFoundation.Kernel.CommonLogging.BaseSystemLogger.WriteInformation(SystemLogEntity message) in D:\Source\Products\Safewhere Identify\Released\5.6\ModelFoundation\CommonLogging\BaseSystemLogger.cs:line 247 at Safewhere.ModelFoundation.Kernel.CommonLogging.BaseSystemLogger.WriteInformation(String message) in D:\Source\Products\Safewhere Identify\Released\5.6\ModelFoundation\CommonLogging\BaseSystemLogger.cs:line 232 at Safewhere.IdentityProviderModel.JobScheduling.HangfireLogger.Log(LogLevel logLevel, Func`1 messageFunc, Exception exception) in D:\Source\Products\Safewhere Identify\Released\5.6\IdentityProviderModel\JobScheduling\HangfireLogger.cs:line 42 at Hangfire.Logging.LoggerExecutionWrapper.Log
...
Identify\Released\5.6\IdentityProviderWebRuntime\Global.asax.cs:line 243
I also made a small change to always log the right stack trace.
Performance counter
Also due to the sandboxing restriction, I had to change code to disable all custom performance counters.
Troubleshooting
Addition to all the logs enabled above, you can open Advanced tools -> Debug console -> CMD and view eventlog.xml found in the LogFiles folder.
Try to restart your app services if things don't work right away. The apps sometimes didn't work for me, then they worked after an hour without any changes.
Please note that I also got a strange problem with ViewState on Azure app service. I didn't find out what the problem is but it won't be a big problem when we kill off the old Admin.
What's next
Update: Use CLI to install a new tenant.
All the manual steps above show what we need to do to deploy Identify on Azure app service. We need to find out how to handle the following issues with minimum manual steps:
- Copy files to Azure app service.
- How to create a database. As-is, we use InstallUtil.exe to execute a bunch of installer classes defined in Safewhere's dlls to set up default data. One option is to copy the InstallUtil.exe file to the bin folders on Azure app service and run the installers there.
- Performance counters are not that important. We can replace them with Application Insights.
Logging to Event Logs is still useful. We can try to log toUpdate: just log to Application InsightsApplicationand feed all logs to Azure Monitor.Revive the option to install Identify under CurrentUser mode.Update: use Azure Key Vault instead.- Option to disable logging to Windows Security Log totally.
- Move all secrets from web.config to Azure Key Vault. Even better, move all non-secretive settings from web.config to Azure app service's Configuration.
- Perform load test.
- Upgrade is another task to consider. Replicate is unnecessary.
Cost analysis
A minimum recommended VM plan is A3 or newer
| INSTANCE | CORES | RAM | STORAGE | PRICES |
|---|---|---|---|---|
| A2 | 2 | 3.5 GiB | 135 GiB | ~$131.40/month |
| A3 | 4 | 7 GiB | 285 GiB | ~$262.80/month |
| A4 | 8 | 14 GiB | 605 GiB | ~$525.60/month |
| A5 | 2 | 14 GiB | 135 GiB | ~$248.20/month |
| A2 v2 | 2 | 4 GiB | 20 GiB | ~$94.90/month |
| A2m v2 | 2 | 16 GiB | 20 GiB | ~$137.24/month |
| A4 v2 | 4 | 8 GiB | 40 GiB | ~$200.02/month |
| A4m v2 | 4 | 32 GiB | 40 GiB | ~$287.62/month |
| A8 v2 | 8 | 16 GiB | 80 GiB | ~$419.75/month |
Note that we need to deploy two VMs.
Meanwhile, cost of a standard service plan is:
| INSTANCE | CORES | RAM | STORAGE | PRICES |
|---|---|---|---|---|
| S1 | 1 | 1.75 GB | 50 GB | ~$73/month |
| S2 | 2 | 3.50 GB | 50 GB | ~$146/month |
| S3 | 4 | 7 GB | 50 GB | ~$292/month |
Premium service plan
| INSTANCE | CORES | RAM | STORAGE | PRICES |
|---|---|---|---|---|
| P1v2 | 1 | 3.50 GB | 250 GB | ~$146/month |
| P2v2 | 2 | 7 GB | 250 GB | ~$292/month |
| P3v2 | 4 | 14 GB | 250 GB | ~$584/month |
All the upcoming scenarios assume that we want to deploy in redundant setup which needs 2 VMs. If running 1 VM is acceptable, the VM option will always be cheaper than Azure app service.
I want to host one or 2 instances for testing
2 instances can need about 1.5 GiB of memory to run smoothly. A2 or A2v2 (~190-260 USD/month) may work but the instances might be a bit laggy due to lacking of RAM (note that the OS eats some RAM as well).
For Azure App Service, we can try S2. S1 might also work but again the instances might be laggy.
I want to host as many instances as possible
We need more RAM and more disk space. Since disk space is cheap, RAM is the decisive factor. A4m v2 VM has a clear advantage over P3v2.
I want to host a single production instance for my customer
Recommended plans are:
| INSTANCE | CORES | RAM | STORAGE | PRICES |
|---|---|---|---|---|
| A2 | 2 | 3.5 GiB | 135 GiB | ~$131.40/month * 2 |
| A3 | 4 | 7 GiB | 285 GiB | ~$262.80/month * 2 |
| A4 | 8 | 14 GiB | 605 GiB | ~$525.60/month * 2 |
| A2 v2 | 2 | 4 GiB | 20 GiB | ~$94.90/month * 2 |
| A2m v2 | 2 | 16 GiB | 20 GiB | ~$137.24/month * 2 |
| A4 v2 | 4 | 8 GiB | 40 GiB | ~$200.02/month * 2 |
| S2 | 2 | 3.50 GB | 50 GB | ~$146/month |
| S3 | 4 | 7 GB | 50 GB | ~$292/month |
| P2v2 | 2 | 7 GB | 250 GB | ~$292/month |
If you want to have 2 cores, S2 can be a good choice.
If you want to have 4 cores, S3 can be a better choice than A3 or A4v2.
However, please note that using 2 VMs means we can split traffics between them which can serve twice more traffics.
Note: we have done no performance testing against all those plans yet, except the A4 plan.