How to set up two factor with WebAuthn
From version 5.8, we have added support for Web Authentication (WebAuthn) as another second factor method besides Email, SMS, Authenticator, and OS2faktor. The new method offers clients, such as Windows Hello, Apple’s Touch ID, and FIDO2, keys as a second factor option.
OTP Connection settings
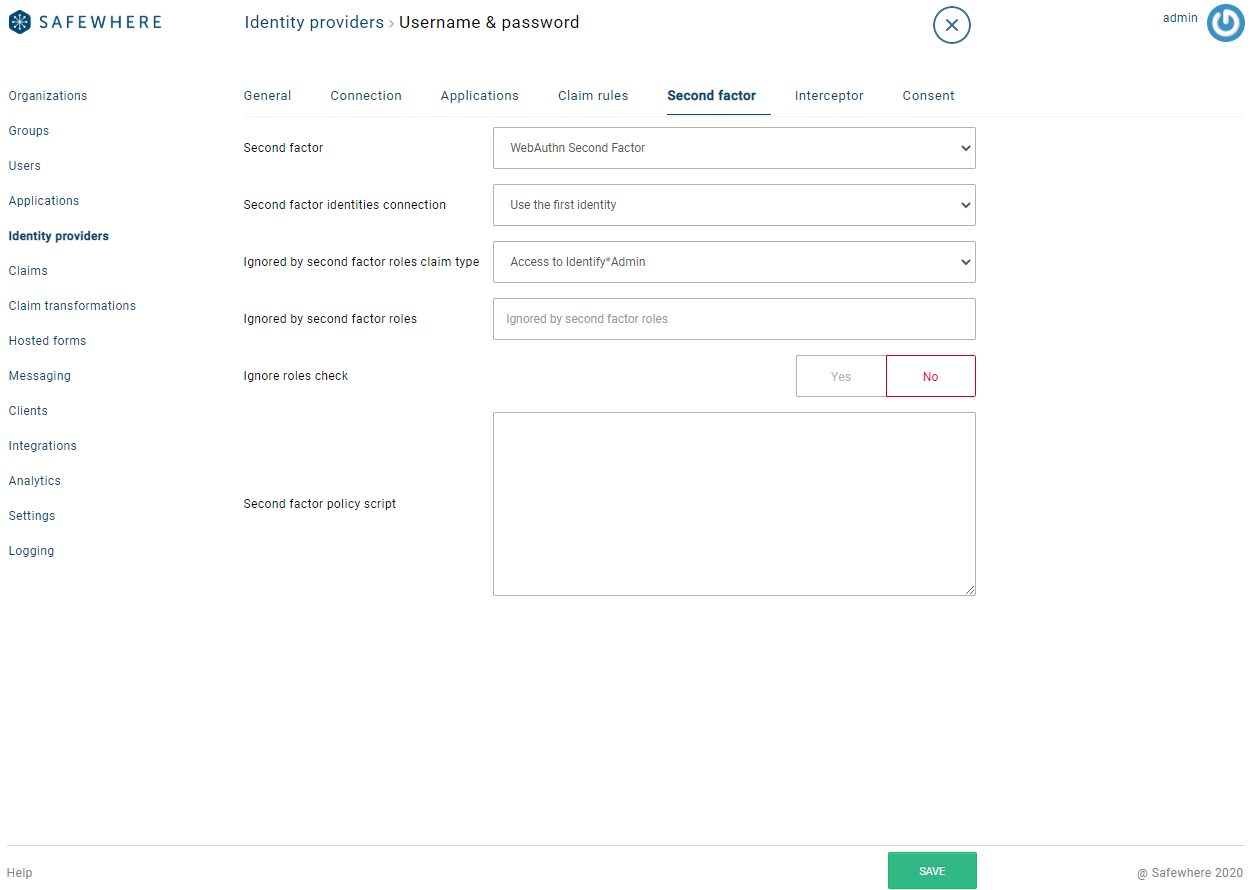
Select the "WebAuthn" as the "Second factor method(s)" of the OTP authentication connection you are configuring.

When you select the WebAuthn method, you can configure several settings:
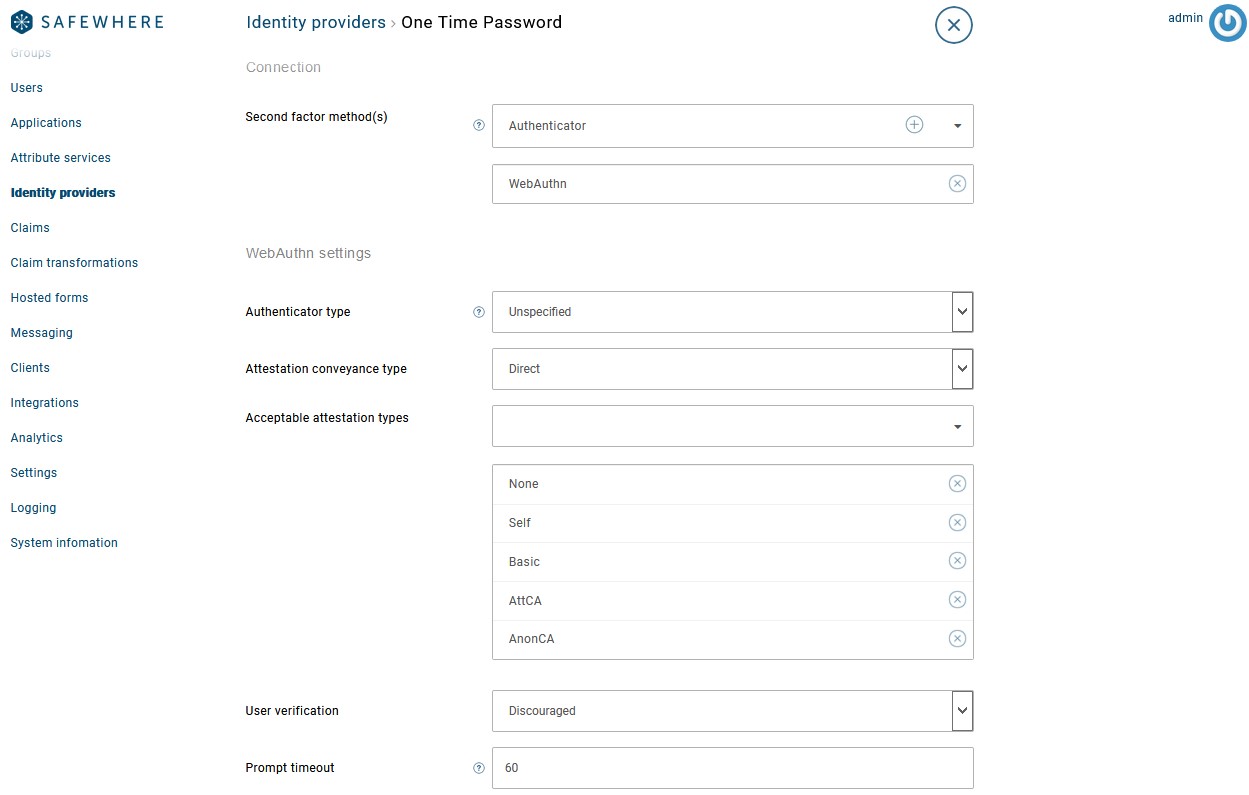
Authenticator type: This setting specifies what type of authenticators (aka devices) that your users can use.
- Platform: This option only allows platform or internal authenticators, such as fingerprint scanners built into WebAuthn client devices (e.g., Touch ID or Windows Hello), to register. To log in to your applications on other devices, you can use the authenticator you registered or a passkey manager synced across devices within an ecosystem. For demonstrations, please refer to thethis document.
- Cross Platform: This option only allows cross-platform/external authenticators such as hardware security keys (e.g. FIDO2 keys). If you use a Yubikey to register as the second factor authentication method, you can plug that key in to any compatible machine and log in to your applications.
- Unspecified: This option allows both platform and cross platform authenticators, giving you the flexibility to choose which authenticator to register.
Attestation conveyance type: This setting specifies whether Safewhere Identify wants to receive the attestation statement of an authenticator while registering a second factor authentication method.
- None: This option indicates that Safewhere Identify is not interested in an authenticator attestation statement. The values of
AaGuidandCredTypeof the stored credential(used to do authentication) will look like below.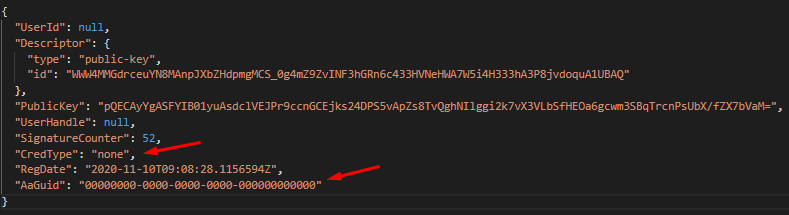
- Indirect: This option indicates that Safewhere Identify prefers an attestation conveyance yielding verifiable attestation statements, but allows the client to decide how to obtain such attestation statements.
- Direct: This option indicates that Safewhere Identify wants to receive an attestation statement as generated by the authenticator. The values of
AaGuidandCredTypeof the stored credential (used to do authentication) will look like below (same for Indirect).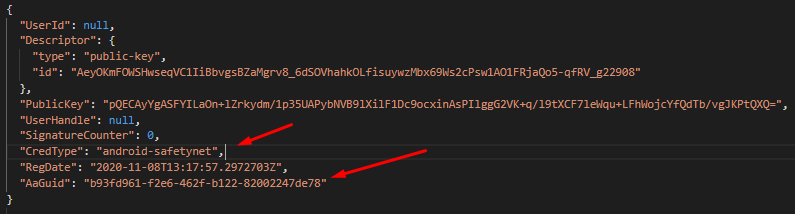
Note:
CredTypeis WebAuthn Attestation Statement Format Identifier.- None: This option indicates that Safewhere Identify is not interested in an authenticator attestation statement. The values of
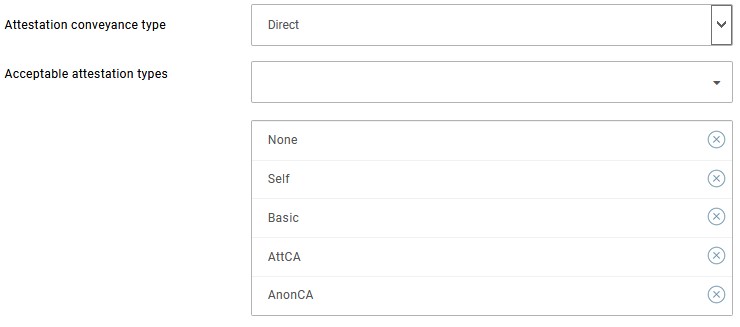
Acceptable attestation types: This setting specifies that Safewhere Identify limits some authenticators that are allowed to do registration. Each authenticator has its own WebAuthn Attestation Statement Format Identifier value.
The list of WebAuthn Attestation Statement Format Identifiers that each Acceptable attestation type supports are:
- none
- Attestation types supported: None.
- packed
- Attestation types supported: Basic, Self, AttCA.
- tpm
- Attestation types supported: AttCA.
- android-key
- Attestation types supported: Basic.
- android-safetynet
- Attestation types supported: Basic.
- fido-u2f
- Attestation types supported: Basic, AttCA.
- apple
- Attestation types supported: AnonCA.
- none
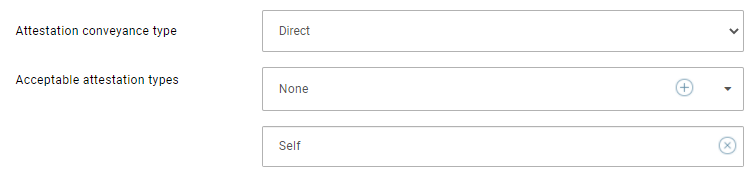
Below examples illustrate the use of this setting:
To only allows cross-platform/external authenticators such as hardware security keys (e.g. FIDO2 keys) to do registration:
To allow all kinds of authenticators to do registration:
User verification: User verification can take various forms of authorization gesture, such as password, PIN, fingerprint, biometric, etc. The point is to distinguish one user from any others, i.e., uniquely identify the user.
- Discouraged: This value indicates that Identify does not want user verification employed during registration or authentication (for example, to minimize disruption to the user interaction flow).
- Preferred: This value indicates that Identify prefers user verification for registration or authentication if possible, but will not fail the operation if the response does not have the user verification.
- Required: This value indicates that Identify requires user verification for registration or authentication and will fail the operation if the response does not have the user verification.
Prompt timeout: The time (in seconds) that you have to respond to a prompt by interacting with your WebAuthn-compatible devices when you need to register or authenticate.
Note: The Register with resident key setting is not applicable in Identify because Identify does not support the usernameless and passwordless login use cases. Currently, Identify only uses WebAuthn as a second factor method.
- Read this WebAuthn developer guide to know about resident key.
- Read this demo to get the idea of the usernameless and passwordless use cases.
WebAuthn settings are represented in the OTP authentication connection’s json format for REST API as follows:
  "configurations": [{
      "authenticatorType": "Platform",
      "attestationConveyanceType": "None",
      "acceptableAttestationTypes": ["None", "Self", "Basic", "AttCA", "AnonCA"],
      "userVerification": "Discouraged",
      "promptTimeout": 60
  }]
Set up two factor authentication with WebAuthn OTP
After completing configuration for OTP authentication connection, you can set it as a second factor of an authentication connection such as U&P, SAML 2.0, WSFederation etc.
Registration
After you performed a first factor login, Safewhere Identify will ask you to register a WebAuthn authenticator:
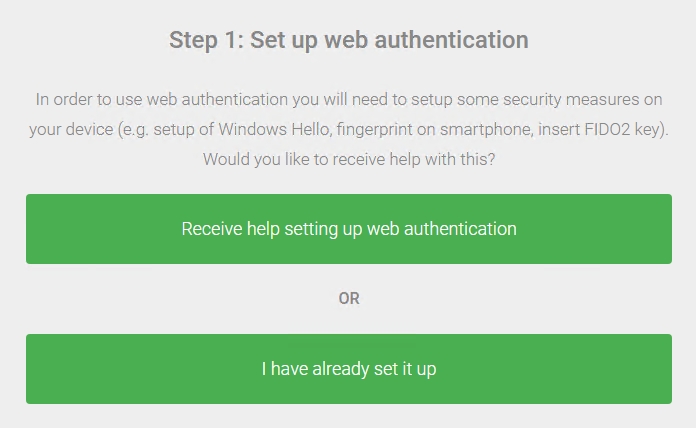
You can select the option Receive help setting up web authentication to see a step-by-step guideline about how to set up a device that you would like to use as your web authenticator.

or you can choose the option I have already set it up to skip the guideline.
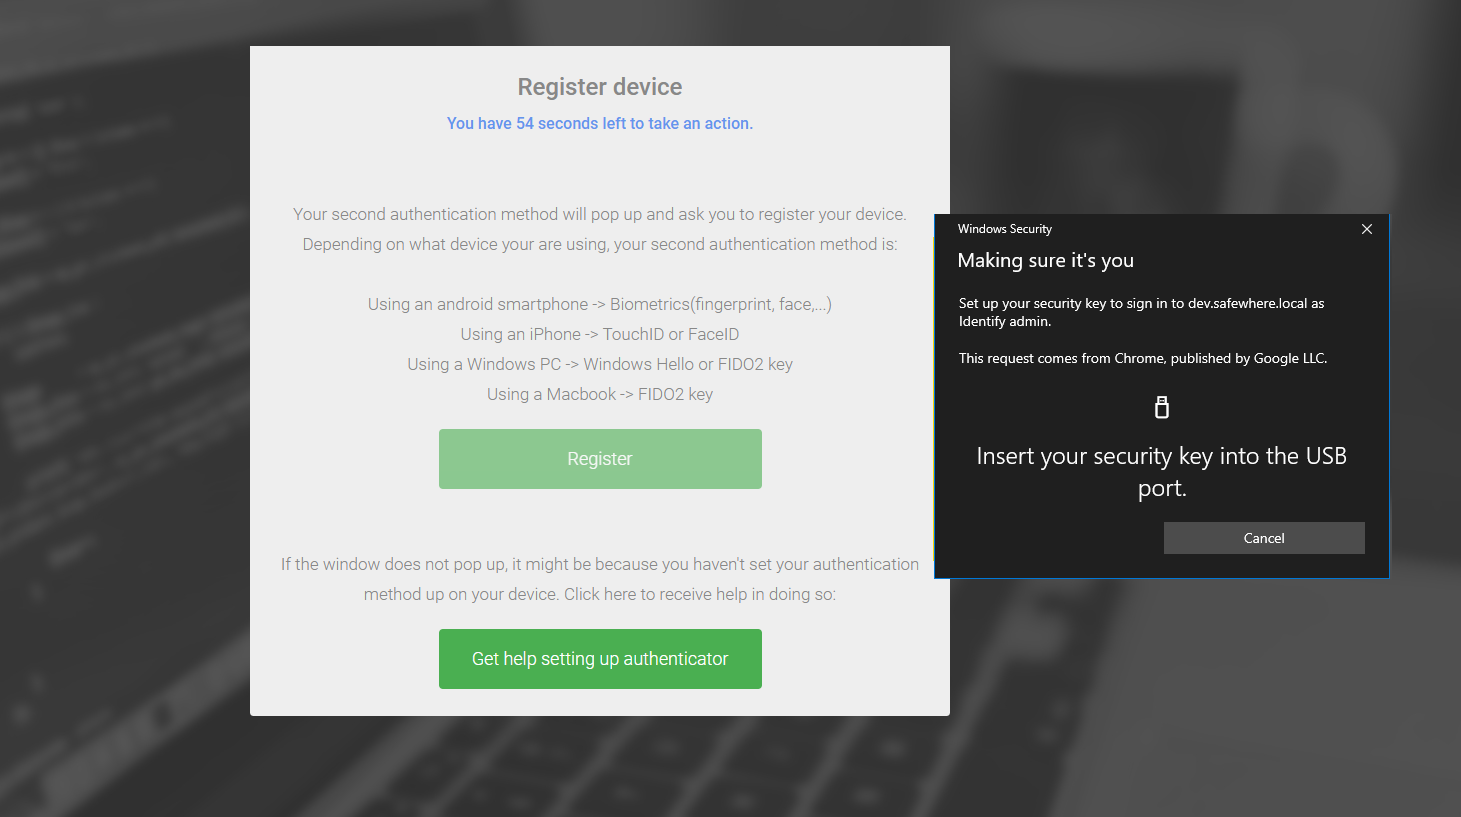
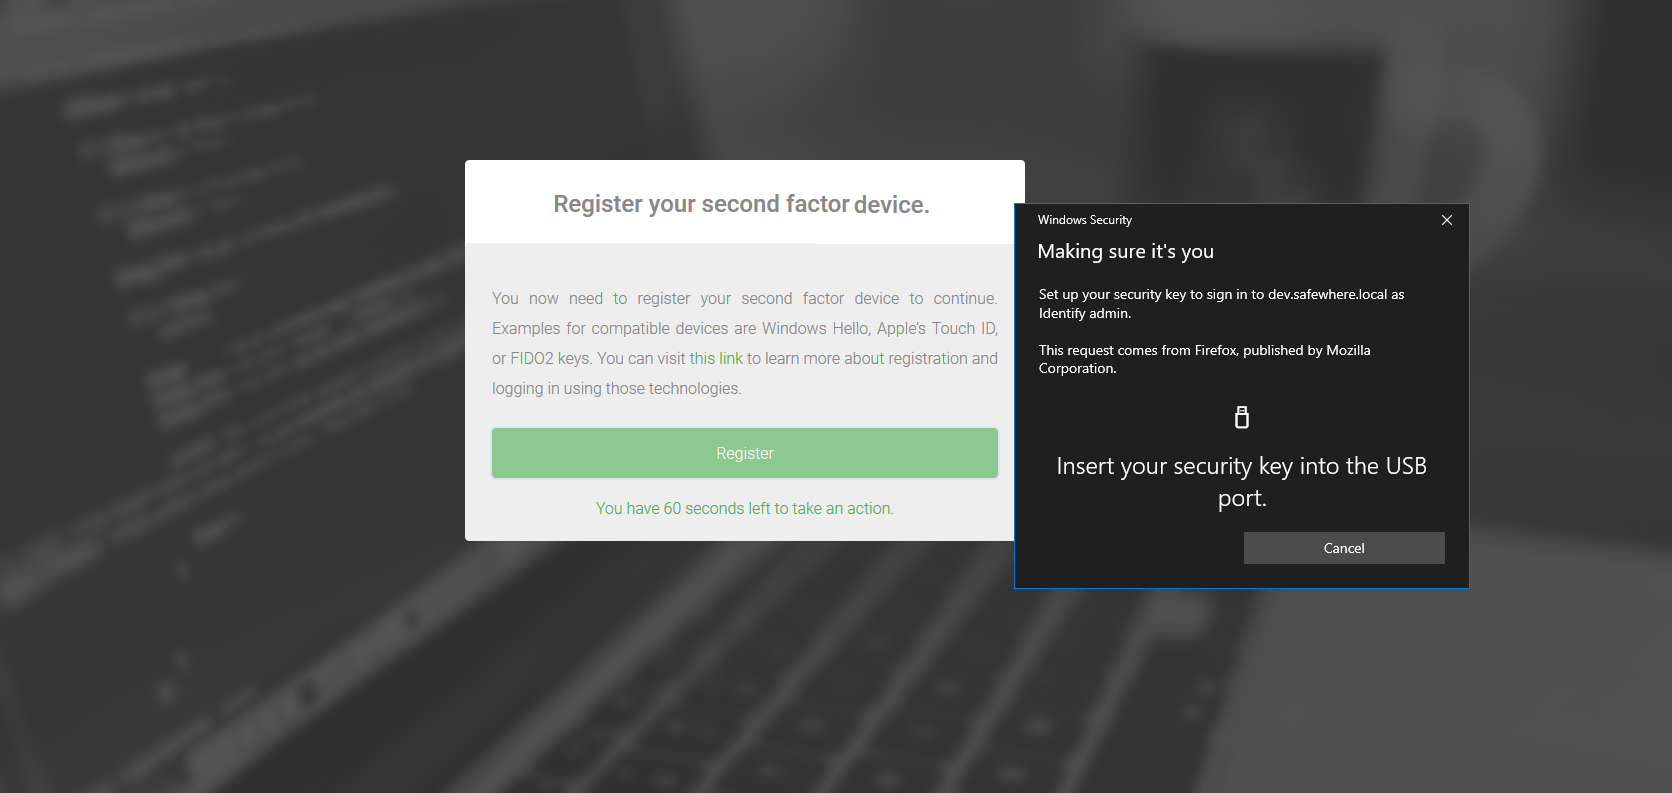
The Register your second factor device form is the final step of both options above. At this form, you need to click on the Register button, and the system prompts you for a previously configured authorization gesture (PIN, biometric, etc.):
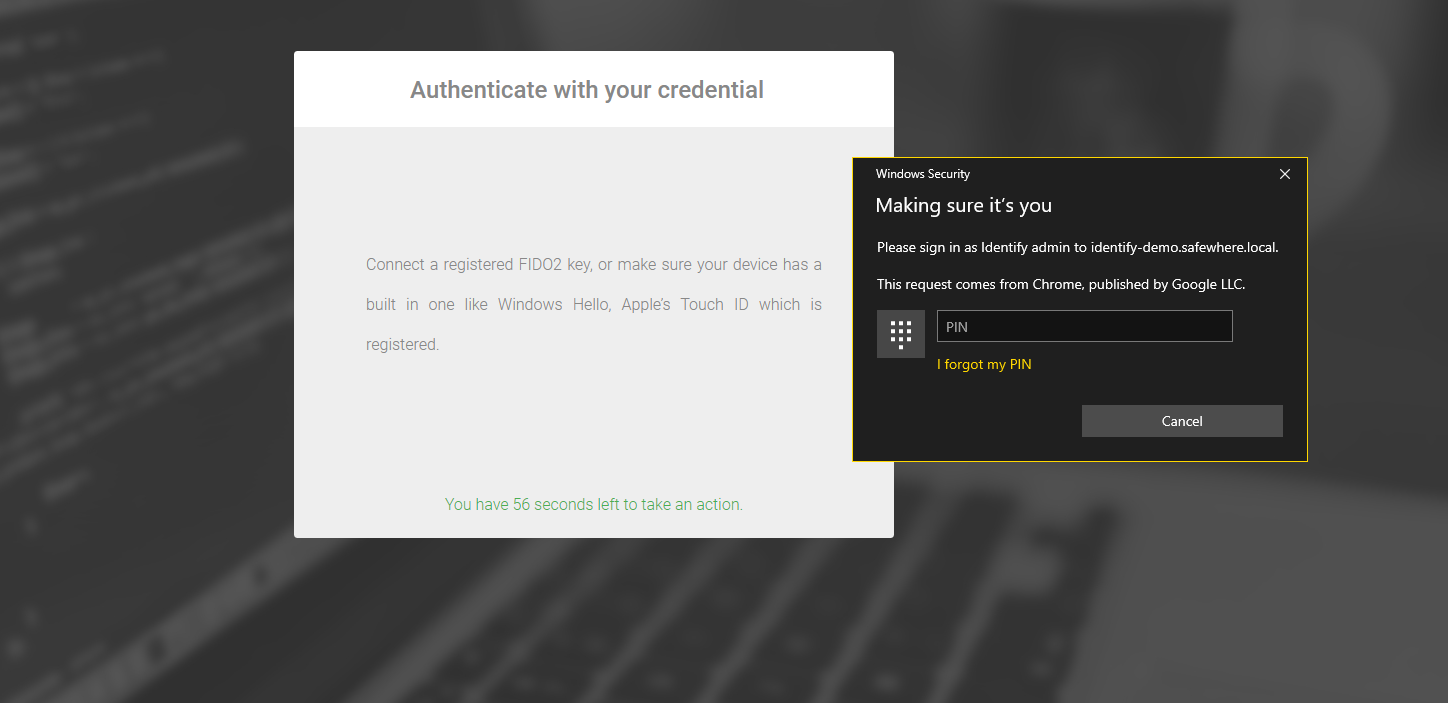
- If the authenticator type is "Platform" and you, for example, have set up Windows Hello's PIN, Identify will show a Windows Hello PIN dialog to ask you for your PIN.

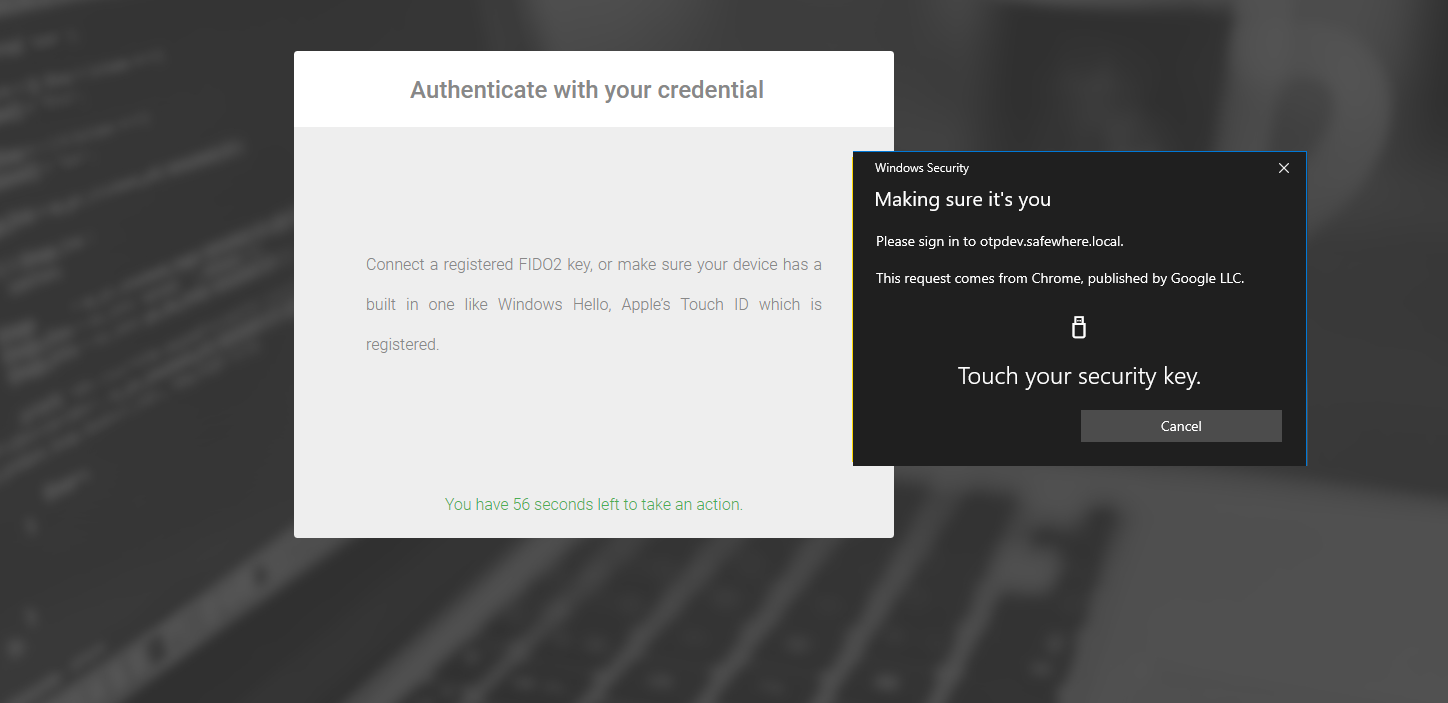
- If the authenticator type is "Cross platform" and you e.g. have a FIDO2-compliant Yubikey, Identify will show a Windows dialog to ask you to insert the key and touch it.
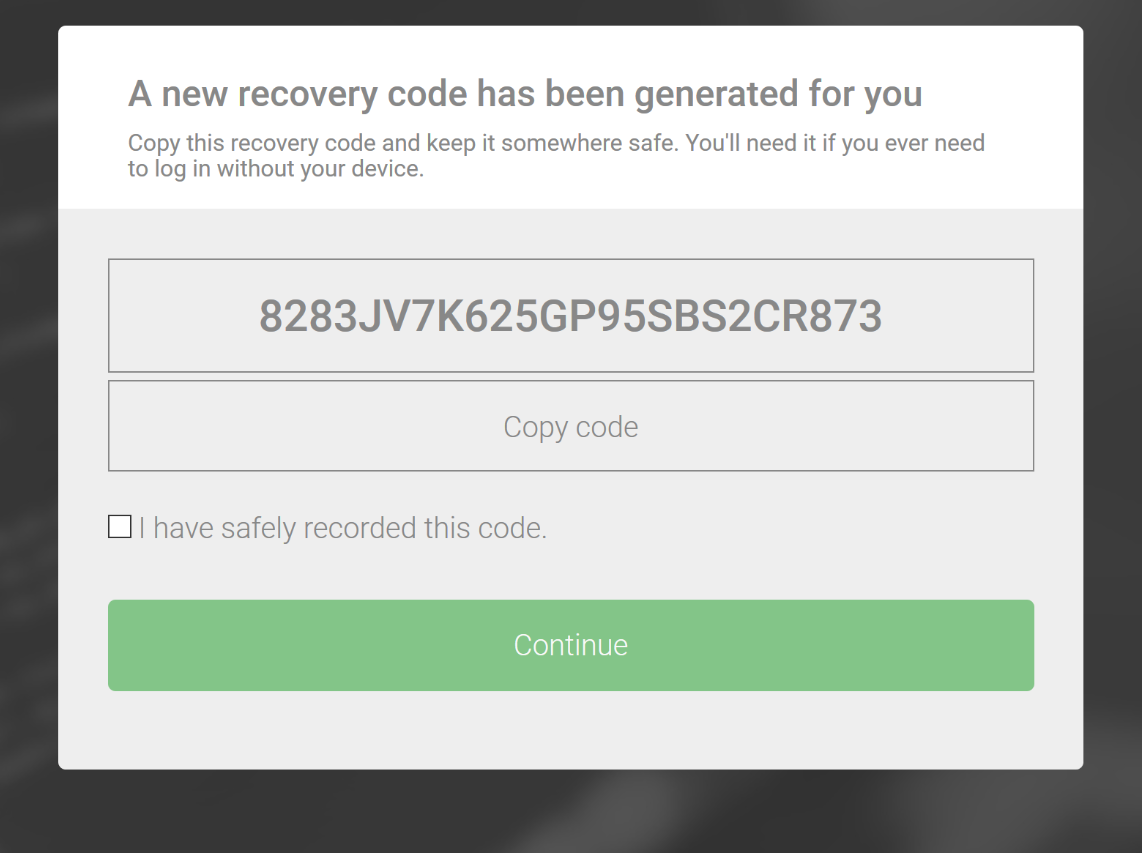
After onboarding succeeds, the system will ask you to save a recovery code as a backup second factor method. You need tick the "I have safely recorded this number" checkbox and click the "Continue" button to finish onboarding.
Authentication
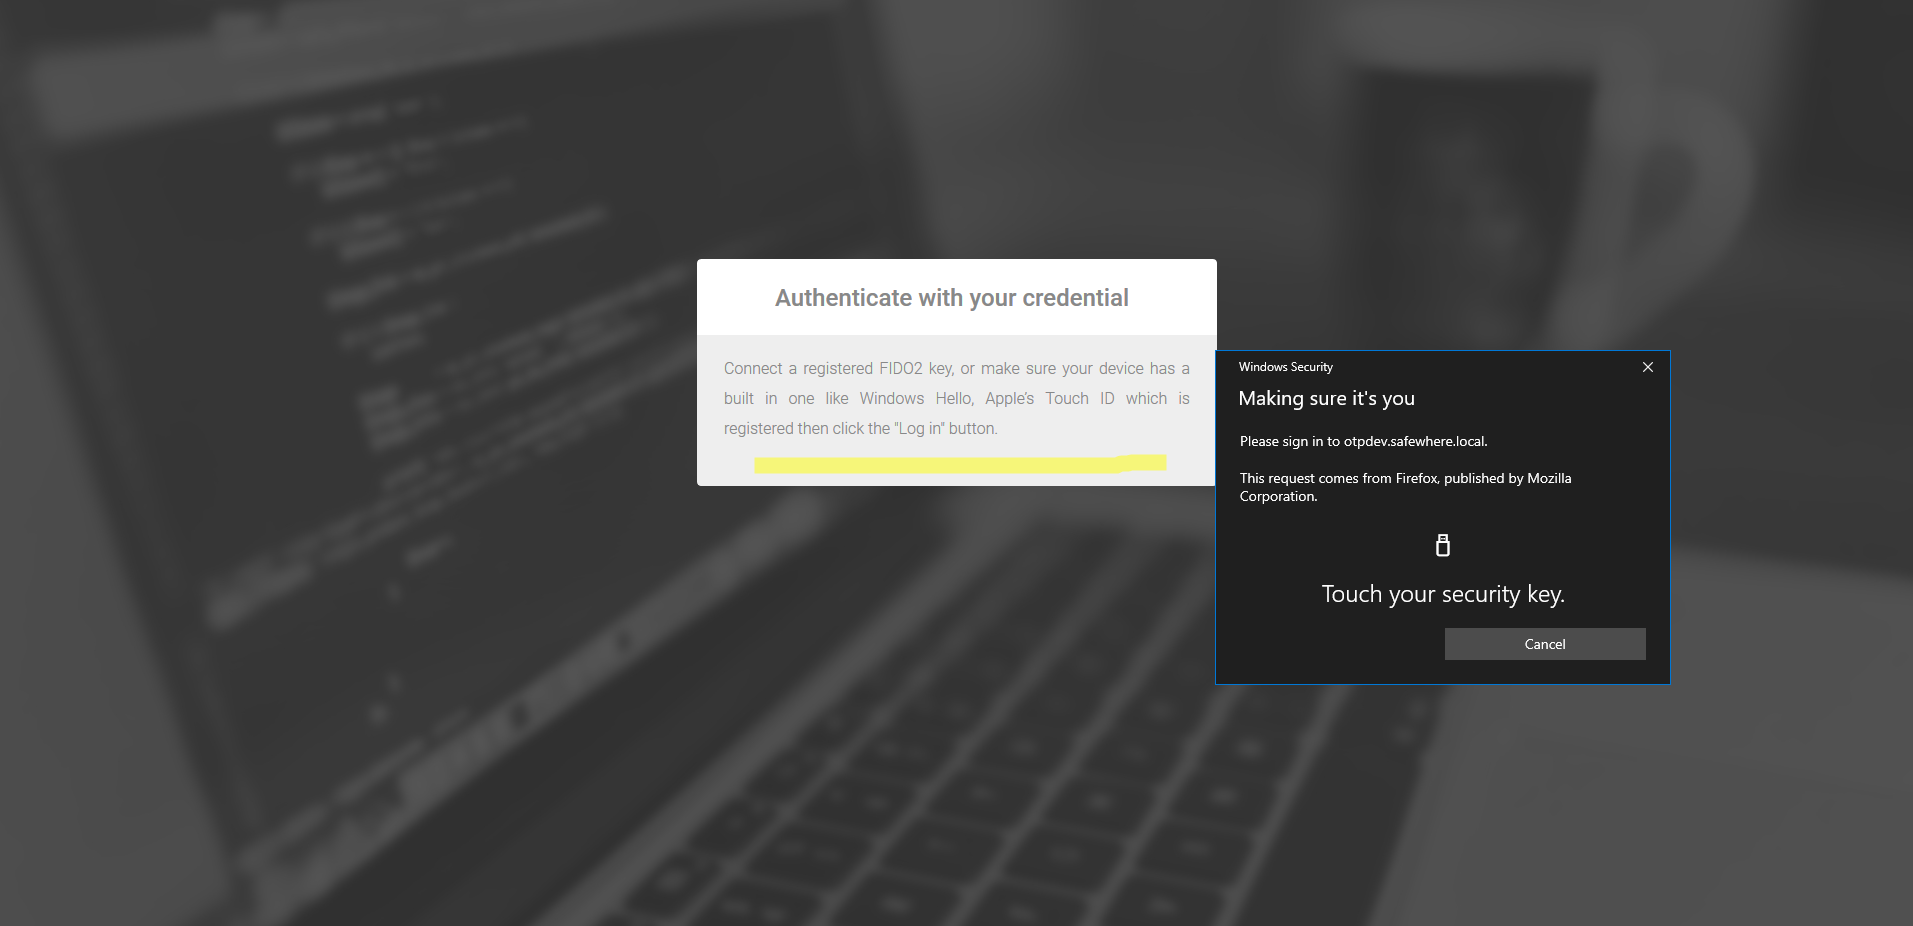
After you have registered your WebAuthn authenticator, the next time you log in, the system will prompt you for an authorization gesture (PIN, biometric, etc.). If you are using Windows Hello PIN, the prompt will be:
If you are using a FIDO2 key, the prompt will be:
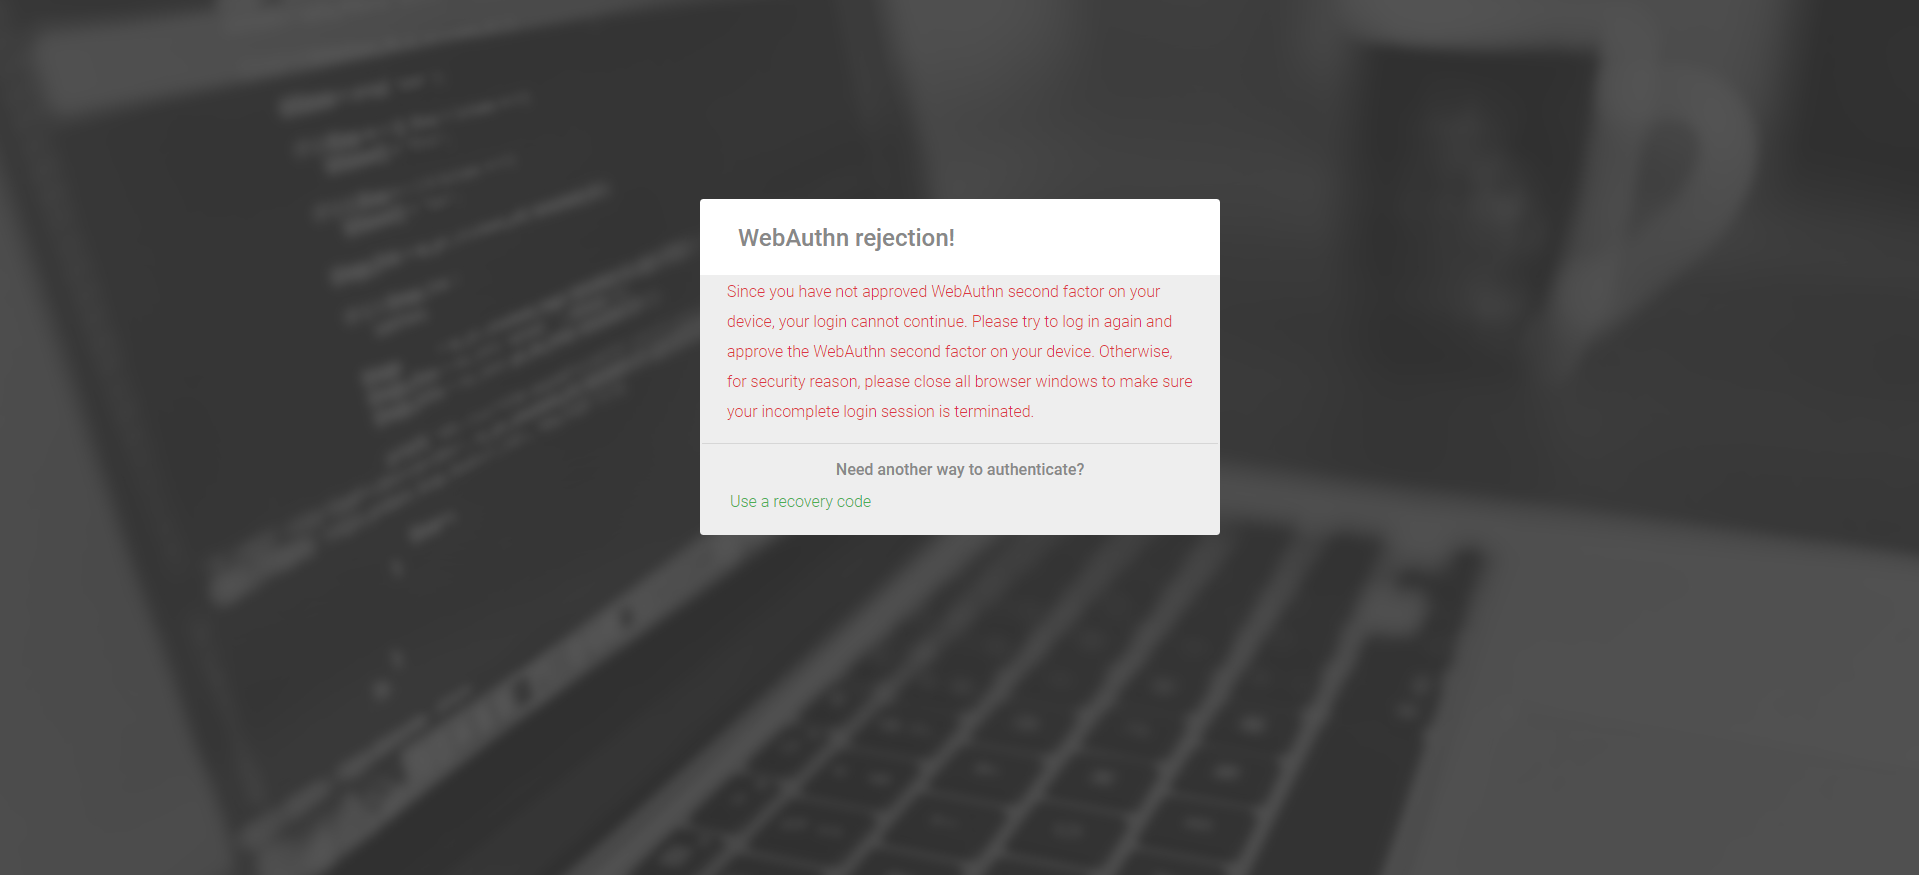
If you are not using or do not have your authenticator devices with you, you can click "Cancel" to use your recovery code instead.
Offboarding
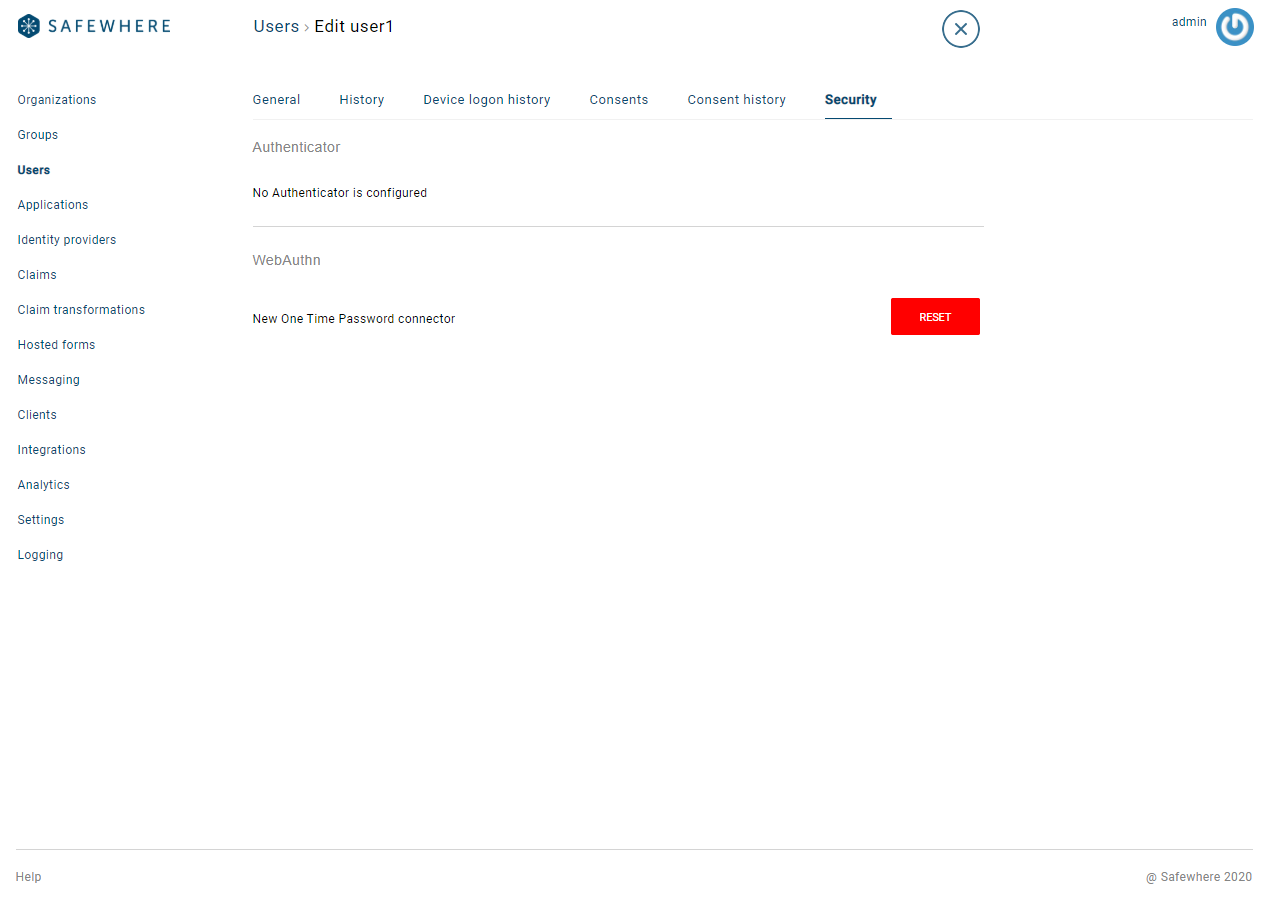
As an administrator, you can navigate to the Security tab on the Admin Portal and reset WebAuthn registrations for your users.
You can also offboard yourself from the My Profile page:
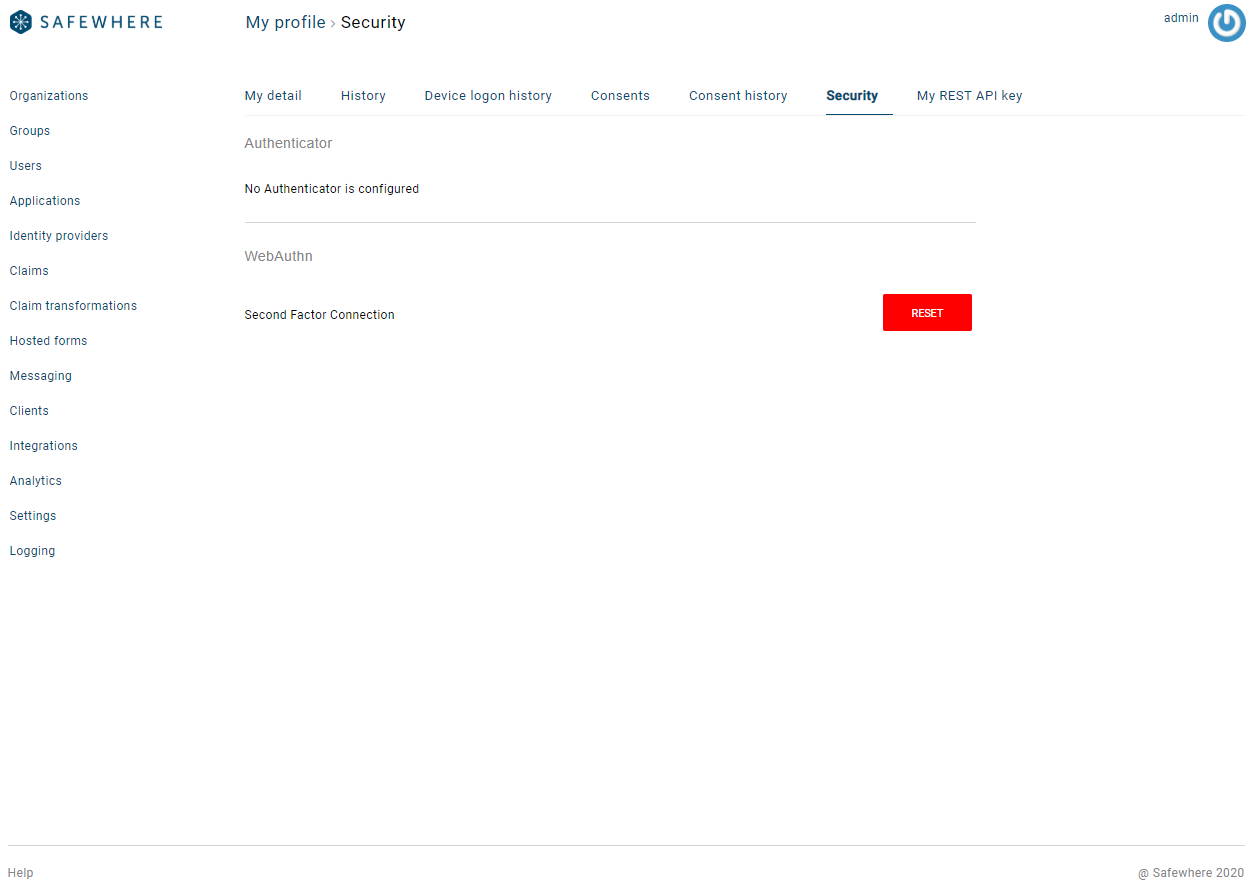
Security settings
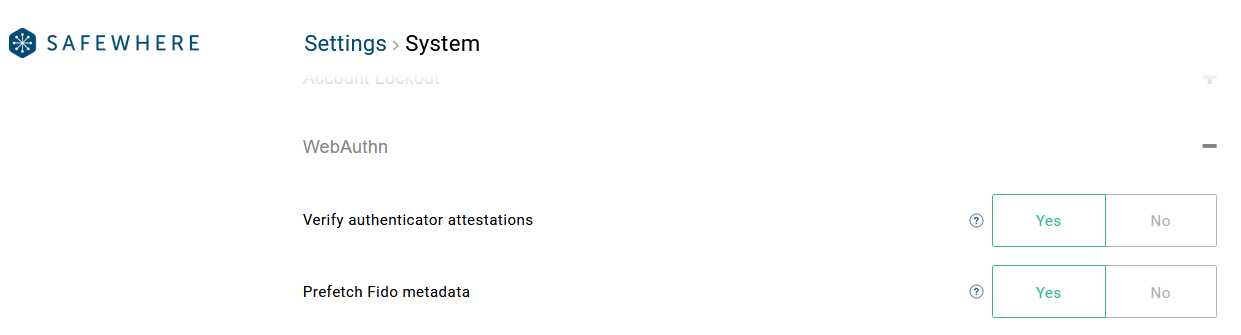
Per the WebAuthn specification, the attestation is how authenticators prove to Safewhere Identify that the keys they generate originate from a genuine device with certified characteristics and establish a hardware root of trust. Identify provides you an ability to configure your instance to collect and validate attestation certificates.
Although performing attestation is good for security purposes, it does come with some drawbacks. As per Yubico's documentation:
If your service does not have specific needs for attestation information, well defined policy for what to do with it and why, you should not verify authenticator attestations. The reasons for this is that it takes more work for the RP to do, your users may not be able to use the authenticator(s) they have, and you risk being incompatible with future authenticators unless you keep your attestation certificate store up to date.
Therefore, verifying authenticator attestations is disabled by default in Identify. When this setting is true, Identify verifies authenticator attestations against Fido Metadata to enhance security.
The validation process needs to download metadata from external locations. To improve verification time, Identify provides you another setting to prefetch and cache metadata from the Fido Metadata services at startup time as well as after every 24 hours. You should only enable it for instances that need to use WebAuthn since prefetching data does cause overhead to your server.
Attestation limitations
As described in the 13.4.4. section, an attestation statement provides no means for a Relying Party to verify that an attestation object was generated by the authenticator the user intended, and not by a man-in-the-middle attacker. For example, such an attacker could use malicious code injected into Relying Party script. The Relying Party must therefore rely on other means, e.g., TLS and related technologies, to protect the attestation object from man-in-the-middle attacks.
The specification suggests that Attestation types other than Self Attestation and None can increase the difficulty of such attacks, since Relying Parties can possibly display authenticator information, e.g., model designation, to the user. An attacker might therefore need to use a genuine authenticator of the same model as the user’s authenticator, or the user might notice that the Relying Party reports a different authenticator model than the user expects.
Set up WebAuthn as a first factor login
Configuration
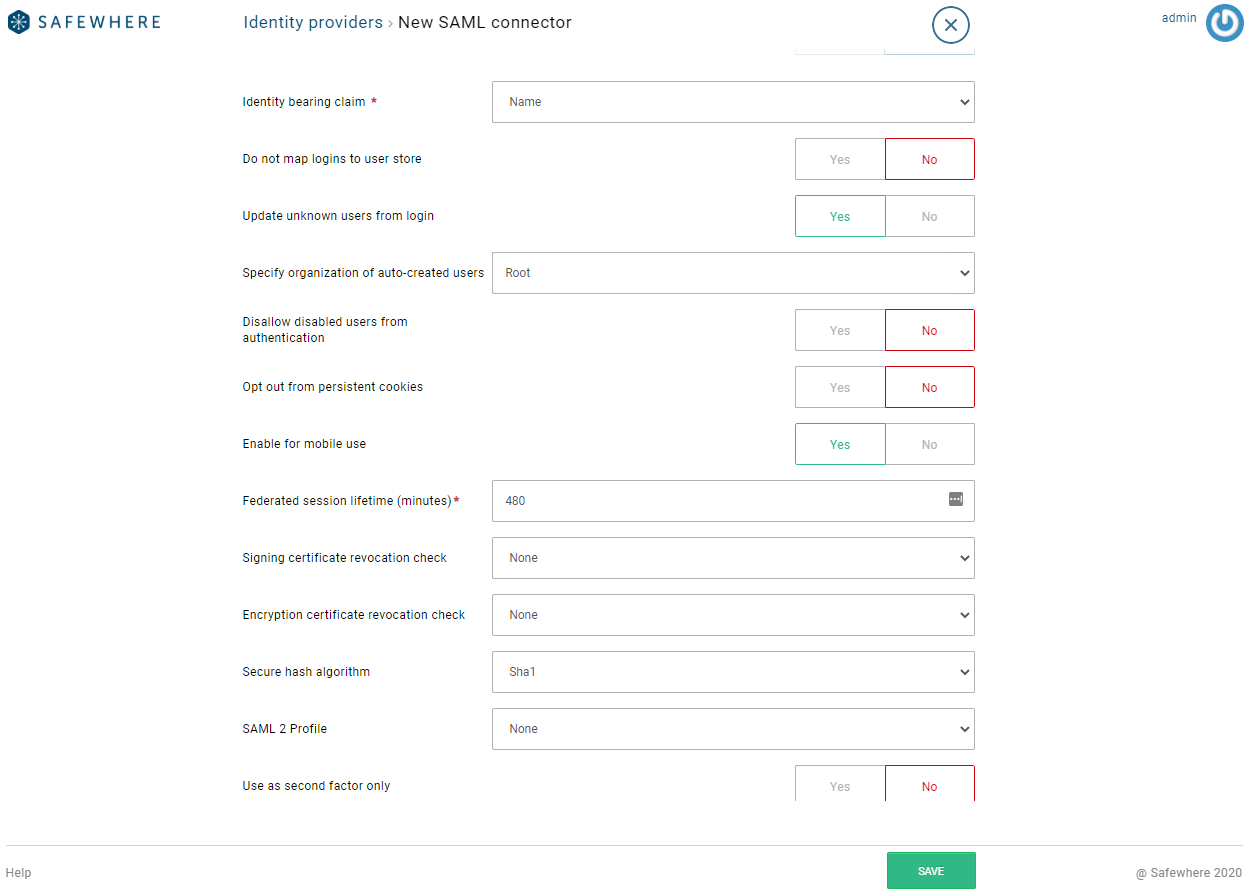
To use WebAuthn as the first factor, you need to create an OTP connection and select WebAuthn as the only Second factor method(s). After that, the option Use as second factor only will show up.
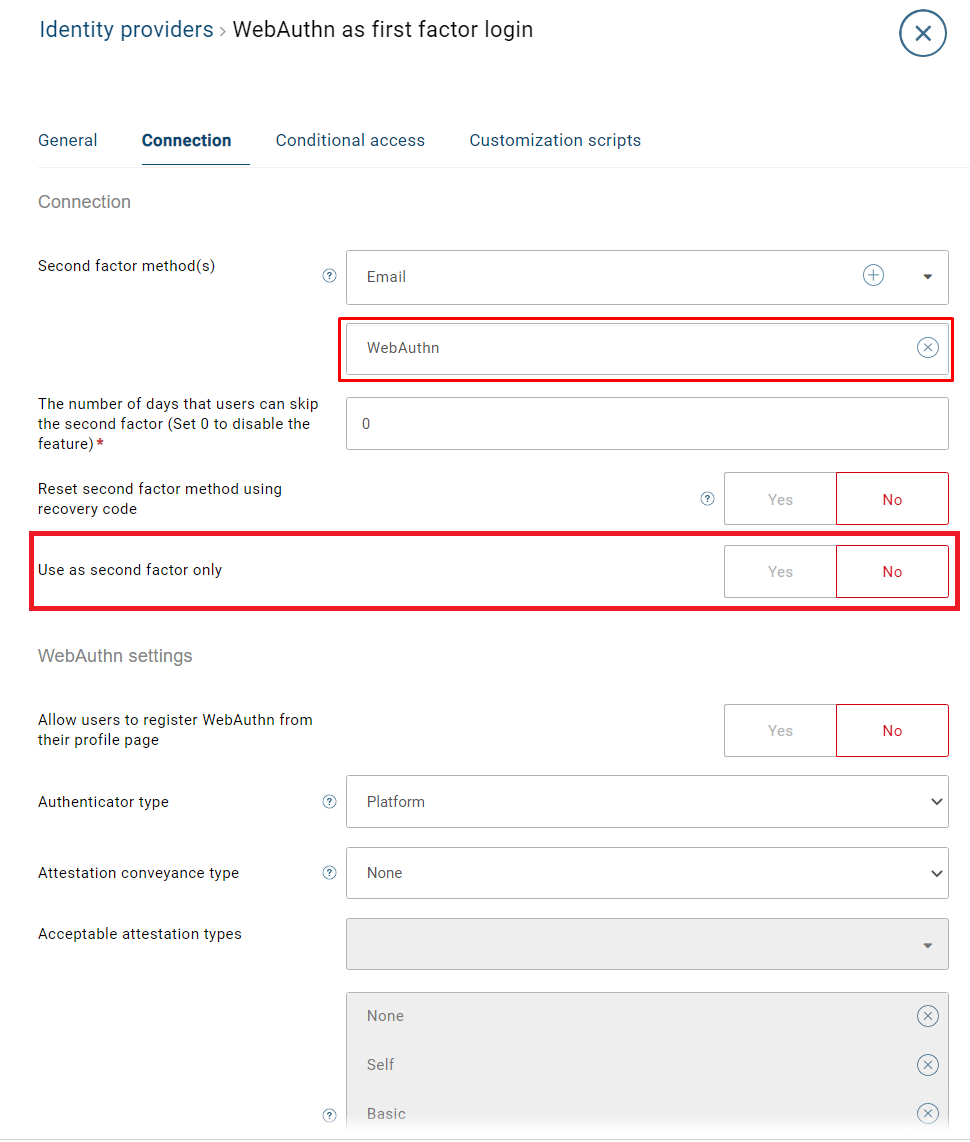
When the Use as second factor only is set to No, the Identity bearing claim will show up. You need to select a bearing claim type for it.
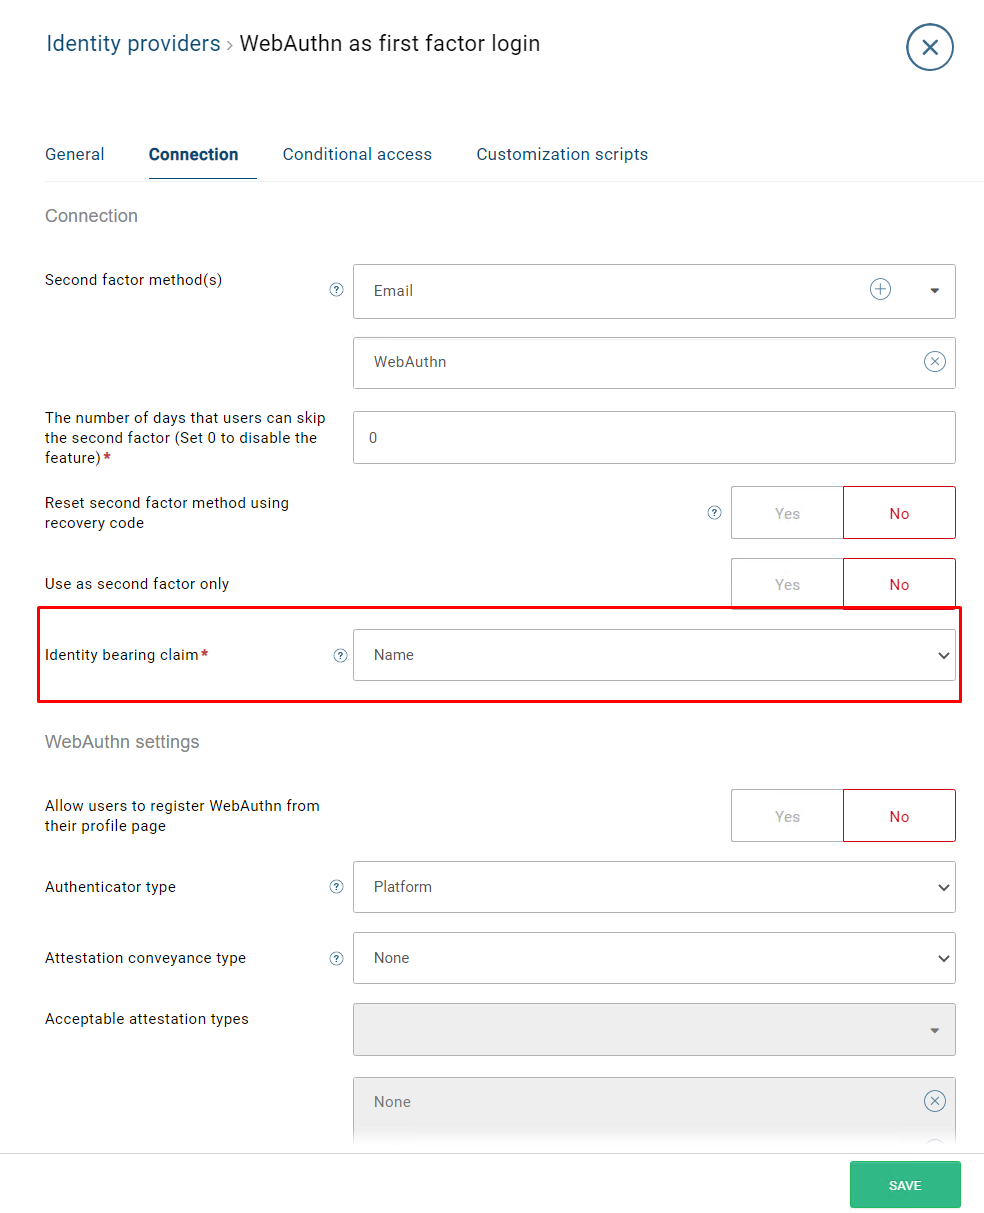
Save your changes.
Register a WebAuthn authenticator to use as the first factor login
Before being able to log in using WebAuthn, you need to register a WebAuthn authenticator first. A secure way to do that is to use our new IdentifyMe product.
Log in using a WebAuthn authenticator as the first factor
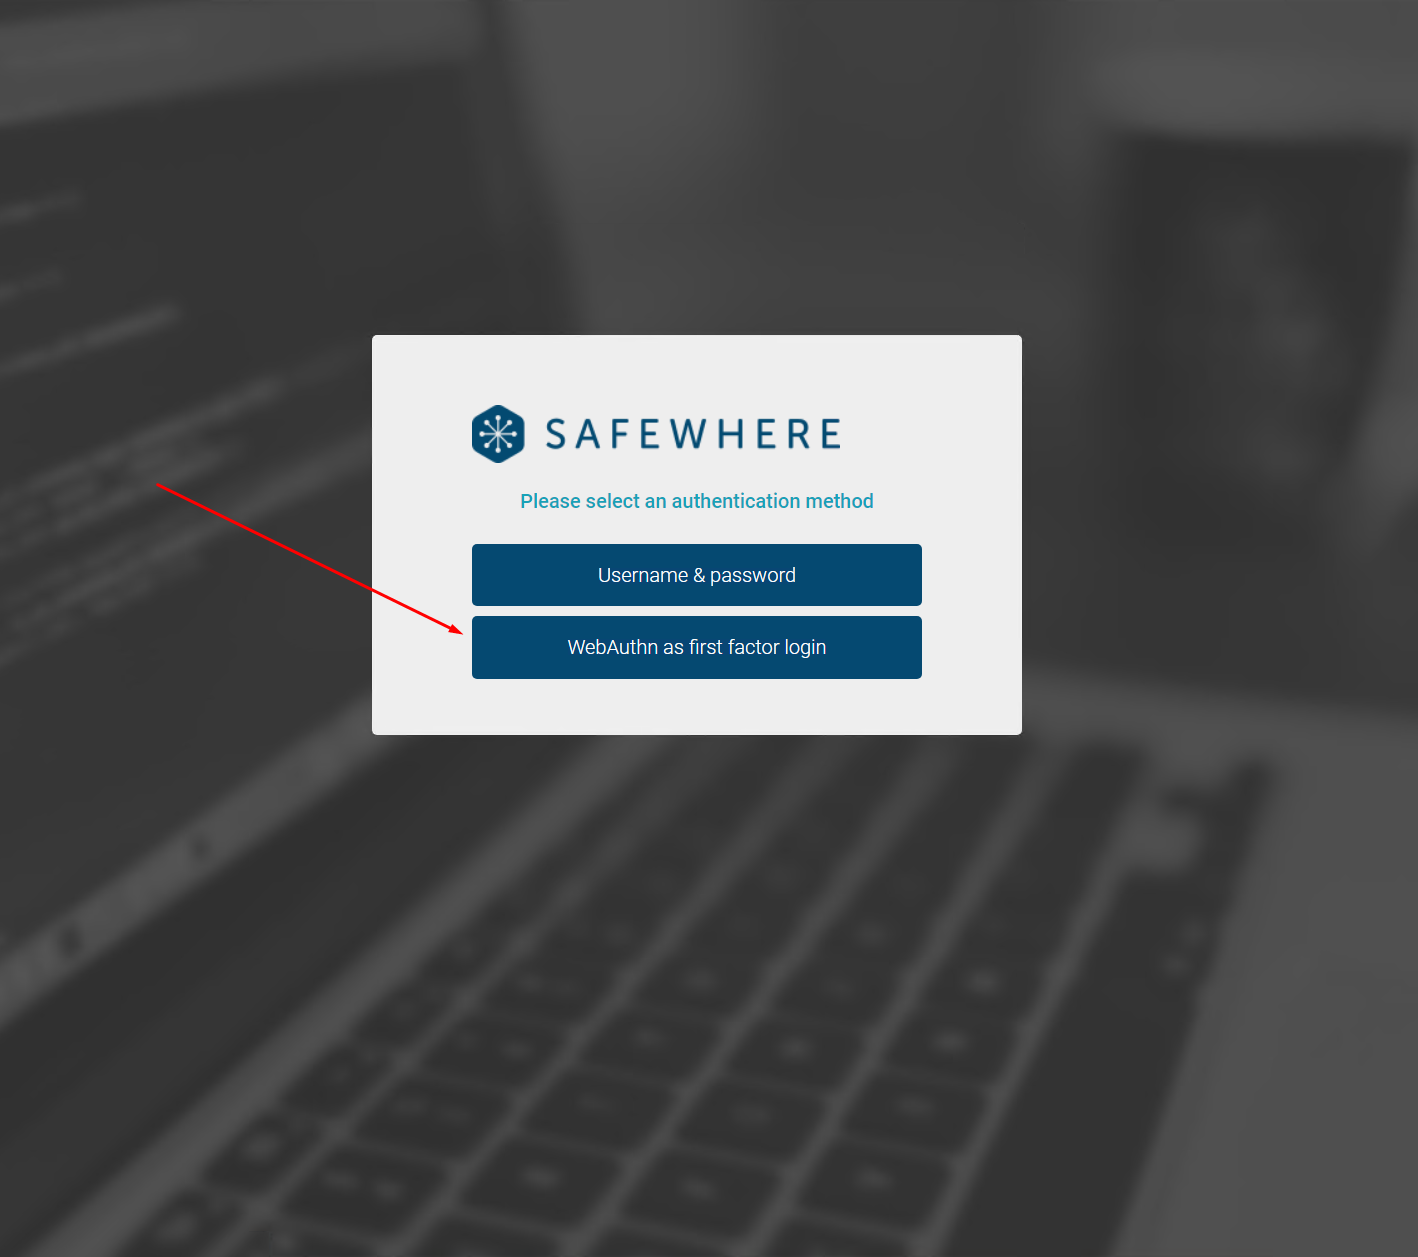
On the authentication selector page, you can select the OTP authentication connection which is configured above.
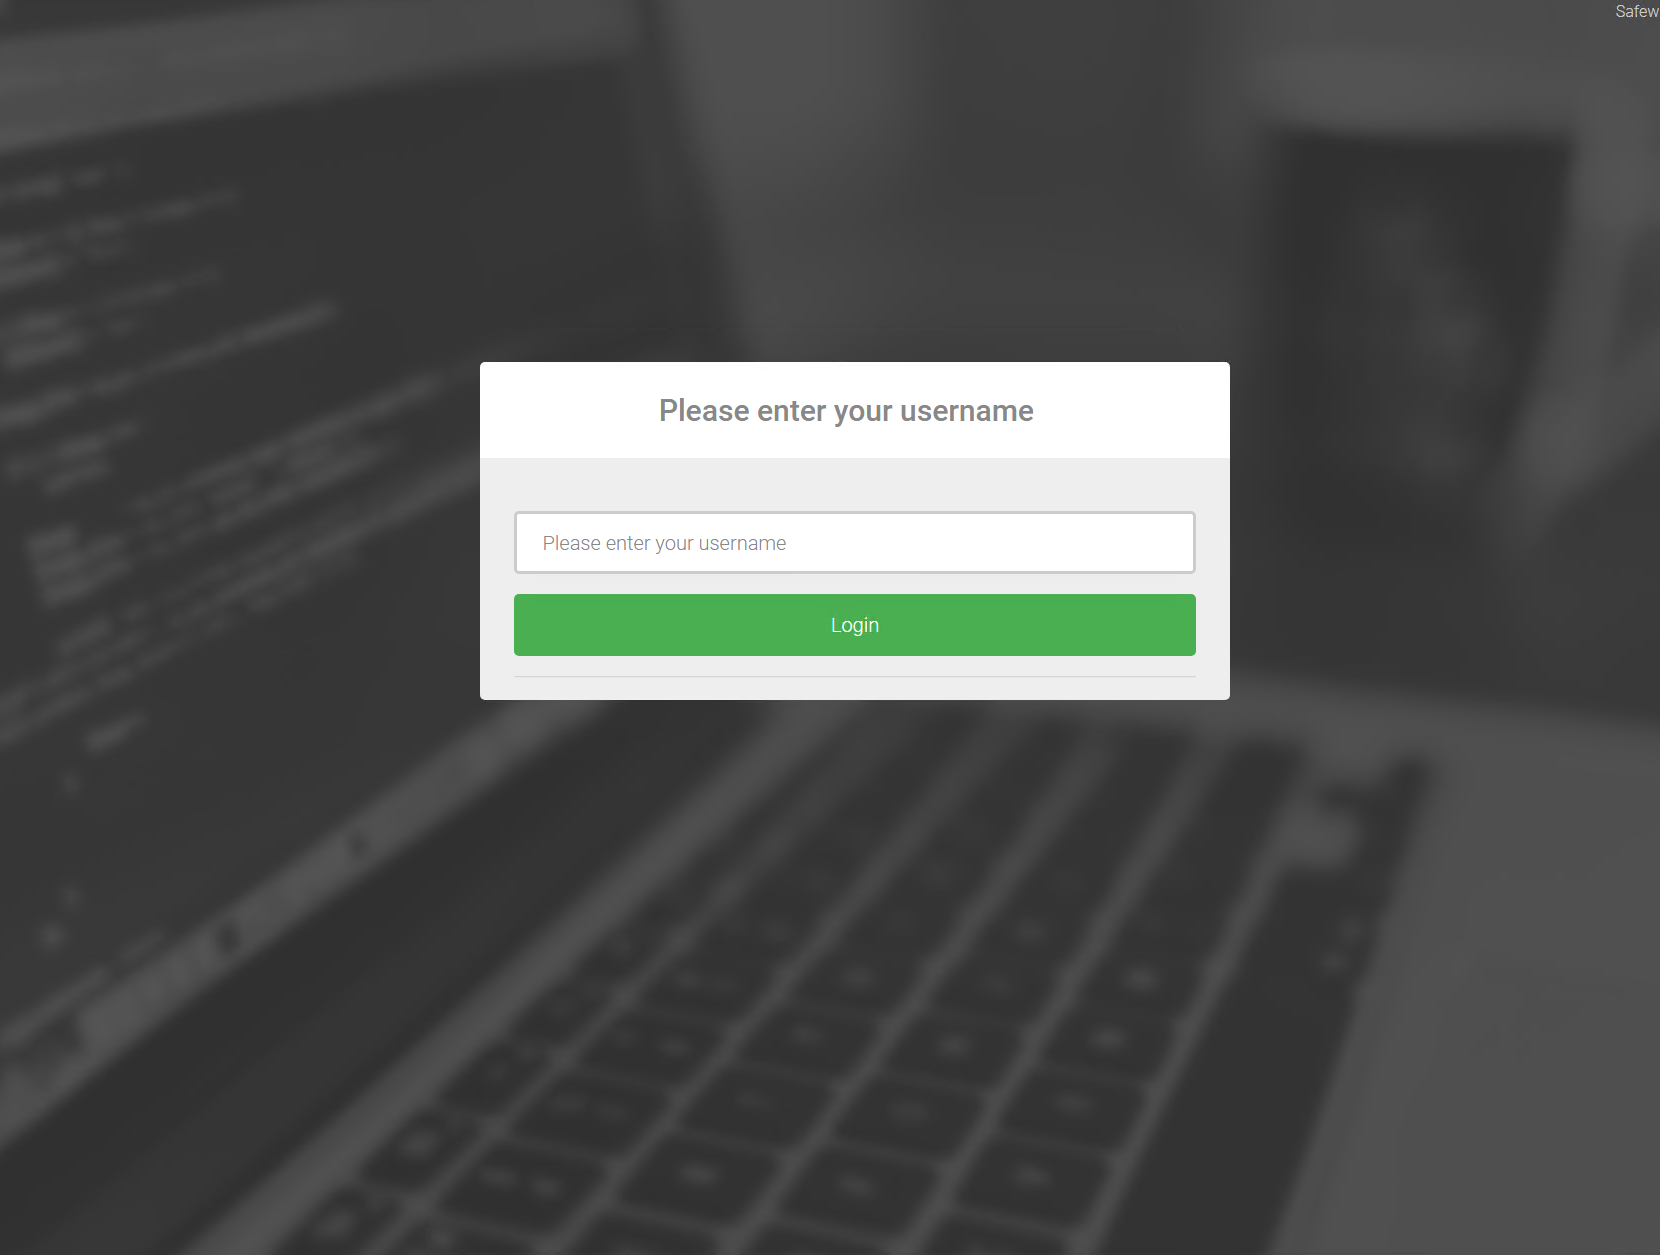
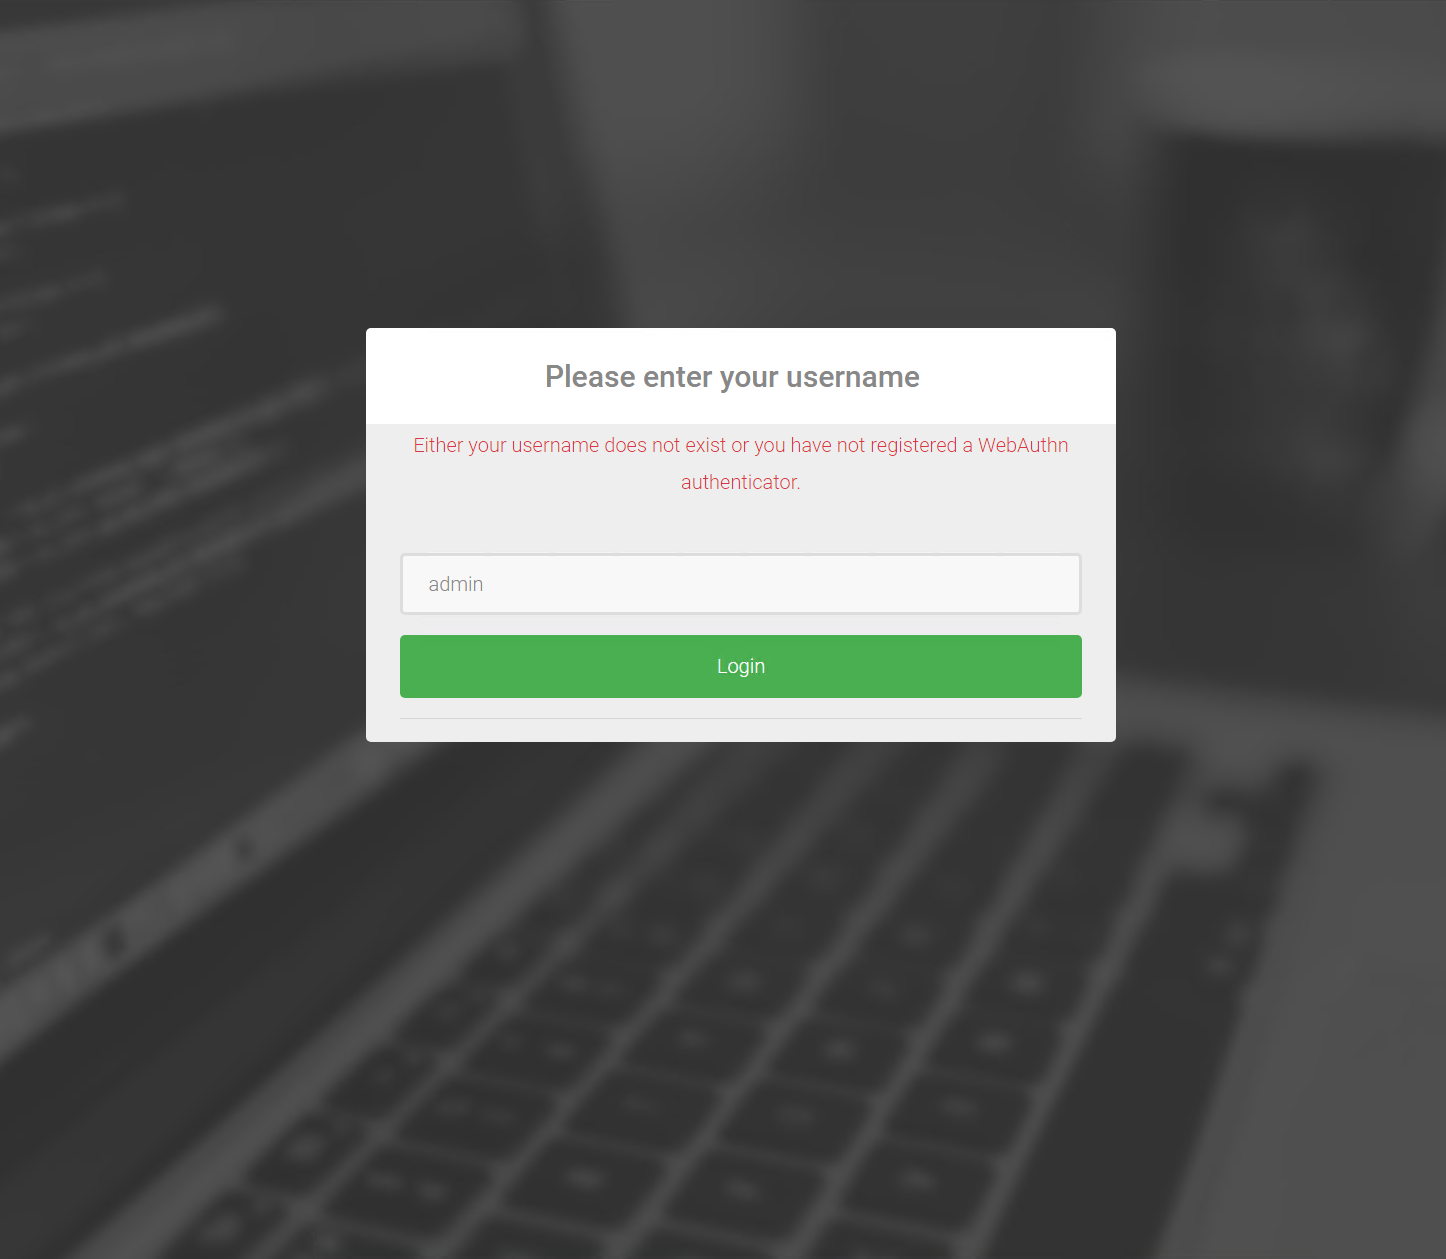
Enter your username. For example, if you use the default Name claim as the Identity bearing claim, you can enter the same username that you use to log in with the Username & password connection.
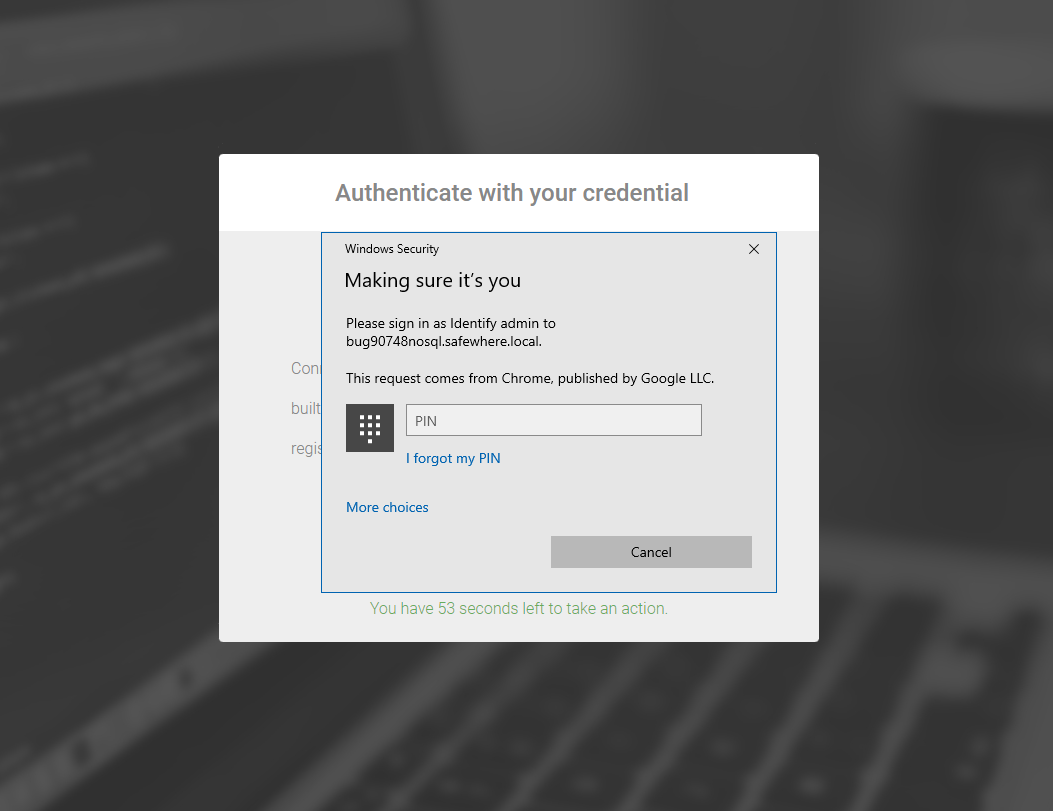
If your username exist, the system will prompt you for an authorization gesture (PIN, biometric, etc.). For example, if you are using Windows Hello PIN, the prompt will be:
If your username does not exist or you have not registered a WebAuthn authenticator, the error message below will show up:
Hosted forms
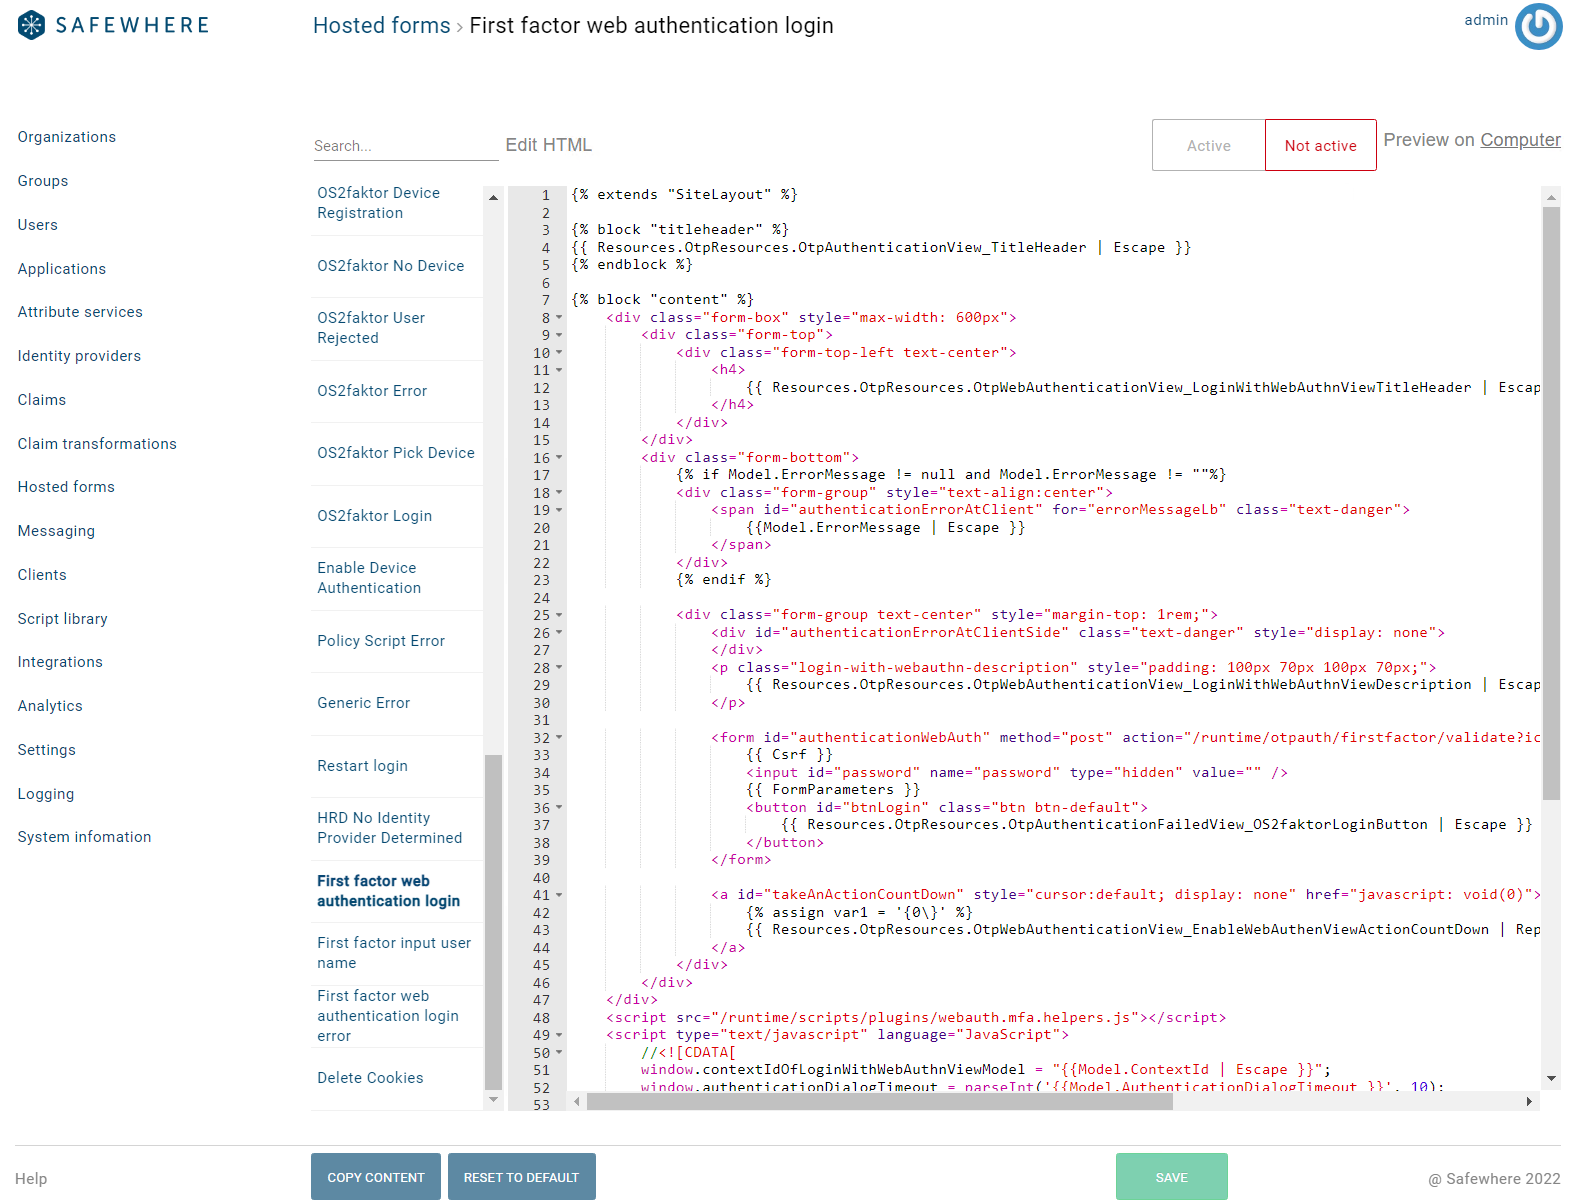
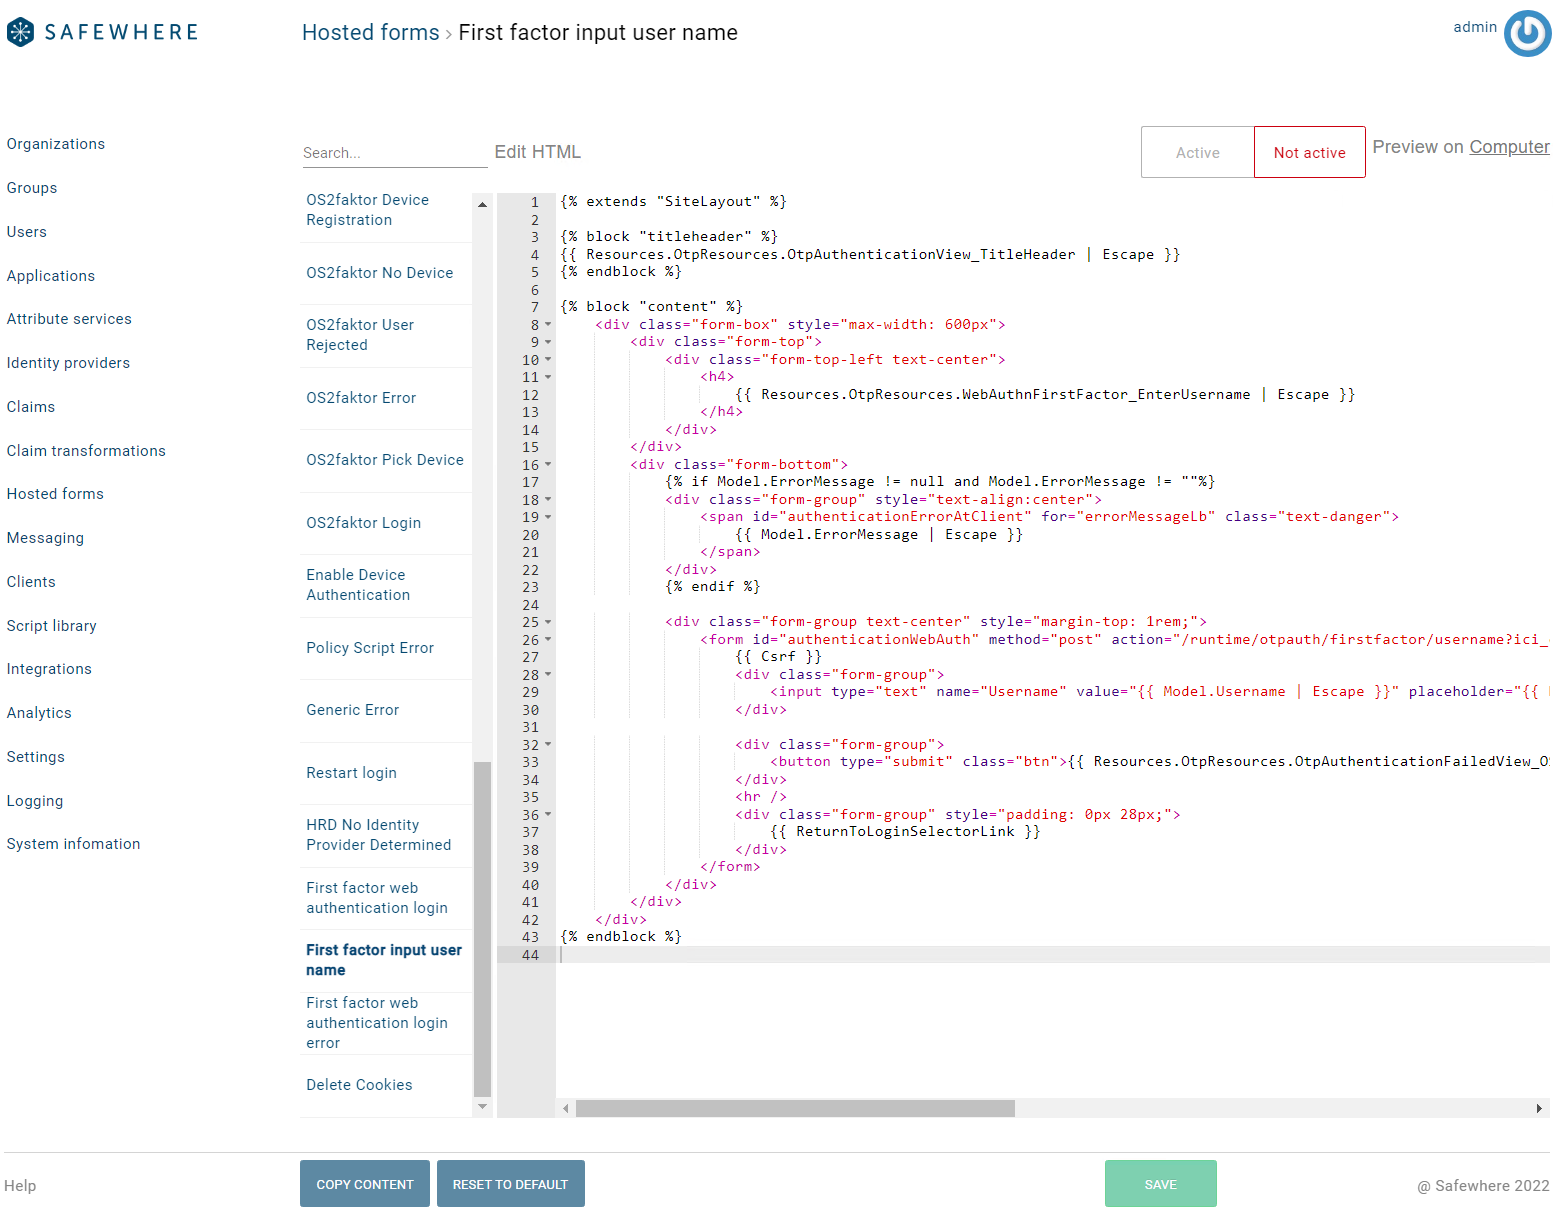
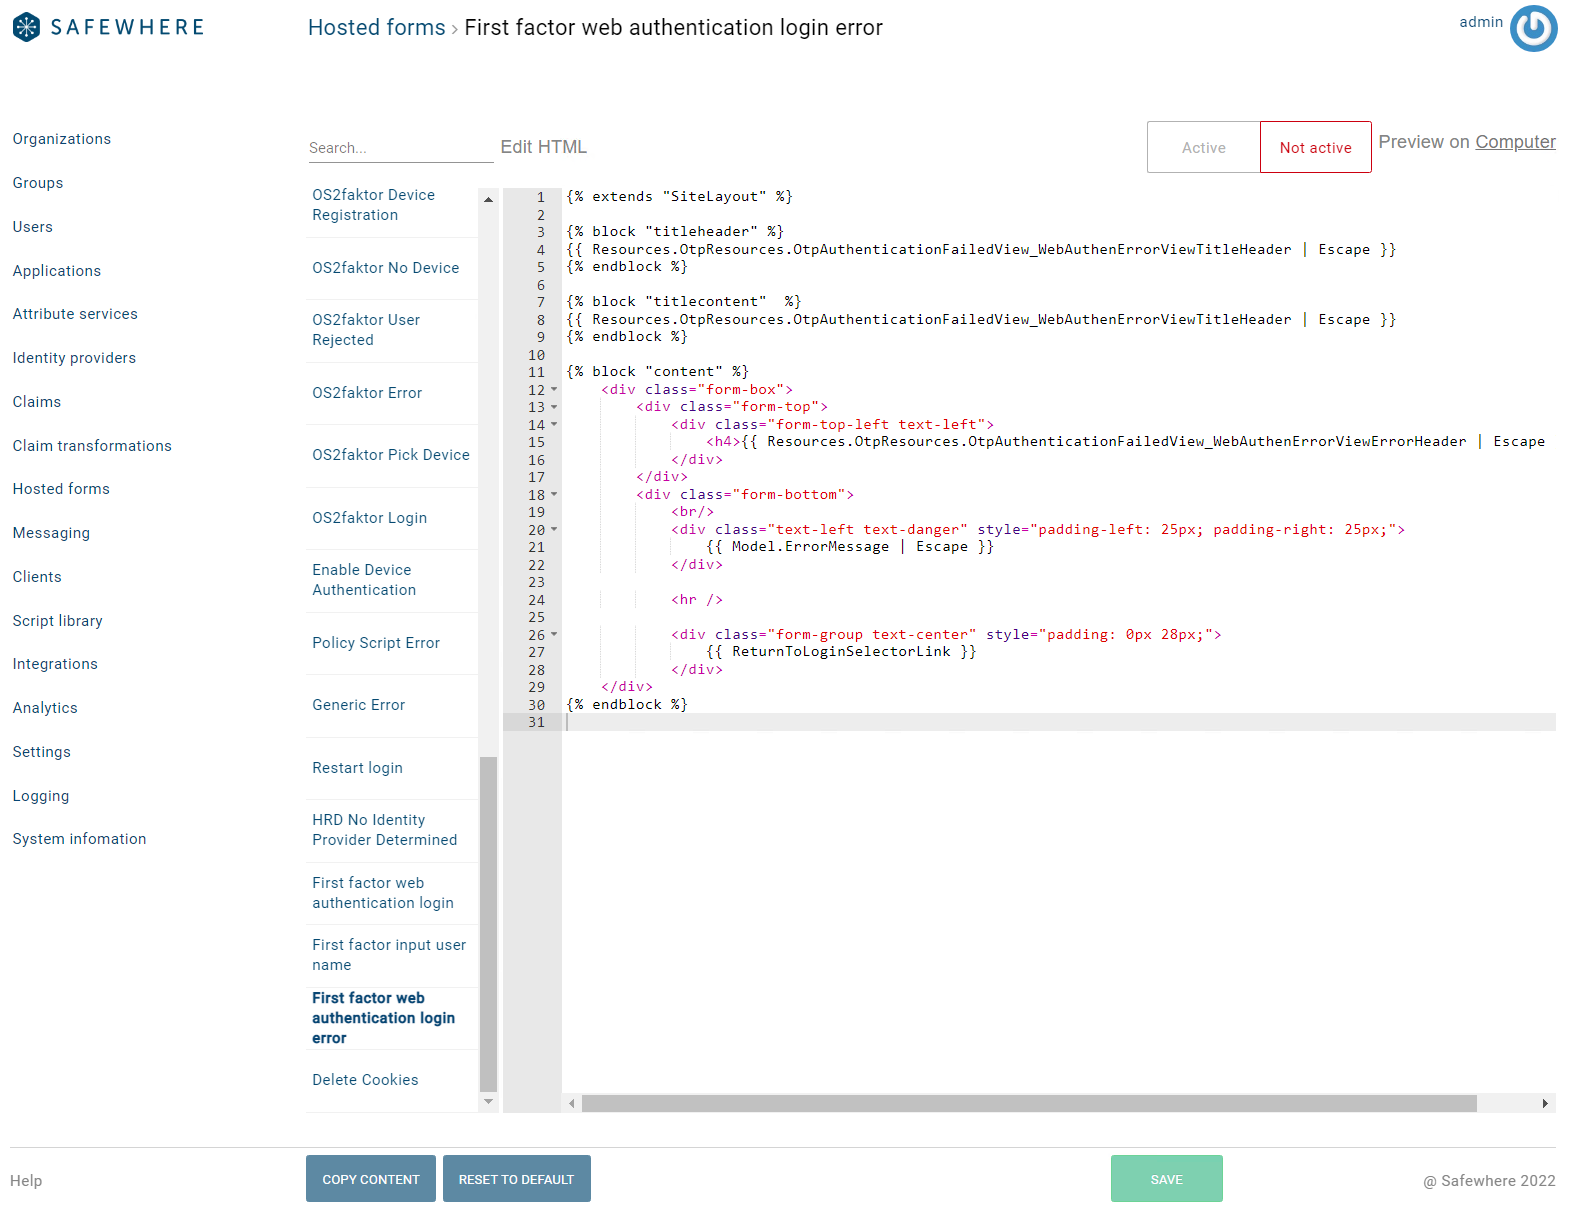
Identify supports hosted forms for all the WebAuthn views. You can find, enable, and customize these views from the Admin portal:
- Onboarding WebAuthn view
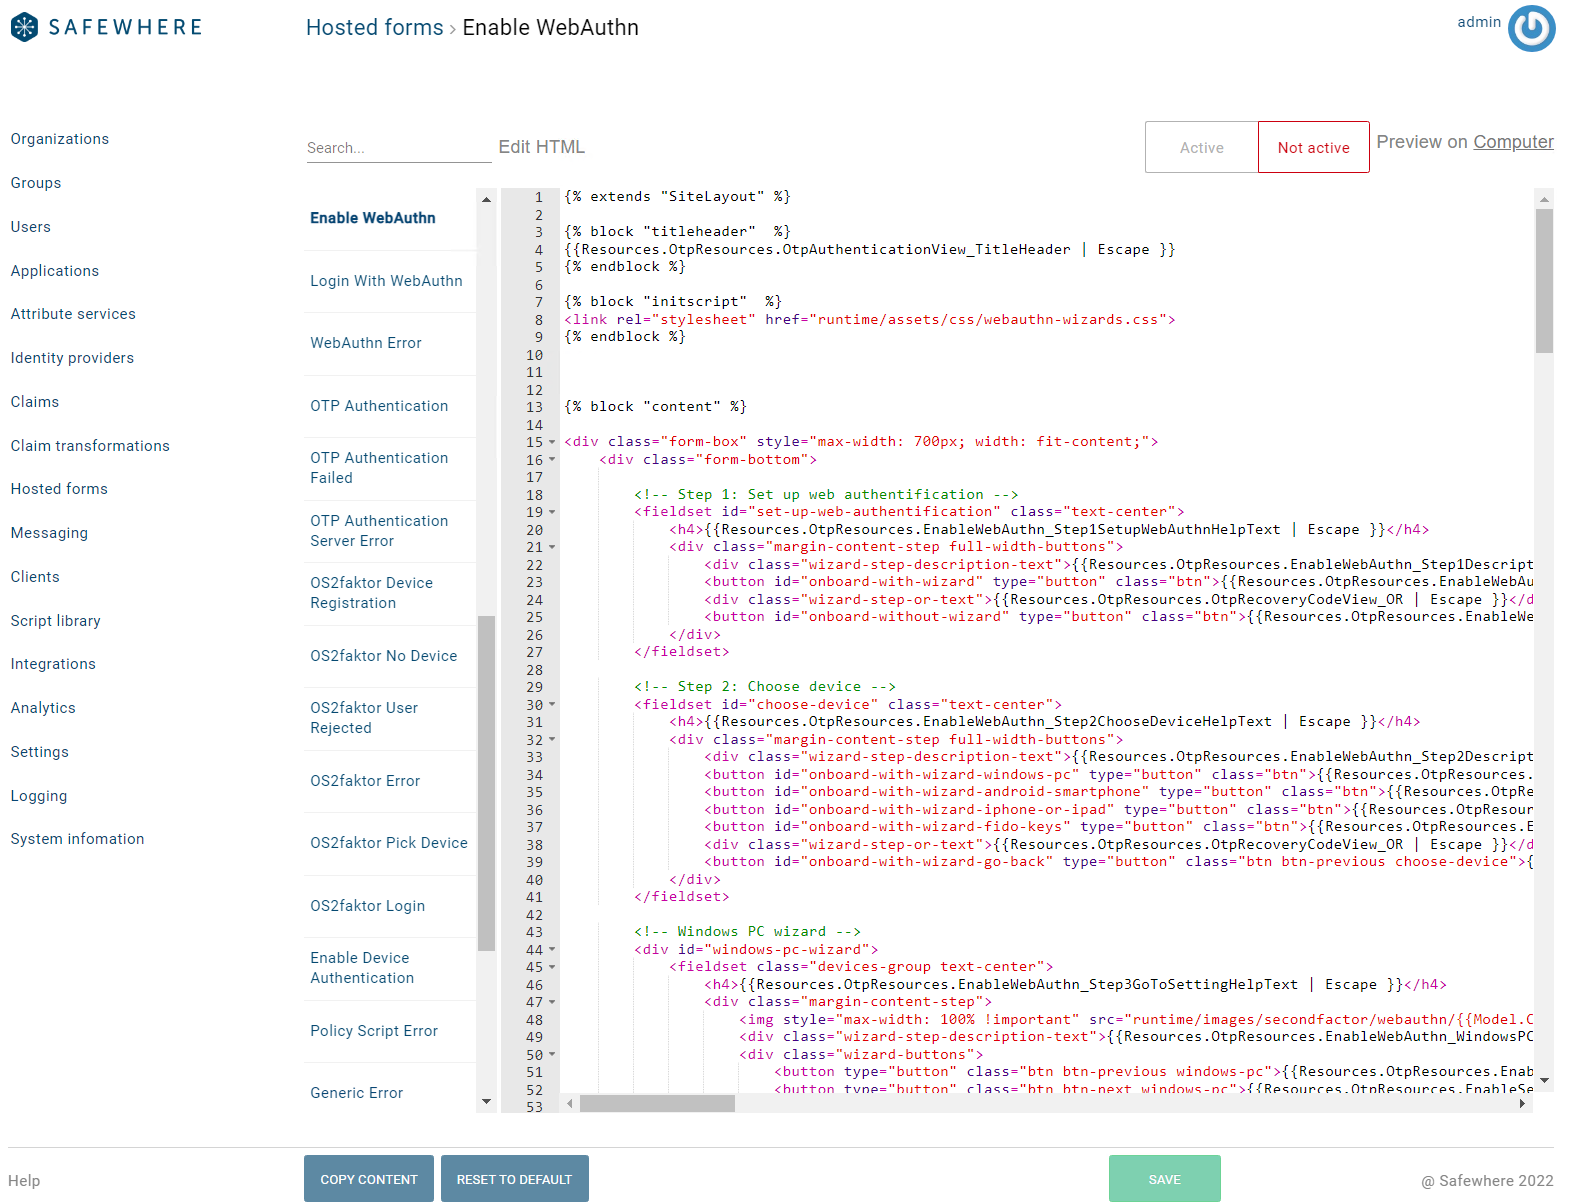
- Authentication WebAuthn view
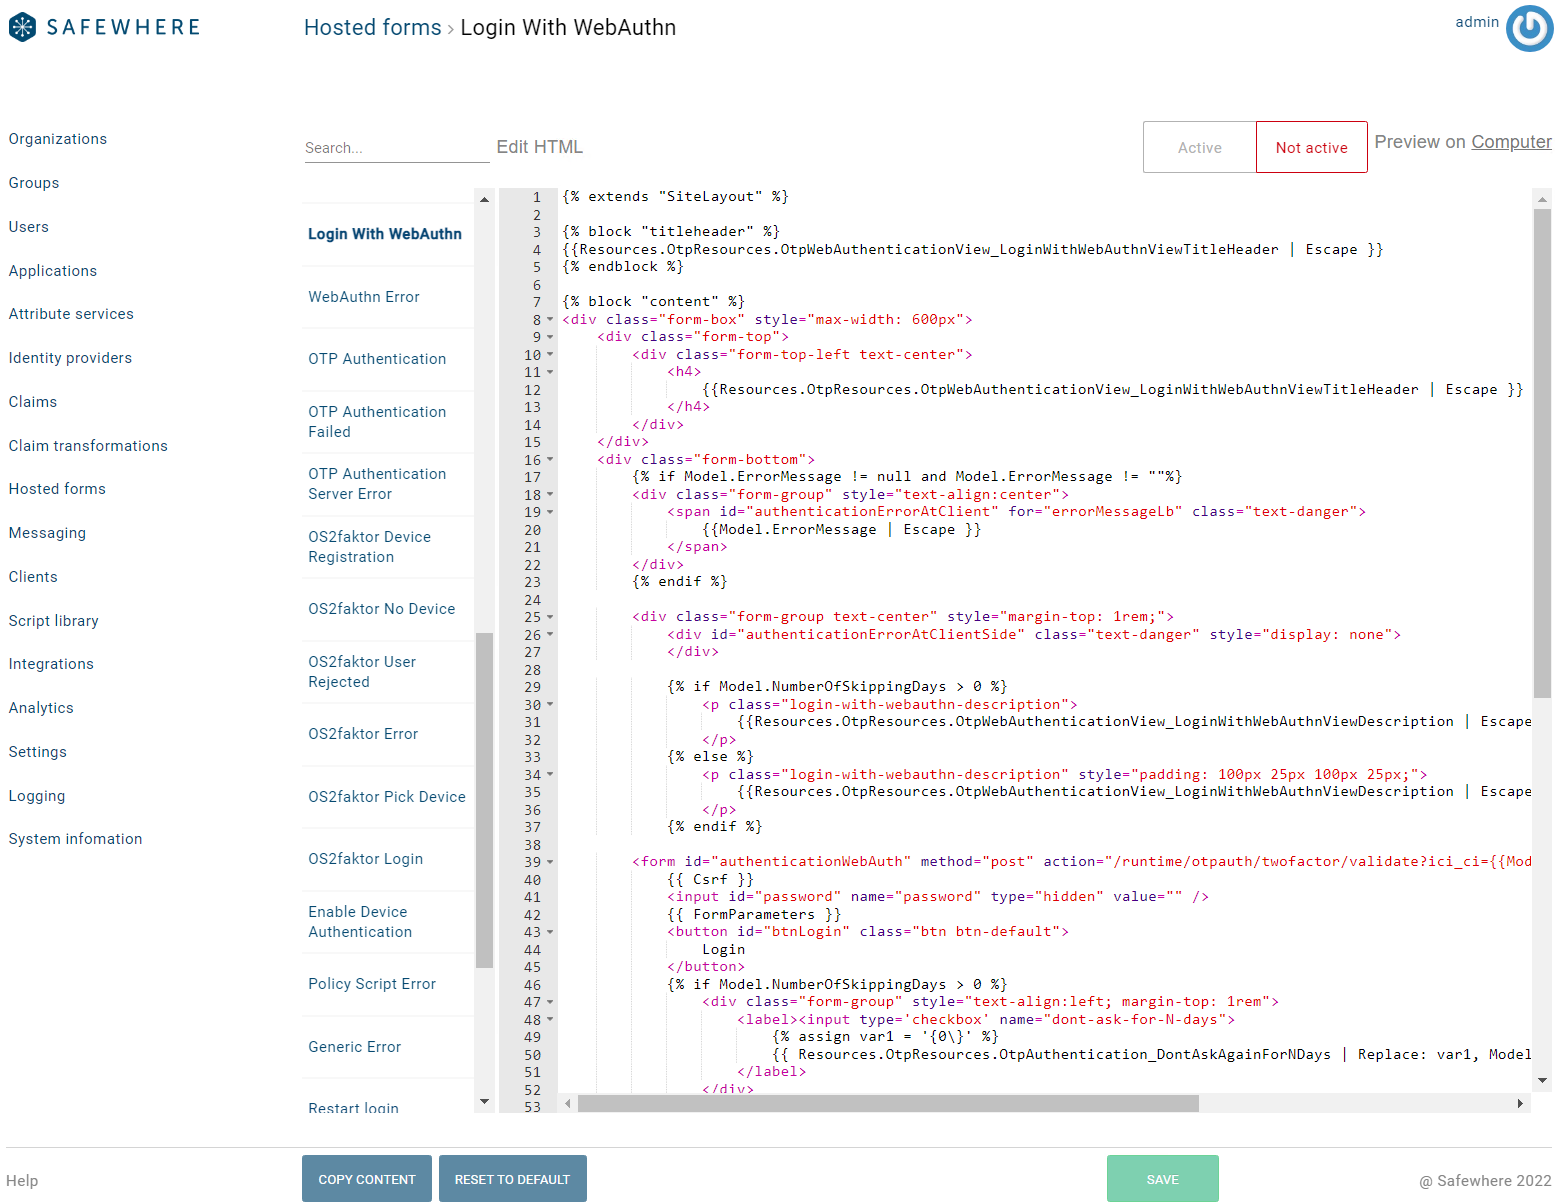
- WebAuthn common errors view
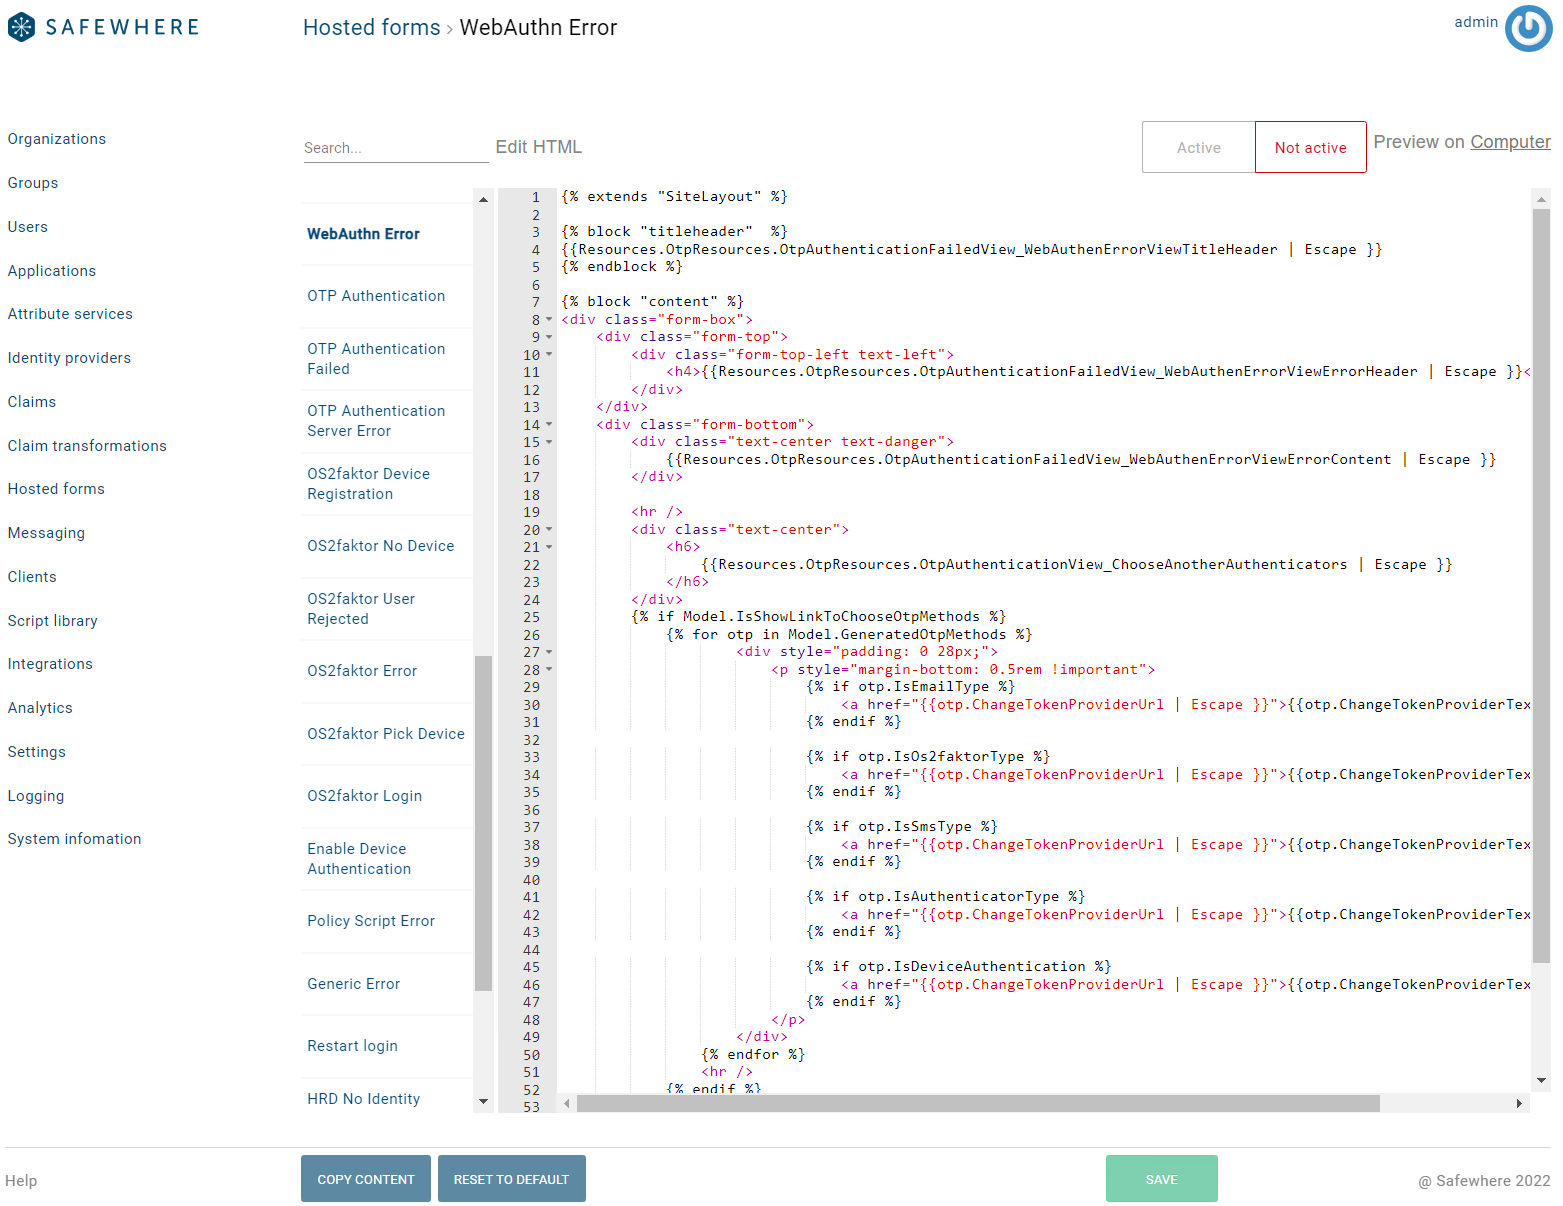
- First factor web authentication login
- First factor input user name
- First factor web authentication login error
Please take a look at Customize hosted forms for Authenticator wizards to get an idea of how to customize a step, add a new step, and how to add a new image for a step.
Known issues
Currently, only three main browsers support Web Authentication:
- Chrome
- Firefox
- Edge Chromium (although the old Edge browser has support for WebAuthn to some extent, it no longer receives updates)
As a side note, Safari 14 will have full support for WebAuthn as well. To see a full list, visit this website.
WebAuthn is still in its early stage of adoption, so there are still known issues. Below is a list of known issues that you should check out before rolling out WebAuthn to your users:
Countdown is not shown while Identify is prompting users for gestures.
Browser: Firefox browser on Windows 10
Description: The countdown message (which is highlighted in the image below) does not count down and the prompt shows until you finish interacting with your WebAuthn authenticator or cancel.
You cannot onboard platform authenticators in incognito or InPrivate browsers.
The WebAuthn second factor method requires users to be created in Identify's user store. Therefore, you need to set Update unknown users from login to Yes for the first factor authentication connection. This action is not necessary if the authentication connection is done via Username & Password.
The WebAuthn registration using Windows Hello (Pin, Face or Fingerprint) fails because the attestation format in the returned AttestationObject is always none although
Attestation conveyance typeisDirectorIndirect.Operation system: Windows 10
Browser: Firefox
This bug was reported on Bugzilla at https://bugzilla.mozilla.org/show_bug.cgi?id=1631010
The "The Attestation type is not supported" error is displayed when users are doing WebAuthn registration.
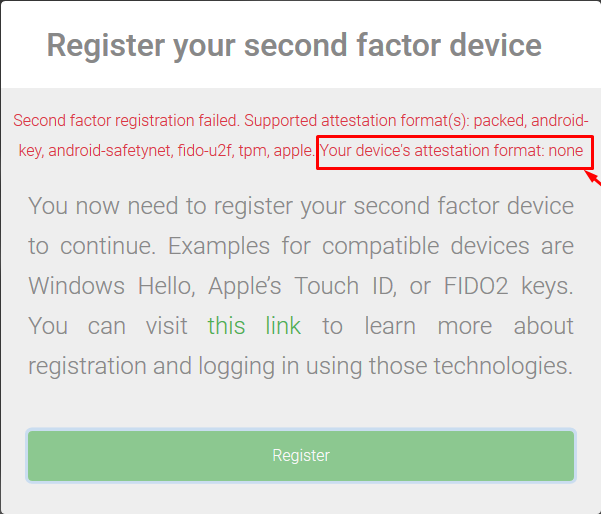
Our expectation is that the attestation format in the returned AttestationObject must be tpm.
Registration and authentication are not supported on Chrome for iOS. You must use Safari 14.
Registration and authentication currently are broken on iOS 15 and its sub-versions. The issue was also reported in the official Github of FIDO team https://github.com/passwordless-lib/fido2-net-lib/issues/303
The inconsistent behavior of the Prompt timeout setting across different browsers
The response time (in seconds) required for interacting with WebAuthn-compatible devices during registration or authentication on Chrome, Firefox, and Safari browsers is currently inconsistent due to recent updates in each browser.
- Specifically, Chrome browsers require setting the Prompt timeout value to a minimum of 180,000 milliseconds (3 minutes).
- Meanwhile, on Firefox browsers, the Prompt timeout functionality is not working.
- On Safari browsers, the default timeout is set to 2 minutes and cannot be customized. For more information, refer to this forum thread.
Workaround:
- For Chrome browsers, the suggested workaround involves setting the Prompt timeout value to 180 seconds or more.
- For Firefox and Safari browsers, no workaround is currently available. There is an expectation that Firefox will address this issue and Safari will allow customization of the timeout in future versions.
The latest browser versions investigated are:
- Chrome: 125.0.6422.113
- Mozilla Firefox: 126.0.1
- Safari: 17.4.1